Showing posts with label breakfast. Show all posts

Monday, June 17, 2013

Blueberry Muffins


Guess what time it is?  Secret Recipe Club!  This month I was assigned Debbi's blog Debbi Does Dinner Healthy.  Debbi is also the very gracious hostess Secret Recipe Club's Group C and keeps us all organized and on schedule each month.  I was excited to browse Debbi's blog because she has so many great dinner ideas....that are healthy!  Debbi mostly focuses on meals that are under 500 calories (though she throws in desserts here and there where calorie counting is strictly off limits!).  I had every intention of making something savory from Debbi's blog.  I had my eye on Raspberry Glazed Rosemary Chicken, Parmesan Chicken Bake and Chicken Poblano Casserole.  All so tasty looking! 

But surprise, surprise...

My sweet tooth took over once again.  I'm starting to sounds like a broken record!  I didn't go with a full on dessert so I give myself kudos for that.  I had some beautiful blueberries to use up so I went with a little something sweet for breakfast.  These blueberry muffins have whole wheat flour in them...so they are healthy!  Right?  Actually they are only 221 calories per muffin, which isn't too shabby.  Especially if it means I can have a little sweet at breakfast. :)


The muffins are fluffy and soft on the inside and have a slight crunch on top (which I love) if you serve them fresh out of the oven!  With a lightly sweet crumb, a pop of fresh blueberries and a bit of heartiness from the wheat flour, it's a great way to start your day.  Thanks Debbi!

Enjoy!

Blueberry Muffins
from Debbi Does Dinner Healthy adapted from Brown Eyed Baker

1 cup all purpose flour
1 cup whole wheat flour
1 tablespoon baking powder
1/2 teaspoon salt
1 egg
1 cup sugar
4 tablespoons butter, melted and cooled
1 1/4 cup light sour cream (I used Greek yogurt)
1 1/2 cups fresh blueberries (frozen can be used as well)

Preheat over to 350 and line 12 cup muffin tin with liners. 

In a medium bowl whisk flours, baking powder and salt.  Toss the blueberries in the dry mixture.

In a separate medium bowl whisk egg until light in color.  Whisk in sugar and then add melted butter in 2 additions until combined.  Whisk in the sour cream in 2 additions until combined.

Add the sour cream mixture to the flour mixture and gently fold until just combined.  The batter will be very thick (almost the consistency of cookie dough) and may have some streaks of flour.  Do not over mix. 

Divide the batter into the muffin tins (I like to use a full size ice cream scoop for consistent portions).  Bake for 25 - 30 minutes, rotating the pan halfway through baking, until muffins are lightly golden brown and a toothpick inserted comes out clean.  Remove muffins from the tin and cool on a wire rack for 5 - 10 minutes.  Serve warm if possible. 

Tuesday, March 26, 2013

Glazed Meyer Lemon Buttermilk Cake and 3 Years of Blogging


Today marks 3 years of blogging.  Wow!  How did that happen?  I'm really not so sure.  The Ginger Snap Girl started with a post called Mysterious Meringues on March 26, 2010.  That title makes me laugh a little, by the way.  I uploaded my first post with a less than flattering picture of vanilla and chocolate meringues and no recipe.  It didn't even have a link to a recipe.  Which I'm fairly certain is because at that point I couldn't figure out how to link to another website.  In fact it's a wonder I got the picture in there. 


I started this blog based on a spark that was ignited when I discovered a whole world of delicious, enticing, inspiring food blogs that I didn't even know existed.  I've said this before, but I honestly felt like I was a kid in a candy store.  Obviously this girl loves candy since I'm still going 3 years later.  Trying to contribute a little something to the food blogging world and continually being motivated and inspired by a number of talented bloggers sharing stories, recipes, drool-worthy photos and a little piece of their lives.


I will say that I'm a really good project starter, however, often not a project finisher.  So the fact this endeavor is still very much in flight, is pretty cool.  As I reflected back over the past year I remembered that I actually set a few blogging goals last year at this time.  In cyber print.  For you all to see and for me to be accountable for.  Let's see how I fared.

1. The Ginger Snap Girl has moved to her own domain name (already purchased...just need to make the leap) - Still own the name, didn't make the move.
 

2. GSG  has gotten a little makeover (nothing drastic like a face lift...but maybe a little boxtox here and there) - No signs of any face lifting just yet.
 

3. I've challenged myself to be a better photographer and storyteller - Definitely made some progress in the photography department.  I have a better handle on how to actually use my camera's manual settings as well as learned some new editing techniques in Light Room.  Still work to do though.  No progress on the storytelling aspect. 
 
4. I've lost 5 pounds and my skinny jeans fit again - Okay this really wasn't a "blog" goal. Or perhaps it was a subconscious one trying to tell me to post more healthy recipes and fewer dessert recipes.  This goal has not be achieved in the conscious or subconscious world. 

5. I'm developing more and more of my own recipes - Very minimal progress here.  I had 6 original recipes of the 56 I posted in the last year.  Lots more work to do here!

 
I'm kinda of bummed that I didn't reach all my goals.  I mean I just got through telling you how I start projects and don't always finish them and here I am not finishing stuff.   But guess what?  This blog is a work in progress and apparently so are certain goals.


So here's to the next year and achieving the previous goals as well as developing some new ones. 

Thanks for sticking with me on this blog journey! 


I'm sure you want to get to the really important stuff now--the cake! 

I'm a firm believer that birthdays (and anniversaries) should be commemorated with cake.  I saw this recipe posted recently on one of my most favorite blogs, Tracey's Culinary Adventures.  I knew it had to be made.  I've actually never made a bundt cake (I don't count the baby bundts I posted recently...those are more like little donuts).  I have 2 bundt pans...a full size and smaller one about half the size of a normal pan.  It was finally time to break one of them in.  I went with the half size bundt since Hubs and I couldn't possibly eat a full one on our own. 

I love how pretty a bundt cake looks.


The cake is nice.  It's mildly perfumed with sunny Meyer lemons, moist from the buttermilk and finished with a sweet and zingy Meyer lemon glaze.  Tracey describes the cake as being lighter than others she made, making it breakfast-worthy.  I totally agree.  The recipe originates from Cooking Light so it is indeed light.  And I can confirm it makes a great breakfast.  Especially when you throw in a few berries.  ;)

The cake was best on the first day.  On the second and third days it was a tad on the dry side, however a 15 second turn in the microwave brought it right back to life.  Plus, who doesn't love warm cake?

Enjoy!


Glazed Meyer Lemon Buttermilk Cake
from Tracey's Culinary Adventures, originally adapted from Cooking Light

Cake

3 cups all purpose flour
1 teaspoon baking powder
3/4 teaspoon salt
1/2 teaspoon baking soda
3 tablespoons Meyer lemon zest
1 1/2 cups sugar
1/2 cup unsalted butter at room temperature (1 stick)
3 tablespoons Meyer lemon juice
1/2 teaspoon lemon extract
3 large eggs at room temperature
1 cup low-fat buttermilk

Preheat oven to 350 F.  Spray a 12 cup bundt pan with cooking spray with flour. 

In a medium bowl whisk together flour, baking powder, salt and baking soda.  In a stand mixer fitted with the paddle attachment add sugar and lemon zest.  Using your hands, mix the sugar and zest until the zest becomes fragrant and even distributed through the sugar.  Add the butter and mix on medium until light and fluffy, about 3-4 minutes.  Add in lemon juice and lemon extract and mix.  With mixer on low add eggs one at a time, beating well after each egg.  Alternate adding flour mixture in three parts and buttermilk in two parts, starting and ending with the flour mixture until batter is just combined. 

Pour batter into prepared pan and smooth the top.  Bake on the middle rack for about 45 minutes or until a toothpick comes out clean.  Cool pan on a wire rack for 10 minutes and turn out the cake.  Allow to cool completely before glazing.

Glaze

1 cup confectioners' sugar
2 teaspoons low-fat buttermilk
3-4 teaspoons Meyer lemon juice

Mix all ingredients in a medium bowl.  Adjust lemon juice to achieve a thinner or thicker consistency depending on your preference.  Pour glaze over the cooled cake.

Notes: I cut the recipe in half baked it in a 6 cup bundt pan. You can substitute regular lemon for Meyer lemons. 

Monday, January 14, 2013

Pumpkin Bread


It's cold here.  I venture to guess this is one of the coldest winters we've had in Southern California in a number of years.  At least it feels that way.  I could try to research it to get a definitive answer, but it doesn't really matter.  It wouldn't change how cold it feels. 

I know that pretty much anyone living outside of California will likely not sympathize with my definition of cold.   But a high of 57 and low of 31 (today's temps) puts a chill in my toes and in our house.  You see, many California houses are not built the way cold weather climate houses are built.  The brisk air seeps in the windows and doors and it seems no matter how high the heater is, the place never really warms up.  I've been spending a lot of time bundling up with layers of clothes, extra socks and a scarf here and there during the days I'm working at home.  Then snuggling under warm blankets on the couch at night with kitty cat next to me. 

Once I'm nice and cozy, a slice of spiced pumpkin bread alongside a hot cup of tea is just the thing to warm my insides. I love it for breakfast, a snack and even dessert.  It's so delicious.

This recipe has a bit of a story. 

My good friend Sharon has been making this bread around the holidays for years.  She pumps out a dozen plus loaves and hands them out to family and friends each year.  I've been the recipient of this bread many times and absolutely love it.  Several years ago I asked her about the recipe and she alluded that it was a long time recipe which her family kept under lock and key. 

Fast forward to this past fall...I asked Sharon if I could have the recipe because I wanted to bake this yummy bread to send to the troops overseas as part of Operation Baking GALS.  A perfect autumn treat that travels well and has a long shelf life.  I let her know that I wouldn't share the recipe with anyone else, but felt the troops should have a taste of this deliciousness!  She happily agreed.  Since October, I've made over a dozen loaves myself.  For the troops, for family and just to eat myself (which I did for breakfast this morning--mmm).  One of the reasons I love this recipe is because it's very reliable.  I've had consistently good results every time I've made it in terms of appearance, texture and taste. 


Not only do I love the bread, but the troops loved it too.  They even posted a comment about it on the OBG Facebook page.  A very exciting moment!  I'm telling you this bread is the bomb.  I hinted to Sharon I would love to post the recipe on the blog and share it with all of you.  She went back to her mom to inquire and her mom was happy to hear the troops enjoyed the bread so much and agreed the recipe should be shared.  Woo hoo!  Sharon also inquired about the origin of the recipe.  Her mom is a special needs teacher and years ago, one of her students brought her a loaf of this bread as a thank you gift.  She loved it so much, she asked the child's mother for the recipe.  The rest is history. 

I'm so thrilled that Sharon's mom agreed this awesome recipe needed to be shared with the world. Well, my little pocket of readers anyway.  THANK YOU Sharon's Mom!  :)


This pumpkin bread is very easy to make and is all mixed by hand.  It yields 2 large loaves (or 8 mini loaves).  You could easily cut the recipe in half to make just one loaf.  The day it's baked it has a wonderful crusty top.  I do enjoy that crust, but I find that I really enjoy the bread best after it's been sealed in a zip top bag for 2+ days.  Though the bread is moist the day you bake it, it's gets even more moist and it seems the flavors really meld together if you can stand to wait 2 days.  The crusty top goes away due the amount of moisture that redistributes through the bread, but the enhanced flavor and incredible moistness are so worth it!  It stores beautifully for upwards of a week. 

This is most definitely my go to pumpkin bread recipe and I look forward to making many more loaves.

Enjoy!

*Note recipe updated on 2/19/2013  to include an originally omitted ingredient (sugar)

Pumpkin Bread
from Sharon's Family

Makes 2 large loaves (9x5)

3 1/2 cups all purpose flour
3 cups granulated sugar
2 teaspoons baking soda
1 teaspoon salt
1 teaspoon ground cinnamon
1 teaspoon ground nutmeg
2/3 cup water
4 eggs
1 teaspoon pure vanilla extract
1 cup oil (Crisco Corn Oil is recommended, but any vegetable oil would be fine)
2 cups pumpkin puree (unsweetened)
 
Butter and flour two 9x5 loaf pans.  Preheat oven to 350.

Whisk dry ingredients in a large bowl until fully combined.  Whisk eggs, water, and vanilla together in a medium bowl or a large glass measuring cup (at least 2 cup size).  Make a well in the flour and add the wet ingredients.  Add the oil and pumpkin puree.  Fold together with rubber spatula until fully combined and no streaks of flour remain.

Divide between loaf pans and bake for 60-70 minutes or until a toothpick comes out clean.

Notes: To make chocolate chip pumpkin bread stir 2 cups of semi sweet chocolate chips into the fully mixed batter.  I also prefer to use fresh grated nutmeg if possible. 

Thursday, October 18, 2012

Caramel Apple Jam


Do you follow Sugar Crafter's blog?  If you don't, you should.  Tracy has all kinds of great recipes, including a number of homemade jams and preserves.  In fact, she has turned her love of canning into a business and sells her unique jams and preserves at local farmer's markets.  That's pretty cool! 

I was browsing Tracy's blog recently and came across these stunning Brandied Apple Preserves.  Apple pie filling anyone?  Yes, please.  When I read through her post, I found her delicious looking preserves were inspired by a new monthly canning project that kicks off this month called Can It Up, founded by Hima at All Four Burners.  I'm totally in! 

I became enamored of canning after my first go at it.  I've said it before, and I'll say it again...It's so completely satisfying to not only make your own homemade jam, but to preserve it to give as gifts or just always have on hand.  I LOVE it. 

The first time I canned preserves I was nervous as heck.  I downloaded the Ball guide to canning from the web and read it through about 10 times.  It seemed like a lot of steps and a bit overwhelming.  The hardest part that first time around was timing everything and juggling multiple pots on my stove top.  But after one go round, it wasn't so intimidating anymore. 

Here's the gist...

1. Clean jars and lids (don't re-use lids...jars and outer bands can be re-used, but buy new lids).
2. Heat jars and lids so the jars don't crack when you ladle in hot jam.
3. Make jam.
4. Fill jars leaving about 1/4 inch space at the top, wipe the tops clean with clean towel or paper towel, put on the lid and screw on the outer band.
5. Repeat step 4 until all jars are filled.
6. Place hot jars in a boiling water bath, fully submerged, and boil for the amount time indicated for the type of product you are canning.  Most fruit jams/preserves take 10 minutes. 
7.  Remove processed jars from water bath and allow to cool on a kitchen towel on your counter for 24 hours, undisturbed.
8. Voila, jam!

I don't own special canning equipment (no canning pot or rack, no wide mouthed funnel, no canning tongs, no magnetic lid lifter).  I use my multi-pot to both heat the jars (step 2) and process the filled jars (step 6).  In my early canning endeavors I used a separate pot for heating the jars and processing the jars, but then figured out it I could do it all in one pot.  I use non stick kitchen tongs to lift the jars out of the hot water and then a doubled up kitchen towel to hold the hot jar while I use a small ladle to fill up the jar with hot jam.  I use my tongs to grab a lid out of the hot water and gently place it on top of the jar and then screw on the outer band.  Once all the jars are filled, I remove the strainer portion of my multi-pot and place the jars in the strainer (using a kitchen towel...since they are hot).  I lower the strainer into the boiling water and process. It really is easy.

October's Can It Up ingredient?  Apples of course! 

Now the big question, what to make?  I made apple butter in my slow cooker last year so I wanted to do something different.  I ran across a few recipes for caramel apple jam and I knew that's the direction I wanted to go.  I saw several recipes that called for a mix of brown sugar and white sugar, reporting that the brown sugar added a caramel taste to the jam.  These recipes also included spices, like cinnamon and nutmeg.  I read some comments that said the caramel flavor was hard to detect and that technically caramel apples don't traditionally have spices in them.  So I continued my search and found this recipe over at Hitchhiking to Heaven (another blogger with a love of canning!).  What drew me in was the recipe called for actually making caramel and then adding in the apple.  It had no spices, unless you count vanilla, and the recipe was pure caramel and apple.


I'm pretty darn happy with the end product.  The one comment/note I will change for next time is to let my caramel become a deeper golden caramel color before removing it from the heat.  I was nervous the caramel would get too dark or burn so I removed it from the heat a touch early.  I feel like the caramel flavor isn't quite as prevalent as I would like, though it's definitely there in the background.  I don't miss the spices and even without them, this jam is reminiscent of apple pie goodness. A wonderful fall treat...to dress up your toast, use in a crumble bar or cookie filling or to give as a gift!  I have 5 jars left to share with friends or family.  So if you'd like to drop by and pick one up, it's all yours!

If you want to get in on the apple canning action, you have until October 31st to link up over at Hima's site.  I'm looking forward to seeing what November's ingredient will be.

Enjoy!

Caramel Apple Jam
from Hitchhiking to Heaven

5 cups unsweetned applesauce (make your own starting with 3 1/2 pounds of apples and about 1/2 cup water) - I used a mix of granny smith, fuji, pink lady and honeycrisp
3 1/2 cups of sugar
1/2 cup water
1 tablespoon lemon juice
1/2 vanilla bean, split lengthwise (I didn't have a vanilla bean so I stirred in 1 tablespoon of pure vanilla extract at the end)
1/2 teaspoon sea salt
3 tablespoons dark rum (I omitted)

If you are making your own applesauce, start by peeling and coring apples and cut in to slices (about 1/4 - 1/2 inch).  Place apples in a large sauce pan with water (about 1/2 cup) and bring to a simmer with the lid on for about 20 minutes, until apples are tender.  Use an immersion blender (or a food mill) and puree the apples into applesauce.

Prepare your jars and lids.  Start by placing clean jars submerged in a pot of water, and bring to a near boil or until very hot.  Heat clean lids in a small saucepan of water.

Make the caramel.  Take a large clean pot (at least 7 quarts) and evenly scatter 1 1/2 cups of sugar over the bottom of the pan (you want to add it evenly because you will not be stirring the mixture).  Add 1/2 cup of water and lemon juice and bring to a slow boil, adjusting the heat as necessary.  Do not stir.  Keep a close eye on this as it turns from a clear syrup to caramel when you turn your back (the whole process took about 15-20 min for me).   When the syrup turns a golden caramel color, remove the pan from the heat. 

While the sugar is caramelizing, combine remaining 1 1/2 cups of sugar and sea salt in a medium bowl, stirring to combine.  If using a vanilla bean, split the bean lengthwise with a paring knife and scrape out the seeds.  Place the seeds and the pod into the sugar mixture and set the sugar mixture aside.

When the caramel is the color you want it, add in the applesauce, the sugar/salt/vanilla bean mixture (pod and all) and stir to combine over medium/low heat.  Once the sugar is dissolved, bring the jam to a boil and stir continuously for 8-10 minutes, or until jam thickens. This jam sputters and splatters quite a bit, but the continuous stirring prevents it from getting too violent.  Hot jam hurts!  You can test jam by placing a small dollop on a plate and placing it in the freezer for a couple of minutes.  If the jam easily slides off the plate when you tip on it's side, it's not quite ready. 

Once jam is done, turn off the heat and remove vanilla bean.  Stir in rum.  Remove a hot jar from your water bath (I use non stick tongs) and ladle jam into the jar, leaving 1/4 inch of head space at the top.   Using a clean damp paper towel, wipe away any excess from the edge of the jar.  Place a hot lid on top and screw on outer band. 

Process finished jars (completely submerged) in a boiling water bath for 10 minutes.  Remove from bath and allow jars to cool undisturbed for 24 hours. 

Makes 6 half pint jars.

Saturday, July 7, 2012

French Toast and the Bread Maker


Hubby has taken a serious interest in bread making.  When he first started on this journey about 6 months ago, I kind of figured it would be short lived, maybe a few weeks.  But it seems his new found forage into the world of bread is turning out to be more of an undiscovered passion.  Hubby is a science guy at heart, which is very much required to get exactly the right combination of flour, yeast, salt and water...the basis of nearly all bread recipes.  Hubby has been doing quite a bit of research on bread.  I use good old fashioned cookbooks and of course food blogs when I want to take on a new food project.  Hubby has a tablet and You Tube.  I don't know how many videos he's watched on bread making, but he's been checking out everything from home bread bakers to master bread makers in France, night after night.  Apparently I've been in the dark about the variety of volume of content on You Tube. 

The first type of bread he tackled was the baguette.  I want to say he made baguettes at least every other day for 2+ weeks, until he got it down.  And he wasn't just making one baguette each time, it more like 4 - 6.  That's a lot of baguettes.  They all got taste tested, but many ultimately ended up in the trash.  It was impossible for us to eat or store the amount of bread he was making.  And unfortunately, it's best eaten the day it's baked, so giving it away to friends, neighbors or passers by was a challenge.  Some of the baguettes turned in to croutons and others got sliced up and placed in the freezer for who knows what?  More croutons.  Maybe bread pudding?  Bread crumbs?  Suggestions are welcome! 

After all those baguettes, he can now make them with ease.   Although I think he longs to have access to the types of ovens used in France that provide the proper steaming capabilities required to get that wonderful crusty exterior that "makes" a baguette.  In the meantime, a pan of water at the bottom of our home oven does just fine.  

My favorite way to enjoy the baguette...warm out of the oven, sliced and dipped in olive oil and balsamic vinaigrette.    


Hubs moved on from baguettes to challah bread.  Challah is a childhood favorite of his.  Again, You Tube was his source of choice.  He made 3 braid challahs, 6 braid challahs, mini single rope challahs looped around to look like a braid.  Again, it was hard to keep up.  Though some did go to waste, much of it is stored in our freezer.  Fresh or frozen, it makes a fantastic french toast (more on that shortly).  And I'm positive it will make a wonderful bread pudding, once I get around to making it! 


From challah, Hubby then went on to sourdough and that's where he's been for the last couple of months.  Sourdough is a whole other animal that requires a "starter".  This is where the whole science of bread making really begins to mystify me.  I'm sure I'm going to butcher this, but a starter is very simply, a combination of flour and water and a lot of patience.  Over time your starter catches yeast in the air.  Did you all know there is yeast in the air?  I had no idea.  When you've captured enough yeast, it starts eating the flour/water mixture and bubbles begin forming, releasing carbon dioxide (and sometimes alcohol). 

Whoa, we're getting a little too sciencey! 

You stir your starter daily and feed it more flour and water over time it starts to develop flavor.  Some bread makers have starters that have been going for decades, even hundreds of years, which totally blows my mind.  Hubby's starters are just beginning their journey.  We have starters in our fridge, on top of our fridge and on our counter top at any given time.  This magic mixture is what apparently gives the "sour" taste to sourdough bread.  Several of Hubby's starters have bit the dust but he's got a great whole wheat starter going for a while now.  For 4th of July he made a white wheat sourdough round that was insanely delicious (the white comes from the bread flour and wheat comes from the wheat starter).  It was even more delicious when we slathered it with homemade rosemary garlic butter.  Sorry, no sourdough pictures.  We were too busy eating it!

Now I'm wondering what type of bread Hubs will take on next...I have a request in for some cinnamon swirl bread. 
In the meantime, I wanted to share one of the ways I found to use some of the soft and lightly sweetened challah bread.   In search of a recipe, I consulted my favorite source, the Cook's Illustrated Cookbook.  I honed in on french toast, even though it's not typically one of my go to breakfast items.  Truth be told, if I'm going to have something sweet, I'll always opt for a piece of cake or pie for breakfast.  Seriously.  But in reality I don't have cakes or pies laying around on most days (thank God!), so I thought our bounty of challah bread would be a great opportunity to give french toast a shot. 

I have to say, I'm a convert.  I think the secret to great french toast is most definitely the type of bread you begin with.  So kudos to Hubby for making a fabulous bread!  I love how pretty challah is.


I've made this french toast twice now and have been completely smitten with the results each time.  The first go round I used fresh challah and the second (pictured below) I used frozen.  Both turning out just perfect.  And the nice thing is the same exact same instructions below can be used whether you are using fresh or frozen.  The french toast is perfumed with cinnamon and vanilla...slightly crunchy on the outside and soft inside.  Top your french toast with warm syrup, fresh preserves, berries or even a sprinkle of powdered sugar.  I am not much of a maple syrup fan so I typically use preserves, slightly warmed.  I topped our last batch with homemade jumbleberry preserves I made recently to use up a surplus of strawberries, blueberries and cherries.  The preserves were a big hit and worked really well with the french toast.  Jumbleberry recipe coming soon!


Treat you and your family to a special breakfast this weekend!

Enjoy!

P.S. I can't promise anything, but I'm working on getting Hubby to do a guest post on one of his bread making adventures.  If you are interested in hearing more about bread, leave a comment to cheer Hubby on!  He's a little shy when it comes to this sort of thing. ;)


French Toast
from Cook's Illustrated Cook Book

8 large slices of hearty white sandwich bread or challah bread
1 1/2 cups whole milk, warmed
3 large egg yolks
3 tablespoons packed light brown sugar
2 tablespoons unsalted butter, plus 2 tablespoons melted
1 tablespoon vanilla extract
1/2 teaspoon ground cinnamon
1/4 teaspoon salt

Preheat oven to 300 degrees.  Place a wire rack on baking sheet and place the bread on the wire rack.  Bake about 16 minutes, or until bread is dry throughout but with a slightly moist center.  Flip bread halfway through baking.  Remove bread and allow to cool for 5 minutes.  Reduce oven temperature to 200 degrees and place wire rack and baking sheet back in the oven.  You will be transferring your cooked french toast to keep warm.

In 9x13 pan add milk, egg yolks, brown sugar, 2 tablespoons melted butter, vanilla, cinnamon and salt and whisk until fully combined.  Place bread in the mixture and allow to soak about 20 seconds per side, until saturated, but not falling apart.  Transfer bread to a plate or baking sheet with a slotted spoon, allowing excess liquid to drain off. 

Heat a 12 inch skillet (I used non stick) over medium low heat and melt 1/2 tablespoon butter.  Add 2 slices of bread and cook until golden brown, about 3-4 minutes per side.  Once done transfer to the wire rack in the warm oven.  Repeat cooking process with remaining slices, cooking 2 slices at a time and adding another 1/2 tablespoon of butter for each batch.

Serve warm and top with your favorite topping such as syrup or preserves (slightly warmed) or fresh berries.

Monday, June 18, 2012

Blueberry Donut Muffins


Are you as shocked as I am that summer is really here?  The weeks and months tick by with or without my approval.  I mark the passage of time with the arrival of weekends and the denial of the restart of the work week.  Holidays, birthdays and anniversarys pass.  I fill up my 7 day medication dispenser with vitamins and such each Sunday evening (dang I feel like an old lady saying that).  (I thought about erasing that last bit about the medication dispenser by the way.)  And once a month I participate in Secret Recipe Club.  Something I look forward to.  It's a fun group to be a part of, but it also means another month has zipped by when I wasn't looking. 

The best thing about the monthly arrival of SRC is trying out a new recipe.  This month I was assigned Denise's blog, Creative Kitchen.  I always have a blast browsing through a new blog, and Denise's was no exception.  She has been blogging since 2009, she's busy with a family of five and focuses on making meals made with "real" whole foods.  Creative Kitchen has a variety of sweet and savory dishes, all made with love and as few processed foods as possible.  I admire Denise's committment to feeding her family real food, but keeping it in balance with the reality of our modern processed food society.  It's a concept I'd like to incorporate more into my little family of two.  Reading Denise's blog made me smile.  She has an enthusiastic spirit that is evident in the stories she shares as well as the dishes she creates.  Creative Kitchen definitely has a new follower! 

Choosing just one recipe is always a challenge.  I was drawn to several, but ultimately decided it was time to tackle the donut muffin.  I am a fan of donuts.  I am a fan of muffins.  And a baked donut sure beats frying. 


This recipe is easy to throw together on a Saturday morning as most of the ingredients can be found in a well stocked pantry.  I thought my pantry was pretty well stocked, but as the donut muffins were baking, I realized I was completely out of butter.  That almost never happens.  I always have butter stashed away in the freezer. 

Not this time. 


The donut muffins require the top of the baked donuts to be dipped in melted butter and then in cinnamon sugar.  What to do?  Go to the store at 7:30 am on Saturday morning in my yoga pants and bed head?  Nope.  Send Hubby to the store for me?  Um, he was still sleeping. 

Time to improvise. 

I had some fresh blueberries in the fridge and I had already been thinking about making a blueberry sauce to drizzle over the donut muffins.  Why not use that in place of butter?  It was one of those happy accidents that turned out really well.


The donut muffins have the texture of a cake donut.  Add in fresh blueberry preserves and a cinnamon sugar crunch on top and you have a tasty breakfast treat on your hands.  I enjoyed one or three with a cup of early grey tea.   Now that's the way I like to start my weekend.  Denise recommends doubling the recipe, and I see why.  These little babies go fast!  Thanks for the recipe Denise!

Now, let's see how quickly July arrives.  In the meantime...

Enjoy!

Blueberry Donut Muffins
adapted from Creative Kitchen

1/3 cup of shortening (CK used coconut oil)
1/2 cup sugar
1 egg
1 1/2 cups all purpose flour (CK used whole wheat flour)
1 1/2 teaspoons baking powder
1 teaspoon salt
1/4 teaspoon nutmeg
3/4 cup milk

Topping:
1/3 cup blueberry preserves (see recipe below or if using store bought, heat preserves in microwave about 30 seconds to 1 minute, until loose)
1/4 cup sugar mixed with 1/2 teaspoon cinnamon

Preheat oven to 350 and spray muffin tin with cooking spray, or line with paper liners.  I used my mini muffin pan (which is a medium sized mini--as opposed to a small mini) and it yielded 12 muffins (I would plan on 6-8 full size muffins).

In a medium bowl whisk shortening, sugar and egg until fully combined.  In another medium bowl, stir flour, baking powder, salt and nutmeg together.  Stir flour mixture into shortening mixture in thirds alternating with milk until just combined. 

Fill muffin cups 2/3 full and bake for 18-20 minutes for mini's or 25 minutes for full size, or until a toothpick comes out clean.  Allow muffins to cool and dip tops in the blueberry preserves and then dip in cinnamon sugar mixture.

Blueberry Preserves
from The Ginger Snap Girl

1 cup fresh blueberries
1/3 cup sugar
1 1/2 teaspoons lemon juice

Combine all ingredients in a small saucepan and cook on medium high heat.  Boil mixture for 15 minutes, stirring frequently, until slightly thickened.  It will continue to thicken upon cooling.

Saturday, May 5, 2012

Chai Banana Bread


I almost gave up.  I've been getting Cooking Light magazine since the beginning of the year and I've had completely mediocre, non-blog-worthy, results with the three recipes I've tried to date.  Until now.  Recipe number four from the May issue turned it all around.  I guess I won't cancel my subscription just yet. 

Chai banana bread was a big success, making the previous lack luster results all worth it.  At least that's what I'm telling myself.  I measure the success of a recipe by asking is it something I would make again?  It may need some tweaks or changes, but the base recipe is solid enough to warrant a repeat.  This recipe?  Already planning it.  No further tweaking necessary (you'll see below I already did the slightest bit of tweaking).


Wondering what "chai" is?  Chai, which is a reference to masala chai, means mixed spiced tea and originates in southeast Asia (around India).  The chai spice mixture, which can vary, typically consists of things like cardamom, ginger, cinnamon, cloves, peppercorn, star anise and allspice.  Chai tea has become popular all over the world, and you can sample the Americanized version at your local Starbucks or coffee house.  Just ask for a "Chai Tea Latte".  You'll get a slightly sweetened, steamed milk beverage infused with a concentration of black tea and spices.  It's actually my favorite hot coffee house beverage (no coffee for this girl).  It reminds me of spice cookies and gingerbread.  Which is probably why it works so well with banana bread.

In this recipe there is no tea involved, just the spices.  Cardamom, ginger, cinnamon and allspice are mixed together.  A portion goes into the banana bread batter and the remainder gets mixed with powdered sugar and a touch of vanilla to create a spiced glaze to finish the bread.  The spices are present, but not overwhelming. 


This lightened up version of banana bread doesn't lack in flavor or richness.  It can easily pass for it's full fat banana bread cousin. 

I made one substitution in the recipe.  I didn't have plain yogurt on hand so I substituted fat free buttermilk.  I didn't actually have store bought buttermilk on hand either, so I made my own.  I added 1 teaspoon of white vinegar to 1/3 cup of fat free milk.  It worked perfectly!


Tip of the day - Make Your Own Buttermilk:

I always get so frustrated when I buy buttermilk at the store because I can never ever seem to use the whole container despite my best efforts.  Making your own is easy. 

To make one cup of buttermilk - Add one tablespoon of white vinegar to a glass measuring cup and then fill up to the one cup line with milk.  Let it stand for 5 minutes and stir before using. 

That's it.  No more wasted buttermilk!  You can use any type of milk you have on hand--fat free, low fat or whole milk.

*****   


Hubby and several of my co-workers sampled the bread and it was well received by all.  Hubs even went back for thirds!  This spiced twist on a classic may just become my new "go to" banana bread recipe. 

Enjoy!   

Chai Banana Bread
from Cooking Light

Notes: the instructions below are how they are laid out in the magazine.  I did make a modification on preparing this by mixing my spice mixture and then adding the 1 1/2 teaspoons of it into the dry flour mixture (instead of mixing it into the batter at the end).  I just had a hard time stepping away from the traditional method of mixing wet and ingredients separately and then combining them together at the end.  I also mixed my vanilla in with the rest of the wet ingredients.  It would probably work out just fine either with either method.


1 1/2 cups mashed ripe bananas (about 3)
1/3 cup plain non fat yogurt (I used fat free buttermilk)
5 tablespoons butter, melted and cooled
2 large eggs
1/2 cup sugar
1/2 cup brown sugar
10 ounces all purpose flour (2 1/4 cups)
3/4 teaspoon baking soda
1/2 teaspoon salt
3/4 teaspoon ground cardamom
1/2 teaspoon ground cinnamon
1/4 teaspoon ground ginger
1/4 teaspoon ground allspice
1 1/4 teaspoons pure vanilla extract, divided
1/3 cup powdered sugar
1 1/2 teaspoons low fat milk

Preheat oven to 350 degrees F.  Coat a 9x5 inch loaf pan with cooking spray.

You can use a stand mixer, hand mixer or just mix by hand the old fashioned way.  I used a stand mixer.  Combine bananas, yogurt, cooled melted butter and eggs until just blended.  Add sugars and mix until blended.

Combine flour, baking soda and salt in a bowl and whisk to combine.  Add the flour mixture to the banana mixture and beat until just blended.

In a small bowl combine the cardamom, cinnamon, ginger and allspice.  Stir 1 1/2 teaspoons of the spice mixture and 1 teaspoon of the vanilla extract into the batter until just combined.  Pour batter into the loaf pan and bake for 65 minutes, or until a toothpick inserted in the center comes out clean.  Cool in the pan set on a wire rack for 10 minutes.  Remove from pan and allow to cool completely.  To store, wrap the bread in foil and place in a zip top bag with the air removed. 

Make the glaze by combining the powdered sugar, remaining spice mixture and milk until fully combined and spoon over the bread.

Wednesday, March 14, 2012

Lemon Cream Scones with Strawberry Glaze


The bad news is my blog posting schedule has gone to hell.  Sorry for those of you expecting to see new content every Tuesday and Thursday.  I've completely fallen off the wagon.  Mabye a schedule is overrated?  Or, maybe I'll just climb back up on the wagon.  I can't give up that easily, right? 

There is good news though......the strawberry streak continues!

I can't seem to get enough of these sweet treasures.  I stocked up again this past weekend at the farmer's market and immediately started thinking of ways to use my berries.  So many options....

I recently made scones for the first time and wanted to try another variation at home that would somehow incorporate strawberries.  Have you ever tried the orange cranberry scones from Trader Joe's?  It was TJ's scones that converted me to the pro-scone camp.  In my anti-scone days, my experience with this tea time treat was a dense, dry, doughy, under-sweetened biscuit.  Something that certainly wasn't worth the calories, I'll take a donut please!  For some reason I picked up a package of TJ's scones a few years back and they won me over.  Their scones are tender on the inside, laced with sweet orange flavor and tart cranberries.  But the best part about them is the glaze or icing drizzled on top.  That extra sweetness is where it's at!  I love how the glaze crackles a bit when you bite into it...totally worth the calories.  That got me thinking about a strawberry glazed scone...

I went in search of basic scone recipe to start with.  My Cook's Illustrated Cookbook provided several options and I decided on the "Simple Cream Scone".  I especially liked the "simple" part and it had potential for a variety of flavor options.  I dressed up the scone dough with lemon zest and lemon juice.  A nice match for a sweet strawberry glaze.  Now, I had to figure how to make strawberry glaze.  A faint memory brought me to my Sweet Melissa Baking Book and a fresh strawberry sauce recipe.  Add a little powdered sugar and you have glaze. 


The scone recipe turned out just how I had hoped, golden and slightly crunchy on the outside and soft and tender on the inside with the faint aroma of lemon.  The strawberry glaze wasn't "crunchy" like the TJ's scones.  I could have remedied that with adding more powdered sugar.  But ultimately I went with a thinner glaze to maintain the bright, fresh strawberry flavor. 

Some scone tips...don't overwork the dough. Work it just until it comes together and start forming the disc you will cut into wedges.  The more you work the dough, the tougher it become.  Bake until just golden without overbaking to ensure your scones stay moist.  Scones are best eaten the day they are made or the next day at the latest.  If you know you won't eat all the scones before they pass their peak, wrap the baked scones individually in foil and store in a ziptop bag with the air removed in the freezer.  When you are ready to enjoy a scone, preheat the oven to 375, remove foil and place the scone(s) on a baking sheet and bake for 15 minutes or until warmed through (bake for 10 minutes if scones are thawed in the fridge first).

A fun twist I plan to try next time is to make mini scones and serve the strawberry glaze as a dip for the mini's.

Enjoy!  

Lemon Cream Scones with Strawberry Glaze
Adapted from Cook's Illustrated Cookbook and Sweet Melissa Baking Book

Cook's Illustrated recipe is titled Simple Cream Scones.  Their recipe includes 1/2 cup of dried currants which are listed as optional.  I omitted the currants and added lemon zest and lemon juice to my version to compliment the strawberry glaze.

2 cups all-purpose flour
3 tablespoons sugar
1 tablespoon baking powder
1/2 teaspoon salt
5 tablespoons unsalted butter, chilled and cut into 1/4 inch pieces
2 teaspoons fresh grated lemon zest
2 teaspoons fresh squeezed lemon juice
1 cup of heavy cream

Preheat oven to 450 degrees and line a baking sheet with parchment paper.  In a food processor add flour, sugar, baking powder and salt and pulse a few times until combined.  Add the chilled butter and lemon zest and pulse until the mixture looks like a coarse meal, about 12 pulses.  Dump mixture into a large bowl.  Stir lemon juice into the cream and pour into dry mixture.  Stir to combine and dough begins to form. 

Turn dough out onto a lightly floured workspace and knead until a sticky ball forms, only 5 to 10 seconds.  Pat dough into a inch round circle and cut into 8 even wedges.  Place wedges onto the prepared baking sheet evenly spaced apart.  Bake about 12 - 15 minutes until scones are lightly golden on top, rotating the baking sheet halfway through.  Cool on the baking sheet on a wire rack for each 10 minutes.  Serve warm or at room temperature.

For the Strawberry Glaze

The base of this recipe comes from the Strawberry Sauce recipe in the Sweet Melissa Baking Book.  I added some powdered sugar to turn it from a sauce into a glaze. Note, the strawberry sauce recipe makes more than you will need for the scones.  You can use the leftover sauce as a topping for ice cream or to make homemade strawberry lemonade (another recipe you can find in the Sweet Melissa Baking Book).

Strawberry sauce:
1 pint of dry strawberries
2 tablespoons sugar
1 teaspoon fresh squeezed lemon juice
2 tablespoons cold water

Place all the ingredients in a small food processor or blender and puree until smooth.  Strain sauce through a fine mesh strainer and discard the seeds.

To make glaze:
Combine 3/4 cup powdered sugar with 1/4 cup of strawberry sauce in a small bowl and whisk until smooth.  Note, this makes for a very loose glaze, but it retains a nice bright red color and strong strawberry flavor.  For a thicker glaze add an additional 1/4 cup or more, of powdered sugar.

Thursday, March 1, 2012

Nutella Scones


Nutella has become a staple in my pantry.  I mostly spread it on English muffins and graham crackers.  But recently I took it to the next level and merged Nutella into the baking world.  Sort of.  Making frosting isn't technically baking.  I made a banana cake and topped it with Nutella frosting.  Banana + Nutella = heaven, by the way.  And now I can say I have officially baked with my favorite chocolate hazelnut spread with these chocolatey scones.

This week our Club: Baked hostess, Lorraine of PhDcupcaker, selected Nutella Scones for the group to bake.  I have been looking forward to this recipe because a.) I have never made scones before and b.) a new way to incorporate Nutella into breakfast is a good thing.

The recipe reads pretty simply.  It doesn't require a mixer or any fancy tools.  But apparently it requires a little finesse.  It definitely wasn't easy as I thought it would be.  The authors of Baked Explorations caution you to not over mix the dough to ensure you have nice tender scone.  They also recommend using your hands to knead the dough.  I don't know about anyone else, but my dough was beyond sticky and I spent quite a bit of time trying to keep the dough from forming a giant chocolate mitten on my hand.  Next time I would keep a little flour on hand to help with the sticky fingers.  Now that I have one scone run under my belt, I'm looking forward to trying other flavor combinations.

I did make a couple of small alterations to the recipe.  The original recipe calls for toasted chopped hazelnuts to be added to the dough.  I omitted the nuts and to dress it up a bit, I sprinkled coarse raw sugar on top for a little sparkle and crunch.  I made half the recipe (yielding 6 small scones) but still added the full amount of sugar (only 1/4 cup in total) because some other bakers had noted that the scone wasn't very sweet.  Even with the extra sugar, I still thought it wasn't very sweet.  But that's okay, the Nutella drizzled on top brings up the sweetness to just the right level.  The scone is tender and almost cakey inside with a little crunch on the outside.  Good stuff.  This is my kind of breakfast.

To get the recipe head over to Lorraine's site.  To see how other Club: Bakers' scones turned out click here.

Monday, February 27, 2012

Strawberries, Yogurt and Granola


If you read my last post you might have anticipated my next post would be for creamy mushroom soup.  Hope you aren't too disappointed to see berries instead.  The soup recipe came from a highly credible source, Cook's Illustrated.  The soup turned out okay, but I didn't love it.  I haven't given up on it though.  I have some ideas of what may have held this soup back from being great so I'll give another go at some point.

In the meantime, what I know is great, are fresh, ripe, sweet strawberries straight from the fields to the farmer's market.  Living in southern California gives me pretty good access to local berries early in the season.  The funny thing is I didn't have my first berries of the year at home.  Two weeks ago Hubby and I took a trip to the mid-west and I was pleasantly surprised when some phenomenal strawberries appeared on my yogurt and granola breakfast in a suburb of Detroit, Michigan.  I thought perhaps it was a fluke.  Then last week I was in New Jersey for work and I had more amazing strawberries.  Really, really amazing.  I've had strawberries on the brain ever since.  I knew a trip to my local farmer's market was number one top priority business this past weekend. 


I wasn't disappointed.  The market was teeming with berries, some big, some small, some gi-normous.  I sampled the small berries and they had the most unbelievably sweet flavor.  Sold!  I'll take 3 baskets, please!  Hubby doesn't eat strawberries so that's 3 baskets of berry heaven all for me.  I decided the first order of business was a simple, but delicious, application of my new found treasures.  Vanilla yogurt topped with fresh cut berries and crunchy honey kissed granola.  I plan to rinse and repeat at least a few more days this week.  A great way to start the day!


I always struggle with storing strawberries.  I feel like they start growing mold the day after I bring them home.  So I asked the girl behind the table at the farmer's market how she recommends storing them.  She suggested placing a papertowel in the bottom of a tupperware and placing a single layer of berries down.  Cover with another paper towel and a layer of berries, and repeat.  Store the tupperware in the fridge.  I'm only on day two, but I think it's going to work.  I hope to be posting more strawberry focused posts this week so I'll let you know how this method holds up.

Enjoy!

Vanilla Yogurt with Strawberries and Granola

3/4 cup low fat vanilla yogurt
1/2 cup fresh strawberries, washed, stems removed and cut in quarters
1/3 cup granola (my favorite is honey flax granola from Fresh and Easy)

Place 1/2 of the yogurt in a small bowl and top with 1/2 of the granola.  Spoon the remaining yogurt on top and finish with berries and remaining granola.

Sunday, November 27, 2011

Apple Danish for Thanksgiving


This year we spent Thanksgiving with my Mom's family at my grandparents house in Palm Desert.  This year was extra special because Hubby and I and our newest cat, Oliver, made the hour and 45 minute drive Tuesday evening before Thanksgiving.  We went out early to help Grandma Jane cook and prep for the big day.

Yes, you read right, we took our cat.  I know, it's a little odd.  Oliver joined our family as a 4 month old kitten back in June.  He is a sweetheart, but he cannot be trusted to stay at home with the two big girl kitties.  He has an affinity for eating toilet paper, digging in trashcans and being a little too inquisitive.  Plus he has about 50 times the energy as the big girls and sadly they have zero interest in playing with the little guy.  This was actually Oliver's second trip to grandma's house (the first was in August--see photo below).  He doesn't love the car ride, usually spending the first half of the drive meowing his little head off, but once he's there he is a happy camper.  He purrs nonstop at grandma's and like everyone else, loves being there.

Hubby and Oliver on his first trip to Grandma's house in Aug 2011
(we drove at night for this most recent trip so we didn't get any photos)


Grandma has been doing our families Thanksgiving for my entire life.  My mom and aunt and I joked that none of us knows how to cook a turkey because Grandma always does it.  She puts on quite a spread and thinks of all her guests favorite dishes (even Oliver got a turkey day treat--a small rawhide stick wrapped with dried chicken--which he absolutely loved).  The big meal contains many dishes that grace most Thanksgiving tables, like turkey and stuffing (with an extra crispy crust on top), mashed potatoes and gravy, ham, sweet potatoes with toasted marshmallows, corn, cranberry and dinner rolls.  She also includes some other special dishes that aren't as traditional, like 7 layer salad (my personal favorite), blueberry pecan salad (my mom's favorite), ambrosia (my cousins favorite) and sweet potato casserole with crusted pecan topping (almost every one's favorite).  It's a feast of major proportions and I always look forward to digging in.  Grandma serves Thanksgiving dinner around noon.  Originally she did it early to accommodate the families that had to go two Thanksgivings in one day.  But no one has to tackle two meals in one day anymore.  So we do two at Grandma's.  The big feast at noon and what I like to call second dinner around 6 pm. I look forward to second dinner just as much as the main event.

There is never a shortage of sweets at Grandma's.  Every year she makes 3 kinds of pies...pumpkin, pecan and apple.  This year she let me make the apple pie using a favorite family recipe from my Dad's family.  I had a blast spending the day with Grandma in the kitchen prepping and baking.  She even helped me crimp my pie crust edges, a skill I am still working to master! 


Grandma also helped me develop the recipe for this apple danish filling.  I brought the leftover dough from my recent danish pastry making adventure.  We whipped up an apple pie like filling to fill the danish on Thanksgiving morning.  Between the two of us, I think we came up with a pretty awesome filling that is most definitely going on the recipe keeper list. 


The filling is sweet and tart, using 2 types of apples.  You can change up the apple mix to suit your tastes.  The danish is sweet with the icing on top so if you prefer a more tart filling, you can use all granny smith's.  A little cornstarch helps the filling thicken.  I recommend making it a day or two before you plan to bake the danish (you can also make the pastry dough ahead).  It sets up even more after chilling in the fridge.  This filling could be used with other dessert options, like an apple turnover using store bought puff pastry, it could be used to fill a crepe, top a cheesecake, or fill a tart shell.  This sweet breakfast treat is best served warm from the oven.


The apple danish was a big hit with my family.  I kept hearing, "Wow, you made this?"  Which makes me blush a little.  I am happy to report there wasn't a speck left over. 
 
Hope you all had a nice Thanksgiving and are gearing up for the holiday fun in December!

For the danish pastry recipe, including some step by step photos, click here.

Apple Danish Filling

Yields about 2 cups
Ingredients:

3 apples (I used 1 granny smith and 2 rome apples), peeled, cored and sliced in 1/2 inch wide by 1 inch tall chunks
1/2 cup granulated sugar
1 tablespoon cornstarch
pinch of salt
1 teaspoon cinnamon
1/8 teaspoon nutmeg
1/2 cup unsalted butter (1 stick), sliced in 1/2 pieces

Directions:

In a small bowl combine sugar, cornstarch, salt, cinnamon and nutmeg until thoroughly mixed.  Heat a medium sized skillet over medium heat and add butter.  Once butter is melted add the apples and sugar mixture. Bring mixture to a simmer and stir occasionally and cook for about 15 minutes or until apples are just tender but not mushy and the sauce is slightly thickened.   Allow mixture to fully cool before filling the danish pastry.  The filling can be made up to three days ahead.  Store in an airtight container in the refrigerator until ready to use.

Monday, November 21, 2011

Danish Pastry Braid


I have never made pastry. When I was assigned Gitte's blog, My Danish Kitchen for this month's Secret Recipe Club I saw Danish pastry and there was no turning back.

Danish Pastry, also called Wienerbrød, is one of many Danish recipes on Gitte's blog. Gitte is from Denmark but has made a home in the United States with her husband and son. She writes that she experienced challenges cooking in a foreign country with unfamiliar ingredients over the years. She has tapped into her family back home to help her learn to cook. She has a lovely blog filled with an array of recipes both Danish and American inspired.  I'm totally intrigued by Danish treats and see some others on Gitte's site I need to make, like Danish Træstammer, like a marzipan covered cake truffle or Danish Hindbærsnitter, Danish cookies filled with raspberry preserves.  Yum!  Pop over to My Danish Kitchen and check out the great recipes. 


Making pastry takes planning and patience, two things I could be a lot better at. So I knew I wanted to give this a go.

The first order of business was to purchase cardamom. My local chain grocery store had it....for $11.79 for a 1.25 ounce bottle! I didn't really want to invest that much money for a spice I wasn't sure I would use again. So I went to a nearby Persian grocery store where I knew they would have an array of spices. I was able to get 0.75 ounce for $1.99.  Now that's what I'm talking about!  Cardamom has a spicy fragrence that reminds of spices similar to allspice and cloves.  I was worried it might be overpowering, but the cardamom flavor was extremely mild in the finished product. 


The dough needs resting time so plan  to make it the night before you want to have it for breakfast.  And then get up (really early) to roll and fold the dough (3 times), chill it again for 30 minutes and then roll it one last time, fill it, braid it, glaze and top it, bake it, ice it and finally cut and serve it.  Phew...I'm out of breath!  It's really not that bad.  Each step is pretty straightforward.  I would plan to allow at least 90 minutes of prep and cook time the morning you want to make this.  I didn't get up as early as I wanted to, but the Danish pastry was done technically done in the (late) morning hours.

A few notes.  I accidentally omitted the sugar in the dough.  I didn't even notice until I was typing up Gitte's recipe.  Whoops.  It still turned out great despite this omission.  There is plenty of sweetness from the filling and icing to make up for it.  Speaking of filling I used ollalieberry preserves that I had on hand in place of raspberry preserves.  Use your favorite preserves.  I had a little trouble braiding the pastry.  First off, I rolled it out too long (about 18 inches instead of 12).  I had too many strips to braid so I ended up cutting about 6 of them off.  This error wasn't noticeable in the finished product either. My braid baked for 15 minutes exactly and could have used 2 more minutes in the oven. 
Check out the big pieces of butter in the dough...this was the first of three times rolling and folding the dough

This is after 3 times of rolling and folding the dough...it goes back into the fridge to chill for another 30 minutes

Ready for braiding

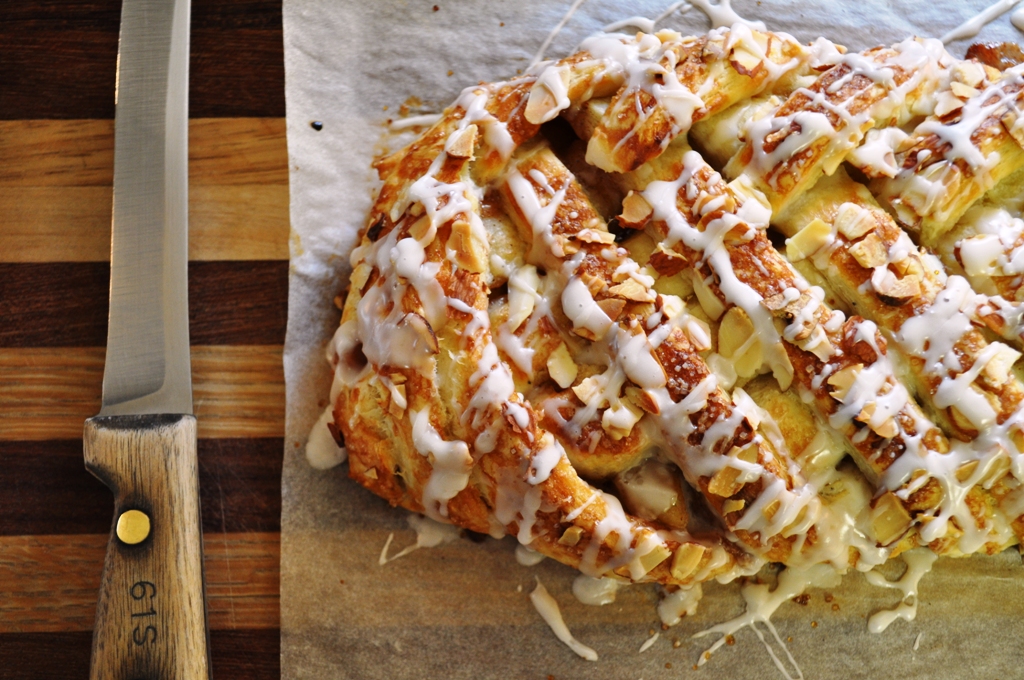
The braid gets glazed with egg wash and topped with pearl sugar and sliced almonds

Fresh out of the oven

The result? Despite things not coming together perfectly, it was still a delicious, flaky fruit filled pastry. This beautiful pastry would be great for a special breakfast or for brunch. The recipe makes two 12 inch braids. I made one and froze the dough for the second one. So another Danish pastry is in my future.  I'm already thinking about filling it with apple pie filling.  Mmmmm.


Enjoy!


Danish Pastry Braid {Wiernerbrød)
from My Danish Kitchen

Makes two 12 inch pastry braids

Pastry Ingredients:
3 1/2 cups all purpose flour
1 1/2 cups cold unsalted butter
2 packages active dry yeast (4 1/2 teaspoons)
1/2 cup warm water (105 - 115 degrees F)
1/2 cup heavy cream
1/2 teaspoon cardamom
1/2 teaspoon salt
2 eggs, room temperature
1/4 cup sugar

Filling:
Seedless raspberry preserves

Glaze:
1 egg, lightly beaten
2 tablespoons water
Pearl sugar, for topping
Slice almonds, optional, for topping

Icing:
1 cup powdered sugar
2-3 teaspoons warm milk
1/2 teaspoon almond extract

Directions:

Place flour in the bowl of (an 11 cup) food processor fitted with the steel blade. Cut butter into 1/4 slices and add to flour. Pulse until the butter is the size of kidney beans.

Dissolve yeast and warm water in a large blow. Let stand for 5 minutes and stir yeast until smooth. Add in cream, cardamom, salt, eggs and sugar and stir until combined. Turn the butter flour mixture into the liquid mixture and use a rubber spatula to carefully mix until the dry ingredients are moistened. Dough will have large pieces of butter and may look slightly crumbly. Cover dough and refrigerate for 4 hours or overnight or up to 4 days.

Place dough on a lightly floured surface and dust the dough and your rolling pin with flour. Roll out the dough to make a 16 to 20 inch rectangle. Fold the dough in thirds longwise, rotate dough 1/4 turn and fold into thirds again, make a small rectangle. Turn the dough over. Repeat the rolling and folding 2 more times (making it a total of rolling and folding 3 times). You will end with a small rectangle of dough. Wrap dough and chill for 30 minutes to overnight. (I chilled for an hour)

Preheat oven to 400 degrees F. Line 2 baking sheets with parchment paper.

Divide the chilled dough into two parts. Roll each half into a 6 x 12 inch rectangle. If you are not making both braids at the same time, wrap the second half of dough and place in the refrigerator until ready to roll. Dough can also be frozen and unthawed in the refrigerator overnight.

Spread the filling down the length of the center 1/3 of each rectangle. Cut slanting (45 degree angle) 3/4 inch strips along both sides such that there are equal number of strips on each side. Carefully transfer the braids to the baking sheets and let dough rise for 15-30 minutes until it appears slightly puffy (it not double in size). Lightly beat the egg and water for the glaze. Once the dough has risen, brush the pastry with the glaze and sprinkle with pearl sugar and/or sliced almonds.

Bake for 12-15 minutes or until golden brown. Make icing by mixing powdered sugar, milk and almond extract until silky smooth. Drizzle icing on the top and let set. Cut crosswise into 2 inch slices.