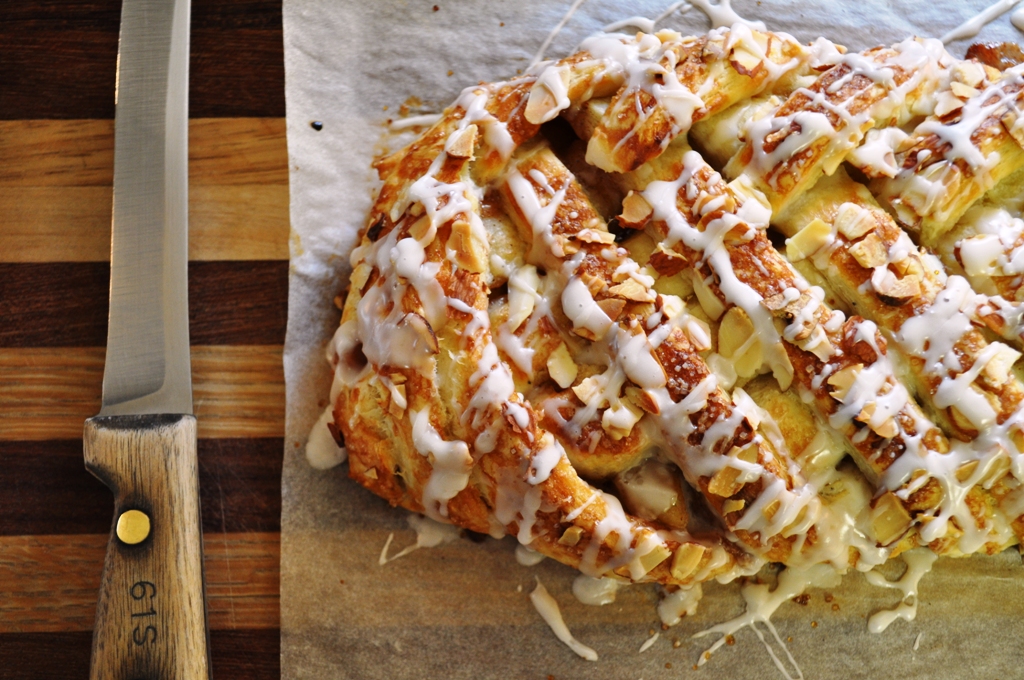
Showing posts with label pastry. Show all posts

Sunday, March 4, 2012

Strawberry Tid Bits and a Tart


I did it.  I ate all three baskets of strawberries I bought last Sunday at the farmer's market. 

By myself. 

It took me 6 days and three breakfasts of strawberries, yogurt and granola, one breakfast of berries with a Nutella scone, two desserts of strawberries dipped in Nutella and the finale was this strawberry tart.  And surprisingly, I am not sick of strawberries!  I am actually a little sad they are gone.  I might just be heading back to the farmer's market this week.

Storing Your Strawberries - Tip of the Day

I mentioned earlier this week, I've struggled in the past to store strawberries for more than a day or two without them growing mold or looking sad and sickly.  I've tried several methods which have all proven to be unsuccessful.  Some of these unsuccessful methods have included, storing them in the fruit drawer of the fridge in the packaging they come in; storing them in a cool, unrefrigerated, spot in the packaging they come in; washing the berries, removing the green tops, allowing them to fully dry and storing them in the fridge in a zip top bag with as much air removed as possible (this is the most successful of the unsuccessful methods).

Now that you know what doesn't work, I am happy to say I can now tell you what does work.  The lady who sold me the berries at the farmer's market shared her preferred method for storing these crimson beauties.  I tried her suggestion and I got 6 full days of beautiful berries.  I had eaten them all by day 6, but I have a feeling they could have gone at least another day or two, possibly more.  Here's the method:
  1. Don't wash the berries until you are ready to use them
  2. Remove any berries that are already soft or where the skin is broken and discard or set aside to eat (you could use these in a smoothie, strawberry sauce or strawberry puree)
  3. Place a paper towel on the bottom of a tupperware container (with a tight fitting lid) large enough to hold all your berries 
  4. Place the dry, unwashed, unblemished berries on top of the paper towel, in a single layer, preferably not allowing the berries to touch and top with another paper towel
  5. Layer paper towels and berries until all your berries are stored, finishing with a paper towel on top of the last layer and store the tupperware in the refrigerator
When you are ready to use your berries, simply wash them, pat them dry (or let them air dry on a towel) and use.  This storage method has by far, been the best I've tried to date.  If you have strawberry storage tips I would love to hear about them in the comments section below.


Strawberry Facts

Did you know....
  • 1 cup of strawberries has more vitamin C than an orange? 
  • Strawberries are high in fiber, potassium and anti-oxidants (all good things from what I'm told)
  • 1 cup of halved berries is approximately 50 calories and low in sugar
  • Strawberries can be used for beauty purposes too...make a strawberry face mask consisting of berries, heavy cream and honey....sounds a lot like dessert to me!
  • Strawberries are delicious (okay, this more my opinion than a fact)

Now let's talk tarts.  I pulled together two recipes I've had success with to come up with this personal sized strawberry tart (or you can also make one large 9 inch tart).  Back when I made these lemon tarts, I froze two mini tart crusts.  Figured it was about time to use them.  And remember the Boston cream pie I made late last year?  And how I RAVED about the pastry cream?  Yep, I made the vanilla pastry cream for this tart (though the chocolate pastry cream would be equally tasty). 

The sweet almond shortbread crust from the tart makes a great base to fill with thick, creamy vanilla custard.  It's like eating cookies and pudding.  Top it with fresh strawberries and you have a pretty irresistable dessert on your hands.

You can make this recipe over two days, making both the tart dough and pastry cream the day ahead.  You can either bake off the tart crust the day before and then wrap it in plastic wrap for filling the next day...or bake it the day you serve it.

Enjoy!

Strawberry Tart
Yields 4 mini tarts or 1 nine inch tart

Note: If you make the entire recipe in the same day, start by making the pastry cream since it needs to chill for a few hours. 

For the vanilla pastry cream filling:
adapted from Matt Lewis and Renato Poliafito's Baked Explorations

Note: Only half a recipe is needed to fill 1 large tart or 4 mini tarts. The full recipe is listed below. This custard is delicious all on its own so feel free to make the full recipe.  You could even dip berries in it.

7 egg yolks
3/4 cup sugar
1/4 teaspoon salt
1/3 cup cornstarch
3 cups whole milk
3 tablespoons unsalted butter
1 tablespoon pure vanilla extract
2 tablespoons light rum (I omitted)

Set aside a medium heatproof bowl and fine mesh strainer.

Whisk egg yolks, half of the sugar, salt and cornstarch in a medium bowl until the mixture is pale, thick and smooth.

Bring the milk and remaining half of sugar to a boil in a medium saucepan over medium heat.  Once the mixture boils remove the pan from the heat and very slowly whisk 1/3 of the hot mixture into the egg mixture, whisking continuously (you don't want scrambled eggs).  Slowly pour the tempered egg and milk mixture back into the saucepan with the remaining milk while continuously whisking.  Place the pan back on the stove over medium heat and continue to stir until mixture boils for 2 minutes (or until thick, like pudding).  Be careful not to overcook or burn the pastry cream or it will have a bitter aftertaste.

Remove the pan from the heat and strain the pastry cream into the medium bowl you previously set aside.  Stir in the butter and vanilla (and rum if using) until butter is melted and fully incorporated.  Allow the mixture to cool for 15 minutes and then place plastic wrap directly on the surface to keep a skin from forming on the pastry.  Refrigerate until fully chilled and set, about 4 hours or overnight.

For the tart dough:
adapted from Dorie Greenspan's Baking: From My Home to Yours

1 ½ cups all purpose flour (or 1/4 finely ground almonds or another nut and 1 ¼ cups flour) - I used nuts and flour

½ cup confectioners’ sugar
¼ tsp salt
1 stick plus 1 tablespoon (9 T) very cold (or frozen) unsalted butter, cut into small pieces
1 large egg yolk
Place the flour (and ground nuts), sugar, and salt in a food processor and pulse to combine. Drop in pieces of cold butter and pulse until mixture has pea size lumps of butter.  Stir the yolk in small bowl and add it slowly to the flour mixture through the feeding tube, pulsing after each addition. Once the egg is in, hold the pulse button down for 10 seconds at time until the dough looks like curds.  Once you reach this point, turn the dough out onto a clean work surface.  Using your hands, knead the dough very lightly to incorporate all the dry ingredients.
Dorie recommends pressing the dough into a buttered 9-inch tart pan (or 4 mini tart pans) with a removable bottom, pressing the dough evenly into the bottom and up the sides of the pan.  Be gentle with pressing the dough into the pan allowing the pieces to just come together.  Prick the bottom of the crust several times with a fork.  Freeze the crust for at least 30 minutes prior to baking. 

The method I used is to gently roll the dough to 1/4 thick between two pieces of waxed paper or parchment, laying the dough into the buttered pan(s).
Preheat oven to 375 degrees F.  Use cooking spray or butter to coat the shiny side of aluminum foil and place it buttered side down, against the crust.   Place the tart pan(s) on a baking sheet and bake for 15 minutes for mini tarts and 25 minutes for a large tart.  Remove from oven and gently remove the foil.  If the crust puffs up just gently press it back down with the back of a spoon. Return to oven and cook for an additional 5 to 8 minutes or until set and golden brown.  Cool completely on a wire rack before filling.

For the strawberry topping:

3 cups of sweet, ripe, strawberries, washed, dried, hulled and sliced vertically into 1/8 - 1/4 inch slices.

Assemble the tart:

Wait until you are ready to serve your tart(s) before assembling so the crust does not get soggy.  Fill the tart(s) full with vanilla pastry cream.  Top the tart(s) with the sliced strawberries, in a circular pattern starting from the outside of the crust and working your way in, allowing the strawberries to overlap slightly.  Serve immediately.

Sunday, November 27, 2011

Apple Danish for Thanksgiving


This year we spent Thanksgiving with my Mom's family at my grandparents house in Palm Desert.  This year was extra special because Hubby and I and our newest cat, Oliver, made the hour and 45 minute drive Tuesday evening before Thanksgiving.  We went out early to help Grandma Jane cook and prep for the big day.

Yes, you read right, we took our cat.  I know, it's a little odd.  Oliver joined our family as a 4 month old kitten back in June.  He is a sweetheart, but he cannot be trusted to stay at home with the two big girl kitties.  He has an affinity for eating toilet paper, digging in trashcans and being a little too inquisitive.  Plus he has about 50 times the energy as the big girls and sadly they have zero interest in playing with the little guy.  This was actually Oliver's second trip to grandma's house (the first was in August--see photo below).  He doesn't love the car ride, usually spending the first half of the drive meowing his little head off, but once he's there he is a happy camper.  He purrs nonstop at grandma's and like everyone else, loves being there.

Hubby and Oliver on his first trip to Grandma's house in Aug 2011
(we drove at night for this most recent trip so we didn't get any photos)


Grandma has been doing our families Thanksgiving for my entire life.  My mom and aunt and I joked that none of us knows how to cook a turkey because Grandma always does it.  She puts on quite a spread and thinks of all her guests favorite dishes (even Oliver got a turkey day treat--a small rawhide stick wrapped with dried chicken--which he absolutely loved).  The big meal contains many dishes that grace most Thanksgiving tables, like turkey and stuffing (with an extra crispy crust on top), mashed potatoes and gravy, ham, sweet potatoes with toasted marshmallows, corn, cranberry and dinner rolls.  She also includes some other special dishes that aren't as traditional, like 7 layer salad (my personal favorite), blueberry pecan salad (my mom's favorite), ambrosia (my cousins favorite) and sweet potato casserole with crusted pecan topping (almost every one's favorite).  It's a feast of major proportions and I always look forward to digging in.  Grandma serves Thanksgiving dinner around noon.  Originally she did it early to accommodate the families that had to go two Thanksgivings in one day.  But no one has to tackle two meals in one day anymore.  So we do two at Grandma's.  The big feast at noon and what I like to call second dinner around 6 pm. I look forward to second dinner just as much as the main event.

There is never a shortage of sweets at Grandma's.  Every year she makes 3 kinds of pies...pumpkin, pecan and apple.  This year she let me make the apple pie using a favorite family recipe from my Dad's family.  I had a blast spending the day with Grandma in the kitchen prepping and baking.  She even helped me crimp my pie crust edges, a skill I am still working to master! 


Grandma also helped me develop the recipe for this apple danish filling.  I brought the leftover dough from my recent danish pastry making adventure.  We whipped up an apple pie like filling to fill the danish on Thanksgiving morning.  Between the two of us, I think we came up with a pretty awesome filling that is most definitely going on the recipe keeper list. 


The filling is sweet and tart, using 2 types of apples.  You can change up the apple mix to suit your tastes.  The danish is sweet with the icing on top so if you prefer a more tart filling, you can use all granny smith's.  A little cornstarch helps the filling thicken.  I recommend making it a day or two before you plan to bake the danish (you can also make the pastry dough ahead).  It sets up even more after chilling in the fridge.  This filling could be used with other dessert options, like an apple turnover using store bought puff pastry, it could be used to fill a crepe, top a cheesecake, or fill a tart shell.  This sweet breakfast treat is best served warm from the oven.


The apple danish was a big hit with my family.  I kept hearing, "Wow, you made this?"  Which makes me blush a little.  I am happy to report there wasn't a speck left over. 
 
Hope you all had a nice Thanksgiving and are gearing up for the holiday fun in December!

For the danish pastry recipe, including some step by step photos, click here.

Apple Danish Filling

Yields about 2 cups
Ingredients:

3 apples (I used 1 granny smith and 2 rome apples), peeled, cored and sliced in 1/2 inch wide by 1 inch tall chunks
1/2 cup granulated sugar
1 tablespoon cornstarch
pinch of salt
1 teaspoon cinnamon
1/8 teaspoon nutmeg
1/2 cup unsalted butter (1 stick), sliced in 1/2 pieces

Directions:

In a small bowl combine sugar, cornstarch, salt, cinnamon and nutmeg until thoroughly mixed.  Heat a medium sized skillet over medium heat and add butter.  Once butter is melted add the apples and sugar mixture. Bring mixture to a simmer and stir occasionally and cook for about 15 minutes or until apples are just tender but not mushy and the sauce is slightly thickened.   Allow mixture to fully cool before filling the danish pastry.  The filling can be made up to three days ahead.  Store in an airtight container in the refrigerator until ready to use.

Monday, November 21, 2011

Danish Pastry Braid


I have never made pastry. When I was assigned Gitte's blog, My Danish Kitchen for this month's Secret Recipe Club I saw Danish pastry and there was no turning back.

Danish Pastry, also called Wienerbrød, is one of many Danish recipes on Gitte's blog. Gitte is from Denmark but has made a home in the United States with her husband and son. She writes that she experienced challenges cooking in a foreign country with unfamiliar ingredients over the years. She has tapped into her family back home to help her learn to cook. She has a lovely blog filled with an array of recipes both Danish and American inspired.  I'm totally intrigued by Danish treats and see some others on Gitte's site I need to make, like Danish Træstammer, like a marzipan covered cake truffle or Danish Hindbærsnitter, Danish cookies filled with raspberry preserves.  Yum!  Pop over to My Danish Kitchen and check out the great recipes. 


Making pastry takes planning and patience, two things I could be a lot better at. So I knew I wanted to give this a go.

The first order of business was to purchase cardamom. My local chain grocery store had it....for $11.79 for a 1.25 ounce bottle! I didn't really want to invest that much money for a spice I wasn't sure I would use again. So I went to a nearby Persian grocery store where I knew they would have an array of spices. I was able to get 0.75 ounce for $1.99.  Now that's what I'm talking about!  Cardamom has a spicy fragrence that reminds of spices similar to allspice and cloves.  I was worried it might be overpowering, but the cardamom flavor was extremely mild in the finished product. 


The dough needs resting time so plan  to make it the night before you want to have it for breakfast.  And then get up (really early) to roll and fold the dough (3 times), chill it again for 30 minutes and then roll it one last time, fill it, braid it, glaze and top it, bake it, ice it and finally cut and serve it.  Phew...I'm out of breath!  It's really not that bad.  Each step is pretty straightforward.  I would plan to allow at least 90 minutes of prep and cook time the morning you want to make this.  I didn't get up as early as I wanted to, but the Danish pastry was done technically done in the (late) morning hours.

A few notes.  I accidentally omitted the sugar in the dough.  I didn't even notice until I was typing up Gitte's recipe.  Whoops.  It still turned out great despite this omission.  There is plenty of sweetness from the filling and icing to make up for it.  Speaking of filling I used ollalieberry preserves that I had on hand in place of raspberry preserves.  Use your favorite preserves.  I had a little trouble braiding the pastry.  First off, I rolled it out too long (about 18 inches instead of 12).  I had too many strips to braid so I ended up cutting about 6 of them off.  This error wasn't noticeable in the finished product either. My braid baked for 15 minutes exactly and could have used 2 more minutes in the oven. 

Check out the big pieces of butter in the dough...this was the first of three times rolling and folding the dough

This is after 3 times of rolling and folding the dough...it goes back into the fridge to chill for another 30 minutes

Ready for braiding

The braid gets glazed with egg wash and topped with pearl sugar and sliced almonds

Fresh out of the oven

The result? Despite things not coming together perfectly, it was still a delicious, flaky fruit filled pastry. This beautiful pastry would be great for a special breakfast or for brunch. The recipe makes two 12 inch braids. I made one and froze the dough for the second one. So another Danish pastry is in my future.  I'm already thinking about filling it with apple pie filling.  Mmmmm.


Enjoy!


Danish Pastry Braid {Wiernerbrød)
from My Danish Kitchen

Makes two 12 inch pastry braids

Pastry Ingredients:
3 1/2 cups all purpose flour
1 1/2 cups cold unsalted butter
2 packages active dry yeast (4 1/2 teaspoons)
1/2 cup warm water (105 - 115 degrees F)
1/2 cup heavy cream
1/2 teaspoon cardamom
1/2 teaspoon salt
2 eggs, room temperature
1/4 cup sugar

Filling:
Seedless raspberry preserves

Glaze:
1 egg, lightly beaten
2 tablespoons water
Pearl sugar, for topping
Slice almonds, optional, for topping

Icing:
1 cup powdered sugar
2-3 teaspoons warm milk
1/2 teaspoon almond extract

Directions:

Place flour in the bowl of (an 11 cup) food processor fitted with the steel blade. Cut butter into 1/4 slices and add to flour. Pulse until the butter is the size of kidney beans.

Dissolve yeast and warm water in a large blow. Let stand for 5 minutes and stir yeast until smooth. Add in cream, cardamom, salt, eggs and sugar and stir until combined. Turn the butter flour mixture into the liquid mixture and use a rubber spatula to carefully mix until the dry ingredients are moistened. Dough will have large pieces of butter and may look slightly crumbly. Cover dough and refrigerate for 4 hours or overnight or up to 4 days.

Place dough on a lightly floured surface and dust the dough and your rolling pin with flour. Roll out the dough to make a 16 to 20 inch rectangle. Fold the dough in thirds longwise, rotate dough 1/4 turn and fold into thirds again, make a small rectangle. Turn the dough over. Repeat the rolling and folding 2 more times (making it a total of rolling and folding 3 times). You will end with a small rectangle of dough. Wrap dough and chill for 30 minutes to overnight. (I chilled for an hour)

Preheat oven to 400 degrees F. Line 2 baking sheets with parchment paper.

Divide the chilled dough into two parts. Roll each half into a 6 x 12 inch rectangle. If you are not making both braids at the same time, wrap the second half of dough and place in the refrigerator until ready to roll. Dough can also be frozen and unthawed in the refrigerator overnight.

Spread the filling down the length of the center 1/3 of each rectangle. Cut slanting (45 degree angle) 3/4 inch strips along both sides such that there are equal number of strips on each side. Carefully transfer the braids to the baking sheets and let dough rise for 15-30 minutes until it appears slightly puffy (it not double in size). Lightly beat the egg and water for the glaze. Once the dough has risen, brush the pastry with the glaze and sprinkle with pearl sugar and/or sliced almonds.

Bake for 12-15 minutes or until golden brown. Make icing by mixing powdered sugar, milk and almond extract until silky smooth. Drizzle icing on the top and let set. Cut crosswise into 2 inch slices.