Showing posts with label pie. Show all posts

Sunday, July 21, 2013

Blueberry Lemon Curd


It's July...very close to August.  Are you all aware of that?  I swear I blink and another month passes.  I'm not sure if that's a good thing or bad thing.  But I am excited about this month's Secret Recipe Club post.  I was assigned the lovely blog, Teaspoon of Spice written by Deanna and Serena, both registered dietitians.  Their blog focuses on healthy yet delicious foods.  In fact they teamed up to start a monthly healthy recipe blog challenge called the Recipe Redux.  It's all about taking recipes and making them better for you, but still keeping them tasty.  I know I could use more of those kinds of recipes in my life!  I have a number of tasty things bookmarked already!

As with every Secret Recipe Club assignment, I always have difficulty choosing just one recipe.  Though it wasn't easy, I finally selected blueberry lemon curd.  I have a love for preserves and curds and just happened to be flush with an abundance of blueberries.  Plus I was totally intrigued by the idea of a blueberry based curd.  I've only made lemon curd in the past and I've really only seen citrus curds.

Blueberry lemon curd rocks!  In case you were wondering.


It's has a rich consistency from the egg yolks and butter, standard ingredients that turn a preserve into a curd (along with a little cornstarch).  I've been eating my new favorite curd for breakfast nearly every day this week on half of my English muffin, smearing peanut butter on the other half (these two pair together nicely).  But for you all, I wanted to share a presentation beyond the English muffin. 

This weekend I set out to pair this beautiful blueberry curd with something equally special.  I thought it would be the perfect time to finally try my hand at French macarons.  The curd would be the filling between those delicate sandwich cookies.  Sadly, the macarons were a huge flop.  I'm not sure where it all went wrong, but I couldn't even pry the little shells off the parchment paper after baking.  3 sheet pans full...into the garbage. 


My second attempt to use the curd was in a recipe I recently saw on Pinterest for lemon bar muddy buddies.  Why not make them BLUEBERRY lemon bar muddy buddies?  Perhaps there is a good reason because, again, I'm not sure where it all went wrong.  The muddy buddies were overly sweet and turned to sog city after a few hours and shortly thereafter, joined the fallen macarons in the trash. :(  Strike two!


I half thought about making homemade linzers, but at that point it just wasn't in me to start another recipe.  Instead I found adorable shortbread tart shells in the baking aisle of my local grocery store. A homerun! The tart shells make a perfect vessel for blueberry lemon curd.  Besides, aren't they the cutest little things?  I happened to have some left over cream cheese frosting to pipe a little flower on top of each one.  Let me tell you, simple is often best.  A perfect blueberry pie bite.

Blueberry lemon curd will be joining my list of keeper recipes!

Enjoy! 

Blueberry Lemon Curd
from Teaspoon of Spice

Yields about 2 1/2 cups

3 cups fresh blueberries
1/2 cup plus 3 tablespoons sugar
1/4 cup lemon juice
2 tablespoons cornstarch
2 large egg yolks
1 tablespoon butter
1/8 teaspoon salt

In a medium heavy bottomed sauce pan, heat blueberries, sugar and lemon juice, stirring occasionally over medium/high heat.  Bring to a boil. Reduce heat and simmer for 6 minutes.  Remove pan from heat and allow to stand and cool about 5-10 minutes.  Using an immersion blender, puree the mixture.  Alternatively you can transfer the blueberry mixture to a blender.  Please be careful though!  It's incredibly hot liquid. 

Return pan to medium/low heat.  Meanwhile, stir together cornstarch and egg yolks until smooth.  Add to the blueberry mixture, whisking constantly.  Allow mixture to come to a boil.  Boil for one minute whisking constantly.  Remove from heat and stir in butter and salt.  Allow to cool for 5 minutes or so, whisking occasionally to continue to release the heat.  Spoon into jars or containers with an airtight seal and continue to cool for another 15 minutes of so.  Seal and refrigerate.

Notes: I used 1 cup of sugar because my blueberries were quite tart.

Friday, May 25, 2012

Strawberry Cream Cheese Crumble Tart


This is a post of random thoughts...and eventually a strawberry tart.  Mostly because my mind refuses to focus on one train of thought at the moment.

Random thought #1:
Operation Baking GALS rocks.  I sent my first box of baked goods off to Afghanistan on May 8th and earlier this week I received emails from three soldiers expressing their thanks.  I can't tell you how cool it was to get those emails.  And it was extra cool, because each email addressed me as, "Ma'am."  So official!  The next round of baking starts on June 1st - 13th.  That means you have time to join the GALS and share some goodies with our troops overseas.   To join head to the Baking GALS site, check out the FAQ's and then click on "Register New Account".  Once you are registered you can access the teams and read about each solider(s) that team is baking for and choose a team to join.  I seriously wanted to join 3 different teams this time, but I'm taking it slow and going to just stick with one for my first few rounds.  Meanwhile, thoughts of cookies are dancing in my head.

Random thought #2:
In the wake of Facebook's (less than) stellar introduction to the stock market I am finally getting around to telling you all The Ginger Snap Girl now has a Facebook fan page!  Yeah!  For some reason I was nervous to put up a page.  What if no one "likes" my page?   But I can always count on my friends and family to be my cheering section.  So I'm super excited to have 46 likes.  If you'd like to make it 47, 48, 49 or magic number 50, check it out... facebook.com/thegingersnapgirl.  Like most things, now that I've done it, I wonder what the heck I was nervous about to begin with?

Random thought #3:
Are you all geared up for the Memorial Day weekend?  Do you have travel plans or barbecuing plans?  Tackling a home improvement project?  Or lounging on the beach?  All of these things sound pretty good to me.  We're keeping it low key over here.  Already did our Costco run to stock up on watermelons, blueberries and feta cheese, among other things.  Barbecuing is on the agenda, along with seeing The Avengers, maybe some planting in the garden/flower bed and dinner with friends at one of our favorite restaurants, California Shabu Shabu

Random thought #3.1:
Have you ever had shabu shabu?  We've only gone to one shabu shabu place, so I really have no clue how it compares to any other...but it's so good that we have no need to look further.  Shabu shabu is Japanese style of cooking your food in a pot of boiling water.  This is a do it yourself meal where you "swish-swish" thinly sliced meats and vegetables in a hot pot until cooked (which takes literally 5 seconds for beef).  The cooked stuff gets dipped in sauces and then eaten with rice.  The sauce is where it's at.  Honestly, the meat and veggies are just a vehicle in which to consume large portions of ponzu and sesame sauce (similar to peanut sauce).  So. Freakin'. Mouth wateringly delicious.  Can't wait.

Really random thought #4:
I had a dream last night that Hubby and I were on a long road trip, driving at night, pulling a boat behind our Jeep (we don't have a boat).  Then in slow motion I see headlights coming towards us.  In our lane.  It was a big old clunker car circa 1977.  We are headed straight for the clunker's headlights and I close my eyes waiting for impact.  But we just keep driving.  The car swerves and misses us, crashing into something on the side of the road.  What does that mean?  Never mind.  I am pretty sure I don't want to know.

Random thought #5:
This weekend marks the one year anniversary of the purchase of our ice cream maker.  I am SO making ice cream to celebrate.  Now the hard part....choosing a flavor.  Perhaps this Kit Kat Ice Cream?  Lime Sherbet?  My own concoction?

Random thought #6:
While working from home today I turned around from my desk to see this (sorry it's a little blurry)...


And this....


Random thought #7:
Holiday weekends make me think about childhood barbecues at my grandparents house and crave deviled eggs, potato salad and strawberry shortcake.  Three things I've never posted.  I need to work on that.

Random thought #8:
Enough with random thoughts. 

Strawberry Cream Cheese Crumble Tart has been on my baking to do list for a year.  I first saw the recipe on Nick Malgieri's blog and bookmarked it.  Strawberry season passed last year and I never got around to making it.  I was recently reminded about it when Tracey of Tracey's Culinary Adventures and Michelle of Brown Eyed Baker each posted beautiful renditions of what I knew would be an awesome tart.  So when I needed a dessert for Mother's Day, this was it! 

The tart starts with a sweet cookie crust.  Cream cheese goodness and strawberries fill the crust and a chunky, crunchy crumb adorns the top.  The tart was a hit with the fam, just one lonely peace remaining.  If you're looking for a special dessert to bring to a Memorial Day party, this would be perfect. 


This dessert is not hard to make.  It is however, time consuming.  Make the cookie crust dough the day before.  It requires chilling time before you roll it out and more chilling time after you roll it out.  But don't bake it yet.  Cover it and store in the fridge.  Bake the crust and the crumble topping at the same time on the day you plan to serve the tart.  Mix the cream cheese filling and cut the berries while the crust and crumble bake.  Assemble it all no more than a few hours before you plan to serve it.  I found the crumble to crust/filling ratio to be a little high.  I only used about 3/4 of the crumble.  I left my tart at room temperature for about 3 hours prior to serving.  It didn't cut into the nice clean pieces I was hoping for.  Next time I will store the tart in the fridge until about an hour prior to serving this tasty tart!

For the recipe head over to Nick's blog.

Enjoy!

Monday, March 26, 2012

The Ginger Snap Girl Celebrates 2 Years with Cheesecake!


Two years ago today I stumbled into the blogging world.  Back then I didn't know where blogging would take me or how it would become such a huge part of my life.  I still don't know exactly where blogging will take me, but I do know that I love every minute of what goes into The Ginger Snap Girl. 

The Ginger Snap Girl is....

an incredible creative outlet.
my biggest fan.
my toughest critic.
a connection to great online friends.
a photography teacher.
always finding a new adventure in the kitchen.
a keeper of my thoughts.
a recipe box.
part of a wonderful community.
my alter ego.
making my pants hard to button.
a journal of sorts.
an excuse to make ridiculously decadent desserts (a difficult sacrifice me and my skinny jeans make for my readers!).
my happy place.

The last two years have sped by faster than I care to admit.  Though this blog has been a wonderful documentation of stories and recipes, my real mission is to inspire you to get in the kitchen and cook or bake.  The most gratifying part of the blog is hearing that someone has made something I posted about.  It doesn't always turn out perfect.  But it strikes a conversation.  How can it be tweaked next time?  How can you customize it suit your tastes.  That's what I love.

I hope when you are reading about my three year blog anniversary next March that....

The Ginger Snap Girl has moved to her own domain name (already purchased...just need to make the leap).
GSG  has gotten a little makeover (nothing drastic like a face lift...but maybe a little boxtox here and there).
I've challenged myself to be a better photographer and storyteller. 
I've lost 5 pounds and my skinny jeans fit again.
I'm developing more and more of my own recipes.

To celebrate two years I wanted to make something I've never made before.  Cheesecake. 


In the realm of desserts cheesecake is not one that I typically gravitate to (plus it seemed intimidating to make).  I often find cheesecake to be too rich and dense for my taste.  But I had a cheesecake over the Christmas holiday that turned me into a believer!  My brother's girlfriend, Lindsay, brought homemade cheesecake to Christmas Eve.  When I took a bite it was light and soft and melted in my mouth.  I devoured my slice in short order.  Welcome to the family Lindsay!  Lucky for me she was kind enough to share her family recipe with me. 


This recipe is easy to make so don't let cheesecake intimidate you like it did me!  What is nice about it is that it doesn't require you to bake the cheesecake in a water bath.  Allow yourself plenty of time to make this because the baked cake needs time to chill completely in the refrigerator which takes at least 4 hours. 

The base of the cheesecake is a graham cracker crust studded with finely chopped pecans (or toasted almonds in my case).  The cheesecake layer is simply cream cheese, eggs, sugar and vanilla.  In the final minutes of baking a topping consisting of sour cream, sugar and vanilla, goes on over the nearly baked cheesecake and then back in the oven for an additional 5 minutes of baking (or about 8 minutes in my case).  I love tartness of the sour cream layer which pairs perfectly with the light, fluffy, sweet cheesecake.  I topped my cheesecake with homemade lemon curd (link to recipe below) and fresh sliced strawberries.  Pure indulgence and totally worth undoing the top button of your jeans to make room.


I'm excited to say I conquered my cheesecake fears and will most definitely be making this again.  This is a great base recipe that can be tweaked with various flavor profiles.  Like a chocolate cookie crust and caramel sauce or chocolate ganache or both on top.  Or a gingersnap crust with lemon curd.  A graham cracker crust with apple compote or fresh berries.  So many options...


Here's to cheesecake and another great year! 

Enjoy!

Ingrid's New York Cheesecake


For the crust:
1 1/2 cups graham crackers
1/3 cup finely chopped pecans (I used toasted almonds)
5 tablespoons melted butter
1 tablespoon sugar

For the filling:
3 eight ounce packages cream cheese, room temperature
5 eggs, lightly beaten
1 cup sugar
1 1/2 teaspoons vanilla (I used 2 teaspoons)

For the sour cream layer:
16 ounces sour cream (don't use light or low fat)
1/2 cup sugar
1 teaspoon vanilla

Preheat oven to 350 degrees F.  Line a baking sheet with parchment or foil and assemble a 9 or 10 inch spring form pan (I used a 9 inch pan).  Place the spring form pan on the lined baking sheet.

Start by making crust.  Mix graham cracker crumbs, pecans and sugar into a medium bowl.  Add melted butter and stir until well combined.  Press the mixture evenly in the bottom of your spring form pan to form the crust.  No need to bring the crust up the sides of the pan.

Next, make the cheesecake filling.  In the bowl of an electric mixer beat the cream cheese on medium for 2-3 minutes.  Slowly stream in the lightly beaten eggs.  Next slowly stream in the sugar and beat until fully combined, about 1 minute.  Add vanilla and mix until combined.  Pour cream cheese mixture on top of crust.  Bake for 50-55 minutes until cheesecake is just set, but slightly wobbly in the center.

About 5 minutes before the cheesecake is done baking, make the sour cream layer.  Mix sour cream, sugar and vanilla in a medium bowl until fully combined.  Let the mixture sit at least 3 minutes and then pour on top of the baked cheesecake and bake for an additional 5-8 minutes.  The topping will appear glossy and will be just set.  Once set, turn oven off and prop open the oven door using a wooden spoon.  Allow cheese cake to cool in the oven for at least 20 minutes.  This should prevent the top of the cheesecake from cracking.  Unfortunately mine still cracked anyway!

Transfer cheesecake still in the spring form pan to the refrigerator and chill for at least four hours or overnight. Do not take cheesecake out of the spring form pan until you are ready to serve it.  Top the cheesecake with your favorite topping.  Some ideas are fresh fruit, fruit compote, curd, chocolate ganache or caramel sauce.

Click here for the lemon curd recipe I used to top the cheesecake.

Sunday, March 4, 2012

Strawberry Tid Bits and a Tart


I did it.  I ate all three baskets of strawberries I bought last Sunday at the farmer's market. 

By myself. 

It took me 6 days and three breakfasts of strawberries, yogurt and granola, one breakfast of berries with a Nutella scone, two desserts of strawberries dipped in Nutella and the finale was this strawberry tart.  And surprisingly, I am not sick of strawberries!  I am actually a little sad they are gone.  I might just be heading back to the farmer's market this week.
Storing Your Strawberries - Tip of the Day

I mentioned earlier this week, I've struggled in the past to store strawberries for more than a day or two without them growing mold or looking sad and sickly.  I've tried several methods which have all proven to be unsuccessful.  Some of these unsuccessful methods have included, storing them in the fruit drawer of the fridge in the packaging they come in; storing them in a cool, unrefrigerated, spot in the packaging they come in; washing the berries, removing the green tops, allowing them to fully dry and storing them in the fridge in a zip top bag with as much air removed as possible (this is the most successful of the unsuccessful methods).

Now that you know what doesn't work, I am happy to say I can now tell you what does work.  The lady who sold me the berries at the farmer's market shared her preferred method for storing these crimson beauties.  I tried her suggestion and I got 6 full days of beautiful berries.  I had eaten them all by day 6, but I have a feeling they could have gone at least another day or two, possibly more.  Here's the method:
  1. Don't wash the berries until you are ready to use them
  2. Remove any berries that are already soft or where the skin is broken and discard or set aside to eat (you could use these in a smoothie, strawberry sauce or strawberry puree)
  3. Place a paper towel on the bottom of a tupperware container (with a tight fitting lid) large enough to hold all your berries 
  4. Place the dry, unwashed, unblemished berries on top of the paper towel, in a single layer, preferably not allowing the berries to touch and top with another paper towel
  5. Layer paper towels and berries until all your berries are stored, finishing with a paper towel on top of the last layer and store the tupperware in the refrigerator
When you are ready to use your berries, simply wash them, pat them dry (or let them air dry on a towel) and use.  This storage method has by far, been the best I've tried to date.  If you have strawberry storage tips I would love to hear about them in the comments section below.


Strawberry Facts

Did you know....
  • 1 cup of strawberries has more vitamin C than an orange
  • Strawberries are high in fiber, potassium and anti-oxidants (all good things from what I'm told)
  • 1 cup of halved berries is approximately 50 calories and low in sugar
  • Strawberries can be used for beauty purposes too...make a strawberry face mask consisting of berries, heavy cream and honey....sounds a lot like dessert to me!
  • Strawberries are delicious (okay, this more my opinion than a fact)

Now let's talk tarts.  I pulled together two recipes I've had success with to come up with this personal sized strawberry tart (or you can also make one large 9 inch tart).  Back when I made these lemon tarts, I froze two mini tart crusts.  Figured it was about time to use them.  And remember the Boston cream pie I made late last year?  And how I RAVED about the pastry cream?  Yep, I made the vanilla pastry cream for this tart (though the chocolate pastry cream would be equally tasty). 

The sweet almond shortbread crust from the tart makes a great base to fill with thick, creamy vanilla custard.  It's like eating cookies and pudding.  Top it with fresh strawberries and you have a pretty irresistable dessert on your hands.

You can make this recipe over two days, making both the tart dough and pastry cream the day ahead.  You can either bake off the tart crust the day before and then wrap it in plastic wrap for filling the next day...or bake it the day you serve it.

Enjoy!

Strawberry Tart
Yields 4 mini tarts or 1 nine inch tart

Note: If you make the entire recipe in the same day, start by making the pastry cream since it needs to chill for a few hours. 

For the vanilla pastry cream filling:
adapted from Matt Lewis and Renato Poliafito's Baked Explorations

Note: Only half a recipe is needed to fill 1 large tart or 4 mini tarts. The full recipe is listed below. This custard is delicious all on its own so feel free to make the full recipe.  You could even dip berries in it.

7 egg yolks
3/4 cup sugar
1/4 teaspoon salt
1/3 cup cornstarch
3 cups whole milk
3 tablespoons unsalted butter
1 tablespoon pure vanilla extract
2 tablespoons light rum (I omitted)

Set aside a medium heatproof bowl and fine mesh strainer.

Whisk egg yolks, half of the sugar, salt and cornstarch in a medium bowl until the mixture is pale, thick and smooth.

Bring the milk and remaining half of sugar to a boil in a medium saucepan over medium heat.  Once the mixture boils remove the pan from the heat and very slowly whisk 1/3 of the hot mixture into the egg mixture, whisking continuously (you don't want scrambled eggs).  Slowly pour the tempered egg and milk mixture back into the saucepan with the remaining milk while continuously whisking.  Place the pan back on the stove over medium heat and continue to stir until mixture boils for 2 minutes (or until thick, like pudding).  Be careful not to overcook or burn the pastry cream or it will have a bitter aftertaste.

Remove the pan from the heat and strain the pastry cream into the medium bowl you previously set aside.  Stir in the butter and vanilla (and rum if using) until butter is melted and fully incorporated.  Allow the mixture to cool for 15 minutes and then place plastic wrap directly on the surface to keep a skin from forming on the pastry.  Refrigerate until fully chilled and set, about 4 hours or overnight.

For the tart dough:
adapted from Dorie Greenspan's Baking: From My Home to Yours

1 ½ cups all purpose flour (or 1/4 finely ground almonds or another nut and 1 ¼ cups flour) - I used nuts and flour

½ cup confectioners’ sugar
¼ tsp salt
1 stick plus 1 tablespoon (9 T) very cold (or frozen) unsalted butter, cut into small pieces
1 large egg yolk
Place the flour (and ground nuts), sugar, and salt in a food processor and pulse to combine. Drop in pieces of cold butter and pulse until mixture has pea size lumps of butter.  Stir the yolk in small bowl and add it slowly to the flour mixture through the feeding tube, pulsing after each addition. Once the egg is in, hold the pulse button down for 10 seconds at time until the dough looks like curds.  Once you reach this point, turn the dough out onto a clean work surface.  Using your hands, knead the dough very lightly to incorporate all the dry ingredients.
Dorie recommends pressing the dough into a buttered 9-inch tart pan (or 4 mini tart pans) with a removable bottom, pressing the dough evenly into the bottom and up the sides of the pan.  Be gentle with pressing the dough into the pan allowing the pieces to just come together.  Prick the bottom of the crust several times with a fork.  Freeze the crust for at least 30 minutes prior to baking. 

The method I used is to gently roll the dough to 1/4 thick between two pieces of waxed paper or parchment, laying the dough into the buttered pan(s).
Preheat oven to 375 degrees F.  Use cooking spray or butter to coat the shiny side of aluminum foil and place it buttered side down, against the crust.   Place the tart pan(s) on a baking sheet and bake for 15 minutes for mini tarts and 25 minutes for a large tart.  Remove from oven and gently remove the foil.  If the crust puffs up just gently press it back down with the back of a spoon. Return to oven and cook for an additional 5 to 8 minutes or until set and golden brown.  Cool completely on a wire rack before filling.

For the strawberry topping:

3 cups of sweet, ripe, strawberries, washed, dried, hulled and sliced vertically into 1/8 - 1/4 inch slices.

Assemble the tart:

Wait until you are ready to serve your tart(s) before assembling so the crust does not get soggy.  Fill the tart(s) full with vanilla pastry cream.  Top the tart(s) with the sliced strawberries, in a circular pattern starting from the outside of the crust and working your way in, allowing the strawberries to overlap slightly.  Serve immediately.

Sunday, January 15, 2012

(Non) Mississippi Mud Pie


Many birthday dinners out at a restaurant when I was a teenager ended with a slice of mud pie topped with a candle. The slices were massive and could be shared with my whole family.  I would always choose a non coffee version of mud pie, like chocolate mint or chocolate chip.  Ice cream is pretty satisfying all on it's own, but when it's packed into a pie form with cookie crust and fudge topping, it transforms into something special.

Jess from The Saucy Kitchen is our hostess for this week's Club: Baked pick and she chose Mississippi mud pie as the recipe the group would make.  Even though I'm a fan of mud pie, I was a little hesitant to make this recipe because I knew it had coffee in it.  I thought for sure the coffee would be in the fudge layers, but when I read through the recipe more closely, the only coffee was in the ice cream layer.  A layer that could easily be changed out for another ice cream flavor.  The authors of Baked Explorations say you can choose whatever ice cream flavor you like, but if you stray from the traditional coffee ice cream, you can no longer call it "Mississippi" mud pie. 

So, here I present, my non Mississippi mud pie.  I used dulce de leche (caramel) ice cream instead of coffee. 


Other than the ice cream swap and using almonds instead of pecans (because I burned my pecans), I followed the recipe exactly.  Well, sort of.  I cut the recipe in half and made a mini mud pie.  Hubby is not a chocolate fan so I wanted to make a small version.   My father-in-law was going to be in town so I knew I could share it with him.  Let's just say I shared 1/4 of the pie with him and I scarfed down the other 3/4 myself over the following 4 days.  I would have to go shopping for new jeans if I had made the full pie.

In case it wasn't obvious by my aforementioned pie hoarding, I really liked this mud pie.  The crust is a chocolate cookie crust.  I used Oreos minus the filling as the base because I couldn't find chocolate wafer cookies at my grocery store.  I liked using Oreos because the wafer part on its own isn't overly sweet so it results in a deep dark chocolate crust.  The next layer is a sweet, rich bourbon fudge.  Just a hint of bourbon brings a depth of flavor to the fudge without being too boozy.  Up next is the ice cream layer which gets topped by chopped pecans (almonds in my case).  And finally the top is drizzled with more bourbon fudge.  I didn't use all the fudge on top since I wanted to see a little bit of the ice cream beneath.  The pie is stored in the freezer and is sliceable right out of the freezer.


This is definitely a dessert geared toward a chocolate lover.  But what is so great about this recipe is I can see it being tweaked and twisted into a variety of flavor combinations.  I'm already envisioning a chocolate mint mud pie, replacing the bourbon in the fudge layer with a bit of peppermint extract and a layer of mint chip ice cream.  Or a strawberry shortcake version...with a graham cracker or vanilla wafer cookie crust instead of the chocolate crust.  White chocolate can be swapped for the dark chocolate in the fudge layers and amaretto in place of the bourbon.  Fresh strawberry ice cream nestled in the middle and you have a fun play on mud pie meets strawberry shortcake.  Really, the possibilities are vast. 

What I love about this recipe is it's easy and presents beautifully.  It does require a little planning ahead because the various layers have to chill or freeze until the next can be completed.  You can't throw it together an hour before guests will be arriving unfortunately.  I spread it out over two days and it was a cinch.


Now that I've been schooled on the ways the mud pie...I'm excited to try other flavor combinations.

To get the recipe head over to The Saucy Kitchen.  Thanks for a great pick Jess!  To see how my fellow Club: Bakers did with their pies click here.

Thursday, September 1, 2011

Boston Cream Pie


Pastry cream.  Pastry cream.  Pastry cream!

Boston Cream Pie (which is really in fact a cake, not a pie) is filled with sweet delicious vanilla and chocolate pastry cream.  I am super jazzed that I have finally made pastry cream.  I think my life has been incomplete without it.  Well maybe that's a slightly dramatic, but really I can't get over how much I love pastry cream.  Pastry cream is a pudding like filling often used between cake layers or to fill cream puffs or donuts.  I have eaten it before, but have never made my own.  Lucky (or perhaps unlucky) for me it is very easy to make.  I could not stop dipping my (of course impeccably clean) fingers into the bowls to get just another taste.  Then I did something I haven't done in years....I licked the bowl.  Well not really.  I used a spatula to scrape all the delicious remnants straight into my mouth.  I didn't let any of this precious magic cream go to waste.  I was little skeptical about using 2 flavors of pastry cream.  I believe traditional Boston Cream Pie only uses vanilla.  But the chocolate and vanilla pastry creams were equally delicious. 


Is it really obvious I adored the pastry cream portion of this dessert?  I guess I need to discuss the other components now.

Let's start with the milk sponge cake.  It had a slightly bizarre texture.  Almost a little tough?  But still moist?  Is that even possible? I don't know.  When you layer all that tasty pastry cream in there it's hard to tell.  I don't think I'd use this sponge cake recipe next time I make Boston Cream Pie (already planning for the next time!).

The cake is topped with rich chocolate ganache-like glaze/frosting.  I thought the topping was pretty delicious and love the contrast of the dark chocolate glaze with the soft luscious pastry cream.  See how I took it back to the pastry cream? 

Overall, this is a pretty special dessert.  Even hubby liked it....well sort of.  Guess what?  He only liked the (vanilla) pastry cream!  He said the cake was "weird" and he's not a chocolate fan.  But like me, he couldn't keep his (not so impeccably clean) fingers out of the vanilla pastry cream.  I am already looking forward to eating this again for breakfast!


Making a Boston Cream Pie is a bit involved with three (well technically four) separate components that have to be made then all assembled.  Consider making the pastry cream the night before you plan to serve the cake.  It needs to chill for 4 hours (or overnight).  You could also chop your chocolate for the chocolate glaze at the same time you chop the chocolate for the chocolate pastry cream and store it in a tupperware for use the next day.  The day you want to serve the Boston Cream Pie bake the sponge cake and once cooled store the layers wrapped in plastic wrap in the refrigerator while you make the glaze.  The cake is easier to slice in layers when it is chilled. 

I halved the recipe and baked the cake in 2 six inch cake pans.  My cake layers were on the thin side because of the size pans I used, but it worked out ok, because the layers of pastry cream were about equal in size to the layers of cake.  Can't get enough of that pastry cream.

Ok, this is ridiculous.  I have used the words "pastry cream" 20 times in this post thus far.  I will consider seeking help.  Right after I think of other ways to incorporate pastry cream into my life...


Boston Cream Pie marks recipe number 5 with Club: Baked.  You see, a group of food bloggers are baking our way through Baked Explorations by Matt Lewis and Renato Poliafito.  So far the recipes have been pretty darn impressive.  If you'd like to join our baking adventure head over to the Club: Baked site and get in touch with Karen.  It's a ton of fun, a great way to learn new things and meet some great people.  To see how the other bakers of Club: Baked did with their Boston Cream Pies, click here.  At a minimum, I am pretty certain your life would be enhanced by a little pastry cream.  ;)
     

Saturday, August 27, 2011

Sweet Melissa Sundays Top 10 Favorite Recipes!

In April 2010 I started participating in the weekly online baking group, Sweet Melissa Sundays.  The group had already been baking their way through the Sweet Melissa Baking Book by Melissa Murphy for about a year when I joined.  And the group posted the final recipe (of just over 100 recipes) on August 21, 2011.  In the past year and a half I've met some amazingly talented bakers and learned tons.  Before joining this group my baking repertoire consisted of mostly cookies, a few cakes or cupcakes and a pie here and there.   What I liked most about the group was being pushed outside my comfort zone.  Without the group I doubt I would have tried more than half the recipes that turned out to be some of my favorites. 

When I tasted each of the recipes below for the first time, I said, "wow".  For each and every one.  Literally, I said, "wow".  Out loud.  I love when you bite into something and you're not sure what to expect or think you know exactly what to expect, and you are pleasantly surprised and all you can say is "wow!" 

To wrap a year and a half of baking I wanted to put together a list of my favorites.  They are listed in order the group made them.  So without further adieu...

Chocolate Cake


This chocolate cake is the base for several recipes in the Sweet Melissa book.  It's incredibly moist and deep dark chocolaty.  I have an affinity for cakes made with sour cream and this one really knocks it out of the park if you are a chocolate lover.  I have made it several times and will continue to go to this as one of my top chocolate cake recipes. 


When I got my first turn to host a recipe for the group I had to go with Gingersnaps.  It only seemed right!  I was surprised at how much I liked these cookies, since I already have my own go to ginger snap recipe.  Melissa Murphy's version contains typical spices you might expect, like cinnamon, ginger and allspice, but what was really unique was the inclusion of white pepper.  Everything in my gut was telling me to omit the pepper, but I felt like I really had to do the recipe proper justice and follow it word for word.  And you know what?  The white pepper works!  It blends with other spices to make a perfectly sweet and mildly spicy cookie.  And it pairs beautifully with a lemon cream filling.

Blueberry and Almond Biscotti


What is a biscotti anyway?  It's essentially a twice baked cookie.  Round 1 is baked in a loaf form and then the loaf is sliced into the biscotti spears you are probably familiar with and those are baked again to get a nice crunchy texture.  I have never been a biscotti person.  Probably because I'm not a coffee drinker or a fan of crunchy cookies in general.  I had never made biscotti before and  I really didn't expect to like this.  I hate being wrong. But love it all at the same time because these biscotti are delicious and you don't need a hot beverage to enjoy them.  They also make great gifts since they keep well for several days. 

Melissa's recipe called for dried sour cherries, but I switched it up with dried blueberries instead.  What made this recipe for me was the lemon zest.  The lemon flavor is incredibly bright in this crunchy cookie, but not overly lemony.  This recipe opened my eyes to the possibility of making various flavors of biscotti (which I have on my to do list).

Sweet Almond Cake with Lemon Curd


Before joining SMS, I will be honest, most cakes I made were out of a box.  With the exception of carrot cake.  My family has a great carrot cake recipe that doesn't involve a box.  One day I'll get around to posting it on the blog.  What I didn't know was the various techniques used in making cakes from scratch.  This one calls for ground almonds and whipped egg whites in the batter.  You whip up the egg whites until they form stiff peaks (similar to making a meringue) and then gently fold the airy mixture into your cake.  I really don't know much about the science of baking, but I do know this cake is delicious with a lightly sweet almond flavor.  It has a lovely toothsome crumb from the ground almonds and a light moistness.  This cake would be a wonderful base for many fillings and frostings.  Speaking of fillings and frostings, the lemon curd and lemon mascarpone frosting that accompany this cake were not the stars for me.  I had to switch to lemon cream cheese frosting because I had trouble with the mascarpone.  This cake recipe, however, is on my list of keepers!

Mom's French Pancakes (aka Crepes)


Can you say yummy?  Can you say easy to make?  Can  you say "Oooh la la"! This recipe was another surprise winner!  I mean I knew I already loved crepes, I just doubted my ability to make these thin delicate little pancakes.  The ingredients are simple and the batter can (and is recommended) to be made the night before you make these little jewels.  I used a large non stick skillet and after making one or two crepes, really got the hang of it.  If you have not made crepes before, you must try them!  The options for filling them are endless....but my favorite combination is seen above.  Nutella and sliced bananas.  Simple.  Delicious!

Lemon Blueberry Buttermilk Pie


Though I am posting these in the order I made them and not in any preferential taste order, I will say this is a fantastic recipe and is among my top 3 favorites from the book (along with the chocolate cake and honey cream caramels).  I was completely blown away by the perfect marriage of lemon and blueberries amidst a creamy custardy filling.  And this pie is one of the easiest in the book to make.  Especially if you use a pre-made graham cracker crust from the grocery store (a slight diversion from the original recipe).  Melissa's recipe calls for traditional pie dough, but as I was making this pie for the second time for Mother's Day earlier this year, I had a crust mishap.  I used Melissa's all butter pie crust recipe and had major shrinkage occur.  Irreparable shrinkage.  At 11 pm on the eve of Mother's Day I went to the grocery store to buy a roll of Pillsbury pie dough, but at the last minute decided to go with a graham cracker crust.  You know the kind that you find in the baking aisle and comes in a foil pie tin with that cool plastic covering that doubles as a lid when you flip it over?  I have to say, I loved it!  I think this pie is even better than fantastic when made with a graham cracker crust.  Definitely a winner!

Pecan Frosting


I almost didn't make this recipe.  Melissa's original recipe is called Coconut Pecan Frosting, otherwise known as German chocolate cake frosting.  I really don't care for the texture of coconut and I'm generally not a fan of nuts in my dessert.  But the point of this group is going outside your comfort zone.  So I failed in that I didn't go completely outside my comfort zone.  I just took a small step.  I decided to simply omit the coconut from the recipe since that was the greater of two evils.  Imagine my surprise when I tasted the final product and loved it!  It really is less like a frosting and more like a candy topping.  My family loved it spread on graham crackers best.  But it would also make a delicious ice cream topping and it's not too bad with pumpkin cake either! 

Honey Cream Caramels


This was yet another goodie I had never made before.  I don't have anything against caramel candies.  I like them just fine, but there are a lot of other treats I would reach for first.  Luckily I didn't write this recipe off!  These caramels are soft and sweet and delicious.  I really didn't think I would like these as much as I did.  I kept going back to the kitchen and sneaking one more (I'm not sure who I was sneaking them from, but I felt a little guilty eating so many of these honey infused treasures).  This recipe is easy to make and caramels are another great giveaway treat because they store for up to two weeks in an airtight container.  They would also be delicious with a little sprinkling of sea salt before they completely set.  Honey Cream Caramels will be making it into my holiday baking rotation this Christmas!

Strawberry Rhubarb Preserves


Melissa shares a master preserves recipe that shares general ratios of fruit to sugar, acid, etc. and then has recipes for 5 different flavor variations.  This is one of those recipes that was widely praised by many members of the group.  I was able to make three variations, plum preserves, white nectarine cinnamon preserves and of course strawberry rhubarb. 

I feel like a broken record here, but preserves or jam was something I had not made before joining this group.  And I was surprised at how easy they are to make and delicious.  There's something special and very satisfying about making toast in the morning and slathering it with your own fresh made preserves.  I also took the leap into the canning world with these preserves.  Yet another great goodie to give away as a gift.  Of three preserve variations I made, the strawberry rhubarb was my hands down favorite!  The tartness from the rhubarb is a perfect match to the sweet strawberry.  And it makes a great filling for a crumble bar

Brown Sugar Vanilla Ice Cream


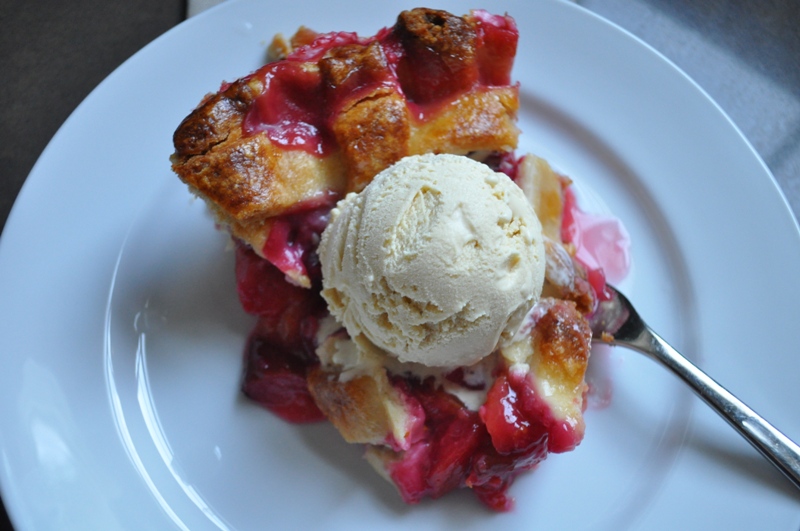
I didn't actually make this recipe along with the group.  They made it long before I even knew Sweet Melissa Sundays existed.  And to be honest, vanilla ice cream is not something that really excites me.  There are so many delectable ice cream flavors in the world to choose from.  But I found I was in need of an ice cream to pair with this Plum and Raspberry Pie with a Sweet Almond Lattice.  This pie was incredibly tart and needed a nice sweet ice cream to balance it out.  I decided to give Melissa's recipe for Brown Sugar Vanilla Ice Cream a shot since I would be serving to others who don't share my lack of excitement over vanilla.  Also, I had recalled reading in various posts from my fellow SMS bloggers, how delicious this ice cream was.  And they were right!  It's got a depth of caramel like flavor from the brown sugar and is the perfect accompaniment to a fruit pie or tart.  Yet another pleasant surprise!

I made 40 recipes with the group and a few more on my own outside the group. There are many more the group made before I joined that I would still like to try...like Butter Toffee Crunch, Lemon Icebox Cake with Strawberry Sauce, Sweet Almond Bread Pudding with Raspberry Sauce, Caramel Apple Turnovers with Sweet Ricotta Filling, and Fallen Chocolate Souffle Cake to name a few. 

It's been a great ride and I've learned a very important lesson...don't judge a dessert by it's ingredient list!  Even if you are unsure if it would be your thing or if you think it sounds too hard or complicated, give it a go.  You might just be surprised yourself!

I want to extend my thanks to all the fabulous SMS bakers.  You girls rock, sharing great ideas, encouragement and support!  I loved checking out everyone's creations on Sunday mornings.  Special thanks to Karen of Karen's Cookies Cakes & More for maintaining the site and keeping everyone on schedule.  She has spearheaded a new baking group called Club: Baked to keep us busy and learning new things.  This group started on July 1, 2011 and we are baking our way through Baked Explorations by Matt Lewis and Renato Poliafito.  This group bakes twice a month and so far there have been some pretty stinkin delicious recipes.  We really just got started so please feel free to join our baking adventure!

Sunday, July 10, 2011

Sweet Melissa Sundays: Plum and Raspberry Pie with a Sweet Almond Lattice


This is my second and final time hosting a recipe for Sweet Melissa Sundays.  The group has nearly baked their way through every recipe in the Sweet Melissa Baking Book.  Only 3 recipes remain after this one with our final posting date on August 21st.   I'm sad to see the group near its end, but also excited because we've recently embarked on baking our way through a new book, Baked Explorations.  Club: Baked kicked off it's first recipe on July1st and we are baking twice a month, posting on the 1st and 15th.  To join the fun head over to the Club: Baked site and get in touch with Karen.

Now, on to the important business.  Pie. 

I will admit that I selected this recipe to host before fully reading it through.  Mind you, I didn't have a lot of choices since we are down to the last handful of recipes.  But I had a moment of dread when I finally did read through the recipe.  It had a lot of steps and a couple of non standard (in my kitchen) ingredients.  Tapioca pearls and almond paste.  I did find the almond paste, but not the tapioca pearls.  I ended up using more cornstarch in place of the tapioca, which worked out just fine.  The tapioca helps with thickening the fruit filling, but the cornstarch did the job. 


This pie is best made over two days to reduce stress and mess in your kitchen.  Day one make the base crust and the almond lattice.  Cover both in plastic wrap and refrigerate overnight.  Day two wash and cut the fruit, make the filling, assemble the pie and bake.  I baked my pie for the full time called for in the recipe but had to lightly cover it with foil to prevent over browning of the lattice crust. 


How did it turn out?  Pretty.  And tart.  Too tart for my taste.  But still pretty.  I've never been a fan of the skin on plums.  I like the flesh of the fruit, just not the skin.  This recipe calls for leaving the skins on and I was hesitant to do that.  So I decided to compromise and leave only half the skins on.  I should have gone with my gut.  Unfortunately the pie was overly tart, despite the fact the inner part of the plums was sweet. 

The almond lattice was delicious, though.  And so was the crust.  This was my first time making Melissa's Flaky Pie Crust and it turned out great!  I would definitely make it again.  It didn't have the issues I have seen in the past with her all butter pie crust shrinking.  The almond lattice would make a great top pie crust for a number of fruit pies, such as cherry or blueberry.  It's tasty and beautiful, with the bright fruit oozing up around the basket weaved sweet almond pastry. 

A quick note about the almond lattice.  It's delicate and requires a little special attention.  You start by rolling out the dough between lightly floured parchment.  The dough is transferred to a baking sheet and cut into long strips with a pizza cutter.  Then the baking sheet goes into the refrigerator for at least 20 minutes, if not longer.  Don't try to separate the strips until after the dough comes out of the fridge, nicely chilled.  Here's where you have to work quickly...the strips can be challenging to remove without breakage.  I used a small spatula to coax each strip off carefully in one piece.  The colder the dough, the easier it is to work with.  I would even recommend placing both your partially assembled pie and the strips back in the fridge if things get too warm. 


I made this pie for Father's Day and served it with Melissa Murphy's Brown Sugar Vanilla Ice Cream.  The ice cream was wonderful and sweet which toned down the tartness of the pie. 


If I make this pie again I would definitely omit the plum skin.  Looking forward to seeing how every one's pies turned out.  Thanks for baking along!


Plum Raspberry Pie with a Sweet Almond Lattice
by Melissa Murphy from Sweet Melissa Baking Book

Ingredients

Flaky Pie Crust:
Note you only need 1/2 the pie crust recipe.  I made the full recipe and froze half the dough.
2 3/4 cups all purpose flour
1/2 teaspoon salt
5 tablespoons cold unsalted butter cut into 1/2 inch pieces
1/2 cup plus 2 tablespoons cold vegetable shortening cut into 1/2 pieces
6-8 tablespoons ice water

Sweet Almond Lattice:
1 cup all purpose flour
1/4 cup sugar
1/8 teaspoon kosher salt
4 tablespoons (1/2 stick) cold unsalted butter cut into 1/4 pieces
3 tablespoons almond paste cut into 1/2 inch pieces
1 large egg yolk
1/2 teaspoon vanilla extract
1/4 teaspoon almond extract
2 tablespoons ice water

Egg Wash:
1 large egg
2 tablespoons heavy cream
Pinch of kosher salt

Plum Raspberry Filling:
1/2 cup sugar
2 tablespoons cornstarch
2 tablespoons tapioca pearls finely ground (you can use a spice grinder)
2 3/4 pounds black or red plum (about 8 plums), washed, pitted and cut into 1/2 inch slices
Zest from 1/2 orange
1 dry half pint fresh raspberries

Directions

To make pie crust:
Place your butter and shortening in the freezer while you prepare the rest of the ingredients.  Prepare a glass of ice cold water.  In a medium/large bowl whisk together flour and salt.  Drop cold pieces of butter into flour mixtures and quickly toss to coat butter in the flour.  Work fast so the heat from your hands doesn't make the butter soft or warm.  Use a pastry blender (or 2 knives) and cut the butter into the flour until large pea size pieces form, turning your bowl 1/4 turn after each cut.  Toss shortening pieces into mixture and lightly coat with flour.  Use pastry blender to cut the shortening into the dough until large pea size pieces form.  Form a well in the center of the flour mixture and add ice water, starting with half the water and gently pull flour into water using a fork.   Dough will start to come together and add remaining water.  Dough is ready when you pinch it and it holds together.  Add additional water if needed.

Turn dough out on a lightly floured surface and form 2 equal size discs.  Wrap each disc in plastic wrap and refrigerate for 45 minutes to an hour.  After the dough is chilled, roll out one of the discs on a lightly floured surface using a rolling pin until 1/4 inch thick.  Gently transfer dough to a 9 inch pie plate.  Take excess dough and fold underneath itself so it lays on the rim of the pie plate with going over the edge.  Crimp the edges and refrigerate the dough until firm, about 30 minutes.

To make Almond Lattice:
Using a food processor, pulse flour, sugar and salt until combined.  Add butter and almond paste and pulse until mixture is course.  In a small bowl whisk the egg, vanilla, almond extra and water.  Add wet mixture to the flour mixture and pulse until the dough appears uniformly moistened and crumbly.  Turn dough out onto a lightly floured surface and form a disc about 6 inches in diameter.  Wrap in plastic and chill for at least 20 minutes. 

Use a rolling pin to roll the dough between 2 large pieces of parchment paper lightly sprinkled with flour.  Roll into a round 11 inches across.  Remove top piece of parchment and cut dough into 3/4 inch wide strips using a pizza cutter or sharp chef's knife.  Transfer the dough still on the parchment to a baking sheet and refrigerate at least 20 minutes. 

To make egg wash:
In a small bowl, whisk egg, heavy cream and salt together.

To make the filling:
Whisk cornstarch, sugar and and tapioca flour in a small bowl.  In a large bowl toss the plum and zest together.  Gently fold in the raspberries.   Sprinkle sugar mixture over the fruit and stir gently to combine.  Transfer the filling to the unbaked pie shell.

To finish the pie:
Preheat oven to 350 and line a baking sheet with foil or parchment.  Remove lattice strips from the refrigerator and carefully separate each strip and lay it across the pie weaving a crisscross pattern.  Press the strips together gently where the strip meets the pie crust dough to join them together.  Gently brush egg wash over the lattice and pie crust edges.  Place the pie on your prepared baking sheet.  Cover the pie loosely with foil and bake for 30 minutes on the center rack of your oven.  Uncover the pie and continue baking for 90 minutes or until the fruit is thick and bubbling.  Cool on a wire rack until pie is room temperature before serving.

Sunday, June 5, 2011

Sweet Melissa Sundays: Pear and Blackbery Pie with Gingersnap Crumble


I almost didn't make this pie.  Even though I had bought a 6 pound bag of pears at Costco last weekend with the intention some would be used for this pie.  Then I remembered that I had a mini pie crust in the freezer from when the group made ginger pumpkin pie last year.  I also had some gingersnap cookie dough balls in the freezer too.  I had everything I needed and no real excuse.  Then I read Dawn's rave review and I knew it had to be done.  Thank you Dawn of Growing Up (And Having Fun) After 40 for hosting this delicious recipe!

I'm glad I got over my laziness and made this tasty pie.  The recipe calls for cranberries but I used blackberries because I had them on hand.  The pears have a very mild flavor and the berries added a nice tartness to this very sweet pie.  The gingersnap crumble adds a nice crunch and the spices pair well with the pears and berries.  This recipe is definitely a keeper. 


There are several steps to make this pie come together.  It would be best to make it over 2 days.  On day 1 make the pie crust, place it in your pie pan, cover with plastic wrap and refrigerate.  Make and cool the gingersnaps, process in the food processor to grind and place in an airtight container.  On day 2 assemble the pie filling and the ginger snap crumble topping then bake.


To get the recipe head over to Dawn's site.   To see other SMS baker's pies click here.

Tuesday, March 1, 2011

Creamy Lemon Almond Tart


Do you own a tart pan?  I recently went from owning zero tart pans, to owning 5.  Way to ease into it, right? I bought 4 mini tart pans and a large 10 inch pan.  I couldn't decide if I wanted to make mini's or a full tart, so I went with both options.  Last week I used the 10 inch pan to make my very first tart.  It was a moderate success.  The filling was a delicious almond cream.  But the tart dough was a little tough.  It did not live up to the description of being like a tender a shortbread.  I pressed the dough into the tart pan.  I am pretty sure I manhandled it a little too much.  So I thought I needed to give the tart another go this week.  I used my mini tart pans and a little more love and care with the dough.

I flipped through, Baking: From My Home To Yours by Dorie Greenspan and found there were many tarts to choose from.  At this point it came down to what ingredients were in the house.  Lemons? Check.  Eggs?  Check.  Butter?  Check.  Sugar?  Check.  "The Most Extraordinary French Lemon Cream Tart" it is!  

The lemon cream is a mixture of sugar, eggs, lemon juice and lemon zest cooked in a bowl over a saucepan with a few inches of simmering water in the bottom.  Just whisk, whisk, whisk until the mixture reaches 180 degrees.  The problem is the 2 thermometers I was using wouldn't go above 140 no matter how long I waited and whisked and no matter how much I turned the heat up.  Dorie says that it could take up to 10 minutes to bring the mixture up to temperature.  After 20 minutes, I finally resolved to the fact it wasn't going to get to 180.  But the good news was it did thicken and take on the characteristics that were described in the recipe.  The creamy filling gets pushed through a fine mesh sieve or strainer to discard the zest.  After it has cooled a bit the lemon cream goes into a food processor to slowly get emulsified with room temperature butter, making it even creamier.  A brief 4 hour rest in the fridge and the filling is ready. 

Meanwhile I started working on the dough.  I decided to go with a sweet tart dough with ground almonds.  I followed the recipe to the tee....except I snuck in some vanilla extract for some extra flavor.  The dough consists of powdered sugar, flour, salt, butter and an egg yolk and comes together in a food processor.  I was careful not to over process and not overwork.  I separated the dough into 2 disks and refrigerated it for about an hour.  Dorie says she always presses her dough into the tart pan.  But I decided to roll it out instead since the pressing method didn't yield good results for me last time.  Dorie warns that rolling tart dough can be tricky because of the powdered sugar content in the dough, making it sticky.  I sprinkled a little powdered sugar on each side of the dough and then rolled it between 2 pieces of parchment paper.  I worked fast and, though the dough was delicate, I was able to gingerly lay it into the tart pans.  The mini tarts baked in the oven for 20 minutes to a nice golden brown.  Check out my tender, shortbread-like crust.  Take two on the crust was a success!


Even though the filling was a little finicky, it had a nice creamy texture and just the right amount of lemon.  Topped off with fresh whipped cream, it made for a pretty nice Sunday afternoon dessert.

There are more tarts in The Ginger Snap Girl's future.

The Most Extraordinary Lemon Tart
from Dorie Greenspan, Baking: From My Home to Yours

Tart Filling

1 cup sugar
Grated zest of 3 lemons (I used 1 1/2 lemons)
4 large eggs
¾ c fresh lemon juice (from 4-5 lemons) (I used 1/2 cup lemon juice)
2 sticks plus 5 T butter (10 ½ ounces) unsalted butter, cut into tablespoon size pieces, at room temperature.
1 9-inch tart shell made with sweet tart dough (see below).

Have a instant-read thermometer, a strainer and a blender (1st choice) or food processor at hand. Bring a few inches of water to a simmer in a saucepan.

Put the sugar and zest in a large heatproof bowl that can be set over the pan of simmering water. Off the heat, rub the sugar and zest together between your fingers until the sugar is moist, grainy, and very aromatic. Whisk in the eggs, followed by the lemon juice.

Set the bowl over the pan and start stirring with the whisk as soon as the mixture fees tepid to the touch. Cook the lemon cream until it reaches 180 degrees F. As you whisk- you whisk constantly to keep the eggs from scrambling- you’ll see that the cream will start out light and foamy, then the bubbles will get bigger, and then, as it gets closer to 180F, it will start to thicken and the whisk will leave tracks. Heads up at this point- the tracks mean the cream is almost ready. Don’t stop whisking or checking the temperature, and have patience- depending on how much heat you’re giving the cream, getting to temp may take as long as 10 minutes.

As soon as it reaches 180F, remove the cream from the heat and strain it into the container of the lender (or food processor); discard the zest. Let the cream stand, stirring occasionally, until it cools to 140 degrees F, about 10 minutes.

Turn the blender to high (or turn on the processor) and, with the machine going, add the butter about 5 pieces at a time. Scrape down the sides of the container as needed as you incorporate the butter. Once the butter is in, keep the machine going- to get the perfect light, airy texture of lemon-cream dreams, you must continue to bend the cream for another 3 minutes. If your machine protests, and gets a bit too hot, work in 1-minute intervals, giving the machine a little rest between beats.

Pour the cream into a container, press a piece of plastic wrap against the surface to create an airtight seal and refrigerate at least 4 hours, or overnight. (The cream will keep in the fridge for 4 days or, tightly sealed, in the freezer for up to 2 months; thaw it overnight in the refrigerator.)
When you are ready to assemble the tart, just whisk the cream to loosen it and spoon it into the tart shell.  Serve the tart, or refrigerate until needed.

Sweet Tart Dough

1 ½ cups all purpose flour (or 1/4 finely ground almonds or another nut and 1 ¼ cups flour)
½ cup confectioners’ sugar
¼ tsp salt
1 stick plus 1 tablespoon (9 T) very cold (or frozen) unsalted butter, cut into small pieces
1 large egg yolk

Put the flour (and ground nuts), sugar, and salt in a food processor and pulse a couple of times to combine. Scatter the pieces of butter over the dry ingredients and pulse until the butter is coarsely cut in- you should have some pieces the size of oatmeal fakes and others the size of peas. Stir the yolk, just to break it up, and add it a little at a time, pulsing after each addition. When the egg is in, process in long pulses- about 10 seconds each- until the dough, which will look granular soon after the egg is added, forms clumps and curds. Just before you reach this stage, the sound of the machine working the dough will change-heads up. Turn the dough out onto a work surface and, very lightly and sparingly, knead the dough just to incorporate and dry ingredients that might have escaped mixing.

To press the dough into the pan: butter a 9-inch fluted tart pan with a removable bottom. Press the dough evenly over the bottom and up the sides of the pan, using all but one little piece of dough, which you should save in the refrigerator to patch any cracks after the crust is baked. Don’t be too heavy handed- press the crust in so that the edges of the pieces cling to one another, but not so hard that the crust loses its crumbly texture. Freeze the crust for at least 30 minutes, preferable longer, before baking.

To partially or fully bake the crust: center a rack in the center of the oven and preheat to 375 degrees F.

Butter the shiny side of aluminum foil and fit the foil, buttered side down, against the crust. (Since you froze it, you can bake it without weights). Put the tart pan on a baking sheet and bake the crust for 25 minutes. Carefully remove the foil. If the crust has puffed, carefully press it down with the back of a spoon. For partially baked crust, patch the crust if necessary, then transfer the crust to a cooling rack. To fully bake the crust, bake for another 8 minutes or so, or until it is firm and golden brown. Transfer pan to a rack and cool the crust to room temperature before filling.