Monday, December 20, 2010

Ginger Snaps


Is Christmas really 5 days away? How did that happen?

Christmas can't go by without baking homemade ginger snap cookies. That would be criminal. The warm spices of ginger and cinnamon in a chewy molasses cookie sing Christmastime to me. Gingersnaps are a staple in my annual holiday baking tradition. Oh, and they are delicious.

The ingredients are simple. The dough is easy to make. And these cookies are WAY too easy to eat. You really can't eat just one. They have a chewy middle and an ever so slight crispness on the outer edge. Just how I like my cookies.

The dough needs to be covered and refrigerated for at least an hour up to overnight.


I like to use my trusty number 60 cookie scoop.


This recipe yields about 75 3 inch cookies.


These delicious spice filled treats make a perfect addition to a holiday cookie tray.


Go on. Go make them. You can thank me later.

Happy baking!

Ginger Snap Recipe
Recipe comes from a family friend and the original source is unknown

Ingredients:
1 1/2 cups butter softened
2 cups sugar
2 eggs slightly beaten
1/2 cup molasses
2 tsp baking soda dissolved in 1 T of boiling water
2 tsp ground ginger
2 tsp cinnamon
4 cups flour

Directions:
Mix butter and sugar until creamy. Add eggs, molasses and baking soda/water mixture. In a separate bowl whisk together the dry ingredients and slowly combine with the wet mixture. Chill for at least an hour (up to overnight). Roll into 3/4 inch to 1 inch balls and roll generously in granulated sugar. Bake at 350 for 10 to 12 minutes.

Sunday, December 19, 2010

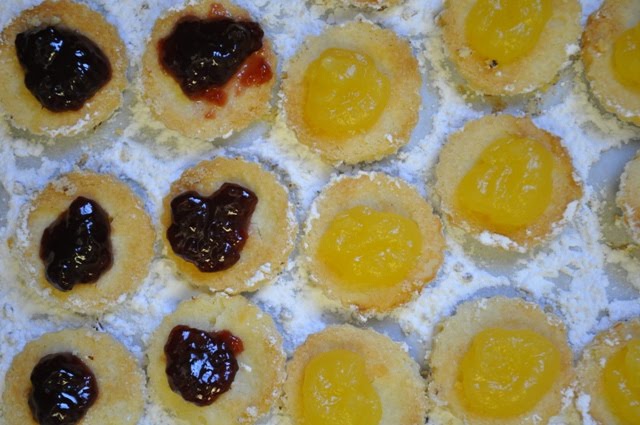
Raspberry and Lemon Linzers


Sometimes I like to pretend that I don't have a job (Amy you should ignore this statement). That all I have to worry about is what new thing I will bake or cook. And this blog is my creative outlet to document my adventures and misadventures in the kitchen. It's true, this blog is my creative outlet. But I do indeed have a job (though I don't mention it much here in this forum). I spent much of this past week traveling for work and putting out fires as this month is our absolute busiest time of year. I am almost a week behind in posting here so you'll see a few posts go up one after another as I want to share these in time for the holidays.

The linzer. It's my favorite holiday cookie to eat. I can't say it's my favorite to make. There are quite a few steps involved...but the effort is worth the end result. After all...these really only make an appearance in my kitchen once a year. Plus I was able to incorporate a few new tips this year to make things just a tiny bit easier.


Making the dough is really simple. It has just a few ingredients and comes together quickly in a stand mixer. I dump out the dough onto plastic wrap and form it in a large square about 2 inches thick. I then cut it into quarters and form each section into a 6-7 inch circle that is about 3/4 inch thick. Wrap each disc in plastic wrap and refrigerate for about 45 minutes to an hour.

The next step is rolling the dough out to cut with a cookie cutter. The dough should be firm but still have a little bit of give when you press into it. Meaning it shouldn't be so firm that it can't be rolled out without cracking around the edges. You may need to let it sit out for 10-15 minutes before it's ready. Only take out 1-2 discs at a time.


Get out the flour and 2 large pieces of parchment paper about 12 x 18 inches.


Unwrap the first disc and place it on a lightly floured piece of parchment. Generously flour each side of the disc. Place the second piece of parchment on top of the dough. Begin rolling the dough out from the center with your rolling pin until it's 1/8 inch thick. Place the rolled out dough (parchment and all) on a baking sheet and refrigerate for at least 15 minutes (the longer is ok too...you want it to get nice and firm). This method makes the cookies easy to cut and peel back from the parchment to place on a prepared baking sheet.

The parchment dough rolling method is new to me this year and has really taken a great deal of frustration out of the process. Dough can be difficult to work with. In past years I rolled out the dough on my counter top and it often resulted in me not being able to pull up the cookie once it was cut. Parchment is a genius kitchen accessory! In fact I buy pre-cut sheets in bulk from a local restaurant supply store that is open to the public (a great resource to check out in your local area).


Remove the top piece of parchment and begin cutting out your cookies. I made bite sized linzers and used a 1 1/4 inch scalloped cookie cutter. Place the cut cookies on a parchment lined baking sheet. Once all your cookies are cut out, gather the dough scraps together and form them into a ball and set aside to combine with the scraps from the next disk of dough.


Now the cookies are ready for an egg wash and almond sugar topping. The egg whites should be whisked until they are frothy.


The almonds are finely ground in food processor (I like to use my Mini Prep) with granulated sugar.


Brush each cookie with egg wash.


And sprinkle the almond sugar topping on each cookie.


Half the cookies need a little window cut out of the top to showcase the filling. I use a micro diamond shaped cutter for these.


This is the second tip that I just figured out this year. That's not actually true. Let's step back to last year. My sister was staying with us and helping me bake. I cut the windows out and then did the egg wash and topping step. This makes for cut outs that are jagged and sometimes grow together to fill in the space when the cookies bake. After they cooled, I would spend time hollowing them out with a toothpick. It was a not so fun step in the process and often resulted in broken cookies (and I had been doing it this way for a few years). My sister casually said why don't you put the topping on the cookie and THEN cut out the window? I stared back at her a bit dumbfounded. I had no answer. So guess how I do it now? Thanks Katie!


Bake for 8-10 minutes. Once cooled group the cookies together on the baking sheet and generously dust with powdered sugar.


Now the fun part! Filling. I use seedless raspberry preserves and lemon curd (both from Dickinson's). Place several heaping spoonfuls of filling in a ziploc bag and squish around a bit to get the juices flowing. Snip off a small corner to and pipe a generous portion onto the bottom cookie.


Top with a window cookie and then eat one immediately so you can taste the fruits of your labor.


These keep well for at least 3 days at room temperature in a sealed container. In fact, I think these cookies get even better after 1 or 2 days. They almost melt in your mouth.


Raspberry or Lemon Sandwich Cookies (also known as Linzers)
Adapted from Jay Crowley's recipe published in the Chicago Tribune around 2002

2 sticks (1 cup) butter
2/3 cup of sugar plus 1/2 cup of sugar
2 eggs, separated
2 1/2 cups flour
1/4 tsp salt
1/2 cup ground blanched almonds (I just grind the almonds in my mini food processor)
Powdered sugar

Raspberry Preserves
Lemon Curd
(I like the Dickinson's brand for both)

1. Beat butter in bowl of electric mixer on medium until fluffy. Add in 2/3 cup of sugar until light and fluffy. Add egg yolks one at a time. Combine flour and salt in a small bowl and then add to butter mixture. Beat just until dough comes together. Divide dough into 4 sections and pat into a circle about 1 inch thick. Cover each section in plastic wrap and chill for at least 2 hours. Meanwhile, combine the remaining 1/2 cup of sugar with the almonds and set aside.

2. Heat oven to 375. Remove 1 section of dough and roll out dough to 1/8 inch thickness between two large pieces of floured parchment paper. Place the dough back on a cookie sheet and refrigerate for at least 15 minutes (if not longer). Remove top piece of parchment and cut into rounds with a 1-2 inch cookie cutter (you can use any size or shape) and place on a parchment lined baking sheet 1/4 inch apart (cookies don't really increase in size much so they can be placed close together). Repeat with remaining sections of dough.

3. Beat egg whites in a small bowl until frothy. Brush all the cookies with the egg whites and sprinkle almond/sugar mixture on top of each cookie. If you want to cut a decorative hole out of the tops of each cookie (so the jam can be seen) do it after you top the cookies with the almond sugar mixture. Remember to save whole rounds for the bottoms. Bake until very lightly browned, about 8-10 min. Cool on a wire rack.

4. Dust cookies with powdered sugar. Spread raspberry preserves or lemon curd on the bottom cookies and top with decorative cookie tops. Sometimes I make these without the decorative holes in the top to save time and an extra step.

Friday, December 10, 2010

Christmas Cake Truffles - Step by Step


Have you had a cake truffle before? Yes? No? No???? Oh my God! You have to make these now just so you can have one. Or 10. Well maybe not 10 at once. My friend did a rough calculation and estimates these little babies to be at least 100 calories each. I haven't checked her math, but WOW! And yes, they are that good. But if you eat 10 you might go into sugar shock. So just eat 1 or 2. Then give the rest away to your friends and family and they will express their undying love to you forever and ever.

They are easy to make and I will take you on my step by step journey of making Christmas themed cake truffles last weekend. Even though there are quite a few pictures (ok, 21 to be exact)...I still wish I had snapped a few more throughout the process. But you will get the gist. I made red velvet and devil's food cake truffles, but you can make any flavor cake you like. Start with your favorite box of cake mix. Yes, I said box. If you are feeling really ambitious you can make your cake from scratch. But I used a box...

of red velvet cake mix and baked according to the instructions.


Let the cake cool completely.


Finely crumble cake with your hands.


Or for a much much faster approach, use a food processor. (I didn't take as many photos of the red velvet process so now we're switching over to chocolate.) Just place hunks of the baked and cooled cake into the food processor in batches.


Once the first batch is crumbled, dump it into a big bowl and then repeat until your whole cake is finely crumbled.


Oooooohhhh, crumbly!


Then grab your canister of store bought frosting, such as cream cheese....yes, store bought. Or you can make your own. Anyway, spoon about 2/3 of the container of frosting into your big bowl of cake crumble.


And work it into the cake. I like to use a rubber spatula.


Until it all disappears and you have a fudgy dough like consistency.


Get out your medium sized cookie scoop (I use a number 60--the number can be seen on the swipy thingy that ejects the dough from the scoop) and scoop away.


Place your cake balls onto a tin foil or parchment lined cookie sheet.


Make sure to use a cookie sheet that will fit into your freezer (I use a jelly roll sized sheet and it's a perfect fit for my side by side fridge/freezer).


Once all your balls are scooped out, place a ball in your impeccably clean hand.


And roll it around between both hands until it forms a solid smooth ball like this one.


Place the balls back on your cookie sheet and freeze for 1 hour. The freezing helps the balls to hold better shape when you dip them in the chocolate. By the way, one box of cake mix makes about 60 truffles.


Here's where I skipped a few photos. Now it's time to melt the chocolate. Place about a half inch to inch of water in a small to medium sauce pan. Meanwhile, place the melting candies (dark cocoa is my preference) in a medium to large deep bowl. 1 and 1/2 bags of candy is usually enough to coat 1 batch of cake balls. Once the water is simmering, turn heat to low and place the bowl on top of the pot of simmering water. Stir occasionally until the candies melt into a smooth, silky, consistency. Don't let too much steam build up on the outside of your bowl. If this happens turn your water down (or use a deeper bowl). Water and melted chocolate don't mix well and any extra moisture can cause your chocolate to seize. Note that if you use white or other colored melting candies, they do not melt as nicely or have the silky dippable consistency of dark chocolate. But I have heard adding a bit of shortening helps thin it out, but I haven't tried it myself.

Once the chocolate is melted I like to remove my pot and bowl from the stove and let the chocolate cool down for about 5 minutes. But leave the bowl on top of the pot...you can place the pot on a potholder. This keeps the chocolate warm. During this 5 minutes you can prepare another cookie sheet (I like to use the half sheet pan size) by lining it with parchment paper. You can also assemble all your decorative toppings. I pour small amounts in little bowls so that not too much goes to waste.

The next step is dipping and decorating. You need think about this BEFORE you start dipping your balls. If you want little sprinkles or jimmies you need to sprinkle them on just after the ball is dipped. If you want to use a colored melting candy to pipe on decorative designs then you would wait until the dipped balls are set up or dried. I did a little of both.

Now to the dipping. Have a standard dinner fork ready and drop your cake ball into the melted chocolate. Gently toss the ball around in the chocolate with the fork until it is well coated. Then scoop up the chocolate covered ball with the fork and lightly tap, tap, tap it on the side of your bowl allowing some of the excess chocolate to drip off back into the bowl.


When you are ready, hold the fork at a 45 degree angle pointing downward and carefully dump or roll the ball off your fork onto the parchment lined cookie sheet you prepared earlier. Do this slowly and be patient. You can coax the chocolate dipped ball off the fork by tapping it a little on the cookie sheet until it rolls off. If your dough is too soft you may see "fork marks" in your cake truffle...don't worry! Keep a small rubber spatula nearby to smooth over any holes. Your want your cake to be completely coated. Another trick I learned is to keep the sheet of balls in the freezer and just pull out about 6 at a time.


If you are using sprinkles you have to decorate each ball as it is placed on your cookie sheet. These babies dry incredibly fast so don't dilly dally! You can also decorate by piping on other colored candy melts or frosting. This type of decoration can and should be done after your chocolate dipped balls have dried.


The decorating possibilities are endless! If you can, seek out a local cake decorating store. They will likely have a much greater selection of decorating goodies then a craft super store like Michaels. They carry things like pretty sanding sugars, lustre dust and sprinkles of all shapes, colors and sizes...super fun stuff!!!


Next place your beautiful cake truffle creations in little candy cups and package them up. These cool boxes are made by Wilton and can be found at Michael's. They hold 9 cake truffles perfectly and make for a nice presentation with the preview window. You want to show off all your hard work! Tie with a decorative ribbon and even put on a label and you have a wonderful homemade treat to share.


Happy cake truffle making!

French Fridays with Dorie: Spiced Butter Glazed Carrots


10 pounds of carrots. We bought 10 pounds of carrots from Costco last Sunday. For a 2 person household. I had 2 dishes in mind this week featuring carrots...and at $4 something it seemed perfectly sensible to buy 10 pounds. Right? So what that I still have 7 pounds left? Maybe there is a really big carrot cake in my future.

The first dish I made this week with our carrot cache was a slow cooker pot roast with onions, carrots and potatoes. It was tasty, but I didn't get a chance to snap any photos. Sorry. And dish number two is my French Friday's with Dorie pick for this week. December is another free form month where we can cook the 5 recipes selected by the group during whichever week we choose. And given my abundance of carrots...this week was the perfect week.

Dorie's recipe for Spiced Butter Glazed Carrots is simple and tasty. But I think I missed the boat on the true "spice" factor because I left out the cardamom seeds. They didn't have a gallon size at Costco for us to buy! But I did use plenty of fresh ginger and garlic. Oh, and butter. The carrots were good. Wow good? Na. But still good. I will likely make them again. And soon...because I don't think that carrot cake requires all 7 pounds sitting in the fridge.

I served the carrots with Dorie's Chicken Diable recipe. I really, really like this recipe and have made it twice now. The sauce is delicious. Wow delicious. Especially if you are a dijon mustard fan. So good. To get Dorie's recipes pick up her fabulous book Around My French Table.

Tuesday, December 7, 2010

Holiday Cream Wafers


Like my leaning tower of cream wafers? For any given blog post I usually take between 70 - 120 photos. This one, I took 8. In a rush. We were on our way to a friends house for dinner with 2 other couples. I thought cookies would be a nice treat to bring along. And I won't lie, I've been looking for opportunities to test out some new (to me) holiday cookie recipes.

In case you are wondering...it's not always wise to try out a new recipe when it's T minus 2 hours and you have to mix up dough, chill it, roll it out, cookie cutter (that's a new verb!) it, toss the cookies in sugar, place them on a baking sheet, poke four sets of holes in the top with a fork, bake for 7-9 minutes, cool, fill with frosting (which also has to be made separately...one kind wasn't enough for me or the time allotted...so I went with vanilla and raspberry) and then sandwich together. Are you tired yet? I am. During the 2 hour countdown I also had to shower, blow dry, brush my teeth, flat iron and swipe on some mascara among other make up products. Wow, I sound high maintenance. Now I'm extra tired. Anyway, clearly my time management skills could use a little....work.

But somehow we, and the cookies, made it to our friends house with exactly zero minutes to spare. We enjoyed good company and tasty food. Have you ever had spaghetti with meat sauce Persian style? Or yogurt sauce with shallots? On your Persian spaghetti? Yum.

And the cookies were a hit too. With a nice cup of Earl Grey tea. On a cool December evening.

These cookies were a Christmas staple made annually by my mom when I was a kid. I remember these cookies being so delicate and delicious. She always filled them with red and green tinted frosting for a festive touch. Funny how you always want to go back to your childhood treats. At some point she relinquished her holiday cookie making to other family members and it has been years since we've had this Betty Crocker classic. This week seemed like a good time to revisit an old favorite. I wanted to give the red tinted frosting a little twist and I added 2 tablespoons of seedless raspberry preserves to the (full) frosting recipe. It's a nice addition and I actually prefer it to the standard vanilla filling.

The wafers are tender and flaky and almost melt in your mouth. The dough is simple...consisting of flour, a little heavy cream and butter, dusted with sugar. The frosting is simple....butter, sugar and vanilla extract. The sweet filling makes up for the small amount of sugar in the wafer. These fun cookies take a little patience (and timing skills) but make a special holiday treat! To get the recipe click here.

This coming weekend is my official cookie making weekend. Check back next week to see Gingersnaps, Linzers sandwiched with raspberry preserves and lemon curd, Chocolate Chip Candy Cane Cookies, Chocolate and Red Velvet Cake Truffles and Meringues. I'm already feeling the sugar high!

Friday, December 3, 2010

French Fridays with Dorie: Speculoos (Christmas Spice Cookies)


It's officially cookie season! For some reason the Christmas season is totally free reign to make mass amounts of cookies. Well I should say I take free reign to make crazy amounts of cookies. I guess I save up all my cookie mojo until December and then I just go nuts. In a given holiday cookie season I make upwards of 600-800 cookies of all shapes and sizes. Even though it seems a little crazy...I know I'm not the only one...you other crazy cookie people know who you are.


Anyway, I always like to try at least one new cookie each holiday season, and this weeks French Fridays with Dorie pick seemed perfect. Speculoos cookies are a small crisp spice cookie that scream holiday. I'm not normally a crisp cookie girl, but for some reason I couldn't stop popping these little babies into my mouth. They were addictive. The spices were perfect...a lot of cinnamon, a little ginger and bit of clove. A perfect blend of warm spicy goodness that makes me smile.

The recipe calls for you to divide the dough into discs and to roll each disc between 2 sheets of parchment paper. This is my first time rolling out dough this way and it worked beautifully. I will be trying this with other rolled cookie dough and even pie crust. Dorie is very specific that the rolled dough must be refrigerated for at least 3 hours before cutting and baking. I waited exactly 3 hours and had no issues getting the cookies cut with my 1 1/2 inch scalloped shaped cookie cutter.

If you think that you should under bake these for a less crisp cookie, don't bother. They just have a stale crunch....sort of crisp but not all the way there. Accept these are crunchy cookies and bake them accordingly.


But you can dress them up a bit by dipping them in dark chocolate. Dorie also recommends sandwiching them with Nutella or dulce de leche. Both would be delicious for certain.


If you want the recipe check out Dorie's newest cookbook, Around My French Table. Perhaps this is going to be corrected in future publications of the book, but my version leaves the egg out of the ingredient list and instructions. So be sure to add in 1 egg to the butter sugar mixture....cause if you don't you won't have cookies....you'll have crumble...and you can't add the egg in at the end. Cause it doesn't work. Trust me.

These are tasty little holiday cookies. Give them a try!