Sunday, January 23, 2011

Sweet Melissa Sundays: Speakeasy


Chocolate torte with booze in it. That's what a speakeasy is. The recipe calls for 2/3 cup of brandy, which is a pretty hefty amount, but I just couldn't bring myself to use it. I'm not generally a fan of liquor flavor in my baked goods. But I didn't totally bail on the booze, I used triple sec (orange flavored liquor) instead. It turned out to be a nice substitution and complimented the chocolate and cinnamon in the cake. Next time I would add a little orange zest too. For me, the real star of this show was the chocolate ganache...absolutely divine and the perfect finish to the speakeasy.

The recipe was a little confusing...it said to butter and flour an 8 x 2 inch cake pan lined with parchment but then toward the end it tells you to remove the cake from a spring form pan. Which is is it? Cake pan or spring form? I went with the cake pan because it's 8 inches and my spring form pan is 9 inches. It actually turned out perfect because I had enough left over batter to also make a 4 inch cake for the next SMS pick, the Sacher Torte, which is a very minor variation on the speakeasy. 2 birds with one stone. High five! Check back in 2 Sundays for the Sacher Torte.

Melissa Murphy's recipe says this should be baked for 80-90 minutes and it should not be tested before 70 minutes for fear of deflating the cake. Mine was definitely done at 70. Like you could give a little knock on the top of the cake kind of firm. I think I should have checked at 60. Even though I was worried it was overdone, the inside was soft and moist (enough).


For the recipe head over to Jeannette's blog, The Whimsical Cupcake. Thanks for hosting this week Jeanette! To see how other SMS bakers did with their speakeasies click here. Props to my sister, Katie, who helped make the speakeasy every step of the way. Thanks sis!

Monday, January 17, 2011

I Made Bread!!!!!


I did it! I am so stinkin excited. I made homemade bread today. For the very first time. And you know what? It's really good!

For Christmas I received the book Sarabeth's Bakery, From My Hands to Yours by Sarabeth Levine. It's a fabulous book that focuses on several aspects of baking and pastry creations. Its chapters feature Morning Pastries, Muffins and More, Beautiful Breads, Everyday Cakes, Party Cakes and Company, Pies and Tarts, Plan and Fancy Cookies, Spoon Desserts, Frozen Desserts, Spreadable Fruits and Frostings, Fillings and Sweet Sauces.

The first recipe I tackled was Rosemary Focaccia Bread. My Hubby is a complete carb fiend. He could live off of pasta and bread for the rest of his life and be in complete bliss. Throw a little rosemary in there and watch out! Plus I had some left over fresh rosemary from my attempt at Paris Mushroom Soup.

I have always heard that making bread is simple with just a few ingredients. But bread making, like much of baking, is a science. I am not much of a scientist....but generally speaking I can follow directions. Don't get me wrong...following directions doesn't always work out. But the bread Gods were with me today.

The part that made me most nervous was the yeast. I used dry yeast sprinkled over barely warm (not hot) water then dissolved after 5 minutes. Was it supposed to bubble or do something special? I consulted Sarabeth's book and I felt better because she said some dry yeast will bubble, depends on the brand. I didn't know what my brand was supposed to do, but it definitely wasn't bubbling. Just go with it. The yeast goes into a mixing bowl along with 1 and 3/4 cup water and 2 teaspoons of finely chopped rosemary. With the mixer on low 2 cups of flour go in. Switch to the dough hook attachment and add remaining 2 1/2 cups of flour. Knead for a few minutes and voila! Bread Dough.

Transfer it to an oiled bowl and cover tightly for an hour until the dough doubles in size. And guess what? After an hour my dough doubled in size. Apparently the yeast was working.


Then the dough gets stretched into a well oiled half sheet pan. Next it needs to "proof". To be honest I don't really know what that means. But the proofing in this case involved a tall kitchen trash bag and 2 tall glasses of hot water. Sound weird? I thought it did. But I put one large glass of hot water inside the bottom of the bag (sitting on the counter of course), placed the sheet pan of bread in next and then another glass of hot water. The glasses keep the bag tented over the dough and give it a nice warm environment to get "puffy" as the recipe describes. This takes about 45 minutes. The puffed up bread gets a few dimples poked into it with your finger and a generous coating of olive oil.


The bread bakes in a 450 degree oven for 20 minutes. Before closing the oven door pump a few sprays of water onto the walls of the oven. This helps to create steam which will help the bread crisp.

I was so excited when I took the bread out of the oven. I couldn't stop smiling. My bread looked pretty darn close to the bread in the book!


Not only did it look good, but it tasted just like I thought it should. Chewy and slightly crisp on the outside and soft on the inside. Wow! I did it! You would have thought I had solved world peace or something. But maybe delicious bread could instill a little bit of peace? It's possible. Look at that bread!


We had the bread for dinner in sandwich form. With roasted eggplant, zucchini and red peppers with pesto mayonnaise and fresh buffalo mozzarella. Yum, yum! If you have thought about making bread and haven't gotten around to it yet, just do it!

Rosemary Focaccia
by Sarabeth Levine

2 cups cold water
2 teaspoons finely chopped fresh rosemary
1 ounce (2 packed tablespoons) compressed yeast or 3 1/2 teaspoons active dry yeast
4 1/2 cups unbleached all purpose flour, as needed
1 3/4 teaspoon fine sea salt
4 tablespoons high quality, fruity extra-virgin olive oil, divided, plus additional for the bowl

1. Place the water and rosemary into the bowl of a heavy-duty stand mixer. Crumble yeast into the bowl. Let stand 2 minutes, then whisk to dissolve the yeast. (If using active dry yeast, sprinkle the yeast over 1/4 cup warm, 105 to 115 degree F, water in a small bowl. Let stand for 5 minutes, then stir to dissolve. Pour into the mixer bowl. Add 1 3/4 cups cold water and the rosemary and whisk to combine.)

2. Attached the bowl to the mixer and fit with the paddle attachment. With the mixer on low speed, gradually add half of the flour, then the salt. Add enough of the remaining flour to make a soft dough. Replace the paddle attachment with the dough hook. Knead on medium-low speed just until the dough is smooth and it cleans the bowl, about 3 minutes. Do not overknead. Gather up the dough and shape into a ball.

3. Coat the inside of a medium bowl generously with olive oil. Place the ball of dough in the bow, and turn to coat with oil. Cover the bowl tightly with plastic wrap. Let stand in a warm place until doubled in volume, about 1 hour.

4. Pour 2 tablespoons of the olive oil in a half-sheet pan, and spread evenly with your fingers. Punch down the dough and transfer to the oiled pan. Using your hands, coax and stretch the dough to fill the pan. If the dough is too elastic, cover the dough in the pan with plastic wrap and let rest for 5 minutes, then try again.

5. Choose a warm place in the kitchen for proofing. Slip the pan into a tall "kitchen-sized" plastic bag and place two tall glasses of very hot water in the bag at opposite ends of the pan to keep the plastic from touching the dough. Tightly close the bag, trapping air in the bag to partially inflate it. Let stand in a warm place until the dough looks puffy, about 45 minutes.

6. Position a rack in the center of the oven and preheat to 450 degrees F. Fill a spray bottle with water. Remove the glasses from the bag, then the pan. Using your fingers, gently dimple the top of the dough. Drizzle the remaining 2 tablespoons oil over the top of the dough. Using the palms of your hands, taking special care not to deflate the dough, very lightly spread the oil over the focaccia.

7. Place the focaccia in the oven. Aiming for the walls of the oven (and not the top of the focaccia), spray water into the oven. The water will create steam to help crisp the focaccia. Bake until the focaccia is golden brown, about 20 minutes. Cool in the pan for 20 minutes before serving. Cut into rectangles and serve warm or at room temperature.

Sunday, January 9, 2011

Sweet Melissa Sundays: Almond Cupcakes with Raspberry Buttercream and Lemon Glaze


Sweet Melissa Sundays is back! The group of online blogging bakers is almost done baking our way through the Sweet Melissa Baking Book...only 16 recipes left (15 after today). We've been on hiatus over the holidays. The new year is here and it's great to back baking with my SMS pals.

Even though I'm still winding down from the holiday sugar high...I was excited to make this recipe. Melissa Murphy's recipe is actually for Hazelnut Raspberry Layer cake. I changed things up a bit. I used almonds instead of hazelnuts....I burned my hazelnuts as I was trying to toast them. I halved the recipe and opted for cupcakes which are easy to take to the office and give away (the half recipe made 12 cupcakes).


The cake consists of nut flour (almond in my case), all purpose flour, baking powder, vanilla extract, browned butter and meringue. It is moist with a nice nutty flavor and comes together pretty easily with just a few steps.


The frosting on the other hand was not my friend today. The recipe calls for making a meringue and then streaming in hot sugar liquid (sugar and water that has reached 240 degrees on a candy thermometer). That step didn't happen for me. My sugar liquid did not stay in liquid form after 2 attempts. I couldn't bear the thought of dirtying yet another pan. I also didn't have raspberry liqueur on hand so I mixed (frozen) raspberries with a generous amount of sugar until they macerated and broke down into a liquidy state. Though I realized later that I should have cooked it down on the stove with the sugar to prevent the need for refrigerating the cupcakes. Melissa's original recipe calls for using raspberry preserves in between the layers of the cake. I thought about filling the cupcakes...but they were super tasty without it so I figured why not save a step. After my burned hazelnuts, and 2 pans of hardened sugar, I quite frankly didn't have the energy for another step.


Despite all my alterations, the frosting turned out pretty tasty. It had just the right amount of raspberry...which is a perfect compliment to the almond cake.

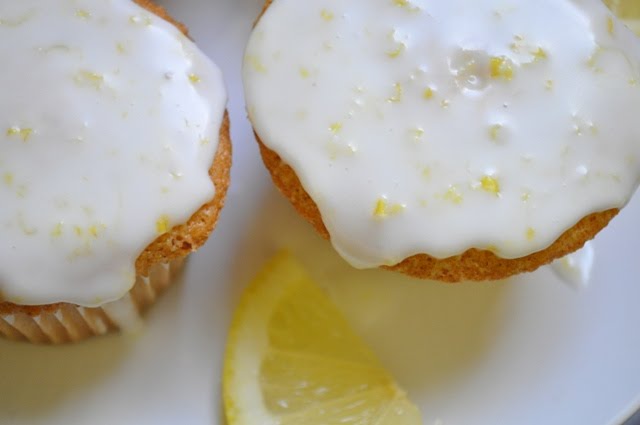
You know what else goes nicely with almond? Lemon. Mmmmm. I went a little more simple here and made a glaze to put on half the cupcakes.


It's just powdered sugar, lemon juice and lemon zest. Simple. Easy. And most importantly, delicious!


Thanks to Candy Girl for choosing such a delicious recipe! You can find the recipe on her site. To see how other SMS bakers cakes turned out click here.

French Fridays with Dorie: Paris Mushroom Soup


Only 2 days late posting. Could be worse.

Are you feeling like I am? Like all those holiday goodies are hanging around a little too long....like around the waist and thighs? It's high time to get back to healthy sensible eating. Well at least for a minute. Because just after this post, I will be posting some yummy almond raspberry and lemon cupcakes. Even more reason to work in lighter and healthier fare.

This week's French Fridays with Dorie recipe fit the bill perfectly. Paris Mushroom Soup. It's low in fat (only 2 tablespoons of butter for 6 very generous servings). Mushrooms, onions, garlic, fresh herbs, chicken stock and little white wine. No cream. The soup gets pureed and served over some fresh parsley, green onions and thinly sliced mushrooms. Unfortunately I didn't have any mushrooms to spare for this step, so it's the one thing I left out. Though next time I would make sure to have ample mushrooms because I think it would really take this soup to the next level.

The soup was light and tasty, though it wasn't as amazing as I hoped it would be. But it was good enough to keep on the make again list to see if the extra mushrooms do the trick. Check out French Fridays with Dorie to see how the Paris Mushroom Soup turned out for the rest of the group. To get the recipe, pick up a copy of Dorie Greenspan's fabulous cookbook Around My French Table.

Monday, December 27, 2010

Chocolate Truffle Cookies


I was browsing my favorite food blogs recently when I came across this on Baking Bites. I knew immediately this was my kind of cookie. Chocolate, with more chocolate and then even more chocolate. Mmmmm. I made up a batch on Christmas Eve to take to my aunt's house along with the other cookies that I normally bring. I'm so glad I did.

If you are a chocolate person, these cookies are for you! A rich flavor and fudgy truffle like texture. It's like brownie, meets cookie, meets truffle. Good stuff!

The dough gets rolled out in 1 inch balls and then coated in unsweetened cocoa powder.


Then bake for 10-11 minutes (the recipe calls for 10 but 11 worked for me). They will look just barely set when you take them out.


Once cooled they get a dip in powdered sugar. I also added a sprinkle of cocoa powder to distinguish them from the pecan short breads (mexican wedding cookies) that were also on my cookie tray. But I would leave off the cocoa powder next time. I like the clean look of the powdered sugar.


They were a hit with the family and will be moving into the annual Christmas cookie rotation. To get the recipe check out Baking Bites.

Sunday, December 26, 2010

Latkes!


The holidays are a time to indulge in those special decadent dishes that your waistline can't afford during your everyday life. One of our favorites is homemade Potato Latkes to celebrate Hanukkah. Unfortunately we were a little late celebrating this year and didn't have our latkes until the eve of Christmas Eve (Hanukkah ended on 12/8). But better late then never. They were delicious.


Latkes are potato pancakes fried in oil and are a Hanukkah tradition. Frying the pancakes in oil is symbolic of the miracle of lights. The short story is in 165 B.C. when Jewish soliders returned triuphant after battle to their holy temple in Jerusalmen that had been occupied by Syrian-Greeks, they proceeded to purify the temple through the ritual of lighting the Temple's menorah for 8 days. They only had enough oil for one day, but lit the menorah anyway. The miracle was that one day's worth of oil lasted for the full 8 days. For more details, click here.

I'm not Jewish, but my hubby is and I am happy to celebrate this thousands of years old tradition because I get to eat delicious fried potato pancakes. I found this recipe in the Gelson's Super Market newsletter the first year I started dating my hubby back in the late 90's. This recipe is fantastic and I think, hands down, is the best latke recipe I've had.

There are a few handy tips I'd like to highlight. Be sure to get as much liquid out of the potato mixture as possible. I put my potatoes and onion mixture in a clean thin kitchen towel and wring it out. You'll be amazed how much liquid comes out. Once the mixture is dry....place it back in your bowl and add in the remaining ingredients. I like my latkes small, thin and cripsy and golden brown. I take a large pinch of the mixture and squeeze out any excess liquid. Then I sort of flatten it out with my hand and place it in the hot oil.


I like to serve the latkes with a sour cream topping, though applesauce is traditional as well. In the early years I would make a whole Hanukkah meal, brisket, kugel and green beans to serve with our latkes. Now, we just have latkes for the meal. Who needs that other stuff?


Potato Latkes
Adapted from the Gelson's Super Market Newsletter

1 large onion peeled and grated
1 lb yukon gold potatoes peeled and grated
1 egg beaten
2 Tablespoons matzo meal (I add 1-2 additional depending on how wet the potato mixture is)
1/4 teaspoon black pepper
1/2 teaspoon kosher salt
1/4 cup (scant) lemon juice
Vegetable oil for frying

Combine grated potatoes and onions together. Place mixture in 2 batches in a thin, clean kitchen towel and wring out all the liquid. Do this a few times because there's a lot of liquid! Add remaining ingredients and mix well. Heat oil on medium high and drop about two tablepoons of mixture per latke in the oil. Press down with back of a spatula to flatten out. Fry about 3 minutes per side until golden brown and crispy. Place finished latkes on a wire rack placed over a paper towel lined baking sheet in a 200 degree to keep warm. Serve with Sour Cream Topping (see recipe below) or applesauce.

Sour cream topping:
Combine 1/2 cup of sour cream with 1/2 teaspoon of Lawry's seasoning salt and 2 Tablespoons of finely chopped chives or green onions.

Tuesday, December 21, 2010

Chocolate Chip Candy Cane Cookies


I love peppermint bark (who doesn't?). I love chocolate chip cookies (again, who doesn't?). Therefore, it's a given that I would also love chocolate chip candy cane cookies. I admit, I didn't think up this divine creation on my own. In one of my first real jobs after college, a co-worker brought these in for the holidays. After one bite I deemed her a cookie genius! She caved and easily turned over the very complicated recipe...

Wait for it.

Nestle Tollhouse Cookies with crushed candy canes stirred in.


Simple and brilliant. How did I not think of these before?


These are delicious, and I am certain Santa would like to have two or three of these with a nice glass of milk when he visits your house this Christmas.


Chocolate Chip Candy Cane Cookies
Adapted from Nestle Tollhouse Chocolate Chip Cookie Recipe

2 1/4 cups flour
1 teaspoon baking soda
1 teaspoon salt
1 cup (2 sticks) unsalted butter, softened
3/4 cup sugar
3/4 cup packed brown sugar
1 teaspoon vanilla extract
2 eggs
2 cups chocolate chips
3/4 cup crushed candy canes (about 12 full size candy canes)

Combine flour, baking soda and salt in a bowl and set aside. Cream butter, sugars and vanilla. Add in eggs 1 at a time. Gradually add in dry ingredients until combined. Stir in chocolate chips and crushed candy canes. Drop rounded tablespoons of dough onto a baking sheet (lined with parchment paper). Bake at 375 degrees for 9 to 11 minutes or until golden.