Tuesday, February 15, 2011

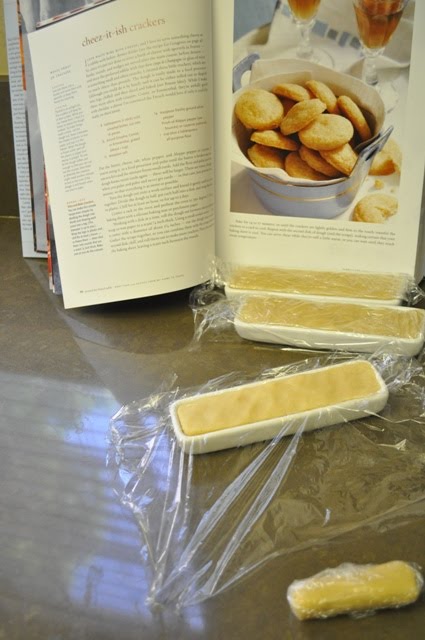
Cheez it ish Crackers


These really taste like Cheez Its...but better. I think the French really have it goin on with gruyere cheese. It's worth every penny of the $10.99 a pound it goes for. The cheese makes these crackers. And for an extra cheesy zip I snuck in 1/4 cup of fresh grated parmegiano reggiano.

These crackers are easy to make too. All the ingredients come together in just a couple of minutes in a food processor.


You have a few options to form the dough into crackers. You can roll out the dough and cut it with a cookie cutter, roll it into logs and slice off rounds or you can press them into a mold and then slice. Keep in mind you have to refrigerate it for a good couple of hours before slicing. I actually refrigerated mine overnight. I had these cute little appetizer dishes that I thought would make the perfect mold for these cheesy crackers. Just line the mold with plastic wrap and press in the dough.


Refrigerate, remove the dough and slice into 1/8 - 1/4 inch thick crackers.


Place on a baking sheet...you could space them closer together than I did. They don't expand much in the oven.


And serve! These make a great snack or appetizer. A nice glass of sauvignon blanc would be the perfect accompaniment. These little bites are addictive, so don't even bother making only half a batch. They keep for several days in a sealed container....but they really won't last that long because they are so stinkin good! Even my picky Hubby gave the Cheez is ish Crackers a thumbs up.


The recipe comes from Dorie Greenspan's book, Around My French Table. An excellent cookbook if you are in the market for some great recipes and entertaining reading. It rates among my top 5 most used cookbooks.

Sunday, February 13, 2011

Sugar Hearts


I spent this past Saturday enjoying an awesome day with my 2 nieces and nephew. One of the activities we did was to decorate heart shaped sugar cookies. The cookies were simple...a Betty Crocker sugar cookie mix and a variety of store bought frosting. Throw in a little food coloring and some sprinkles and you have cookie master pieces in the making! And a little bit of mess. But that's half the fun right?


We packaged up the cookies to give to the kids parents. The kids did a great job and we all had a blast.


Happy Valentines Day!

Thursday, February 10, 2011

Cream-Filled Chocolate Sandwiches (Oreos)


You might not be able to tell from the photos, but these are homemade oreos....on steroids. They are 3 times the size of a standard oreo. When I saw these in Martha Stewart's Cookies cookbook, I thought they would be soft chewy cookies with cream filling. But they have a crunchy crumbly texture...with a delicious cream filling.


I didn't set out to make oreos, but it turned out to be a nice detour. This recipe calls for scooping out dough with a 1 1/4 inch cookie scoop then flattening out the cookies to 1/8 inch thick using the bottom of a glass dipped in sugar. This makes for a huge cookie. Next time I make these, I will roll the dough out and use cookie cutters.

After baking up a the first batch, I thought the cookies would look nice with a little extra sparkle so I dipped each flattened cookie in sugar before baking. They don't really look like oreos with the sugar coating, but they are still tasty. Messy (when they crumble), but tasty.

You can also dress these up with a little decoration by rolling the edges in colored sprinkles or candies. I rolled some in blue sanding sugar to give as a gift for a the parents of a new baby boy.


To get the recipe click here.

Tuesday, February 8, 2011

Chocolate Cupcakes with Chocolate Ganache Filling and Orange Cream Cheese Frosting


A birthday isn't a birthday without chocolate cake with orange frosting. By those standards I almost didn't have a birthday this year. But never fear, the birthday was made complete almost a week after the fact. January is a busy birthday month for my family...2 cousins, my niece, my nephew, my sister and me. And though my own came and went without my favorite cake...I got together with my sister this past weekend to celebrate both our big days, which was the perfect opportunity to make our traditional cake.

My grandma made this cake for most family birthdays for as long as I can remember. It is truly my all time favorite. This year I made cupcakes and decided to try out a new recipe for the cake. Truth be told, grandma always used a boxed chocolate cake mix. And I had a box of Duncan Hines Devil's Food cake on hand. But I wanted to make it a little extra special and I found a version on Duncan Hines website that called for sour cream. (On a side note, I was browsing the Duncan Hines site and saw a lot of great recipes, several of which I bookmarked.)

The cupcakes baked up nice a full with a soft springy texture to the touch. My batch only made 18 cupcakes (rather than 24) because I think I was a little generous filling them. The sour cream makes the cupcakes incredibly moist. Though I thought the cake didn't have enough chocolate punch so I decided to make some chocolate ganache to fill them.

Filling a cupcake is easy (this was my first time). Cut a cone shaped cylinder out of the center of each cupcake and fill with your desired jam, frosting, ganache or other tasty filling.


Once filled, place the piece of cake you cut out back in.


Since this was my first time filling cupcakes I didn't think to keep track of which cut out went with which cupcake.


But it really doesn't matter because you are going to cover them up with delicious frosting.


The ganache sets up and the center of the cupcake is just like a soft dark chocolate truffle.


I didn't have enough ganache for all 18 cupcakes so 6 of them went ganache-less.


The frosting is homemade cream cheese frosting with the zest of two oranges mixed in. If you haven't had chocolate and orange together before, you must try it. So delicious!

Chocolate Cupcakes with Chocolate Ganache and Orange Cream Cheese Frosting Recipe
Cake:
from Duncanhines.com

1 box of Duncan Hines Devil's Food cake mix
1/4 cup water
1/3 cup vegetable oil
1 cup sour cream
4 large eggs

Blend cake mix, water, oil, eggs and 1 cup sour cream in large bowl. Beat at low speed until moistened (about 30 seconds). Beat at medium speed for 2 minutes. Fill cupcake liners 2/3 full of batter. Bake and cool according to package directions. Mine baked for 20 minutes at 350.

Filling:
Chocolate Ganache
from Sweet Melissa Baking Book by Melissa Murphy

6 ounces best-quality semisweet (58%) chocolate
1/2 cup heavy cream
1 tablespoon light corn syrup

1. Coarsely chop the chocolate and place it in a medium bowl.
2. In a small saucepan over medium heat, heat the heavy cream until scalding, or until the cream is steaming and tiny bubbles have formed along the edges. Do not boil.
3. Pour the hot cream over the chocolate. Let stand for 5 minutes, then whisk until smooth. Stir in the corn syrup.

Cut a 1/2 inch cylinder in the middle of the top of each cupcake and reserve the cut outs. Fill a pastry bag or ziploc bag with ganache filling and pipe about a tablespoon of filling into each cut out. Replace reserved cake cut out over the ganache filling.

Orange Cream Cheese Frosting:
1 stick of room temperature butter
1 8 oz container of room temperature cream cheese
1 teaspoon vanilla
1 lb of confectioner's sugar
Zest of 2 large navel oranges

Beat butter and cream cheese together. Add confectioner's sugar in batches until completely combined. Beat in vanilla and orange zest. Spread a generous portion of frosting over each cupcake.

Monday, February 7, 2011

Penne with Tomato Cream Sauce


This is one of those recipes that always impresses me. The first time I made it I took the first bite and paused...then I turned to my husband, and said "Wow!". For some reason (that I cannot figure out)I haven't made it for probably a year....and tonight, I said to hubby, "Damn, this is good!". Heavenly really. I'm still reeling in the delight of tonight's dinner. The sauce is luscious and has a wonderful depth of flavor. Garlic and red onion almost melt into the pureed tomatoes. A pinch of red pepper flakes give the sauce just the slightest note of heat deep in the background. This goodness simmers for a bit, marrying all the flavors together. The sauce is finished by stirring in cream and evaporated milk. Then topped with fresh chopped basil and freshly grated parmesan cheese and this dish reaches perfection.

Want to hear the cool part? This is a healthy version of Penne Vodka and comes from the Cook Yourself Thin Ladies over on Lifetime. They call it Penne alla "Not-Ka." If you are interested in tasty lower calorie versions of recipes, I recommend checking out the recipes on Lifetime's website or the Cook Yourself Thin cookbook. One of my other favorite CYT recipes is their absolutely delicious Meatballs. I have even served the meatballs with penne alla not-ka in the past. The meatballs are light and pair nicely with the tomato cream sauce. Of course I think the tomato cream sauce is good enough to drink straight up. Man, this is a good sauce!


A few tips for this very easy recipe. Use red onion. Not yellow, white, sweet or spanish. It's gotta be red. Don't overcook the pasta...it will continue cooking when it gets transferred to the sauce. Remember to set aside some of the pasta water to get just the right consistency of pasta and creamy sauce. And lastly, I almost always double the recipe to ensure lots of tasty leftovers for lunch or another quick dinner.

Enjoy!

Penne Alla "Not-Ka"
from Cook Yourself Thin

Serves 4, Calories per serving: 371

2 teaspoons olive oil, plus extra for serving
3 cloves garlic
1/2 cup chopped red onion
3/4 teaspoon salt
1 14-ounce can diced tomatoes or whole tomatoes in juice, pureed in a food processor
Pinch red pepper flakes
8 ounces penne
1/4 cup heavy cream
6 tablespoons evaporated nonfat milk
1/3 cup grated Parmesan cheese
1/4 cup shredded fresh basil
1/8 teaspoon black pepper

1. Bring a large pot of salted water to a boil for the penne.

2. In a large saucepan, heat the 2 teaspoons oil with the garlic over low heat until the garlic begins to brown, about 3 minutes. Add the onion and 1/4 teaspoon salt, cover, and cook until the onion is softened, about 2 more minutes. Add the tomato, 1/2 teaspoon salt and the red pepper flakes. Bring to a simmer, reduce the heat and simmer very gently 10 minutes. Stir in the cream and evaporated milk and simmer 1 more minute.

3. Meanwhile, after the sauce has cooked 5 minutes, add the penne to the boiling water and cook until just shy of al dente, about 6 minutes. Drain, reserving about 1/2 cup pasta water. Add the drained penne to the saucepan and simmer until the penne is al dente, 1 to 2 minutes, adding a little of the pasta cooking water if the mixture is dry. Stir in 1/4 cup of the Parmesan, along with the basil and black pepper.

4. To serve, divide pasta among 4 serving bowls. Drizzle each serving with 1/2 teaspoon olive oil, and sprinkle with the remaining Parmesan.

Sunday, February 6, 2011

Sweet Melissa Sundays: Sacher Torte


Two weeks ago we made the Speakeasy from the Sweet Melissa Baking Book. I used that opportunity to also make this week's pick, the Sacher Torte. Sacher Torte is a very minor variation on the Speakeasy. The only difference is you split the cake into two layers and fill it with a generous portion of apricot jam. I had enough batter left over to make a 4 inch mini cake for the Sacher Torte. My torte used triple sec instead of brandy (I'm thinking Amaretto would be nice too). The triple sec, orange flavored liquor, was a good compliment to the apricot filling. I liked creating this version with just a little jam twist. This is a good cake, but I'm not sure I will be making it again. Too many other recipes on my to do list.


Thanks to Jessica of My Baking Heart for selecting this week's recipe. Pop over to her site for the recipe. See how other SMS bakers.

Monday, January 24, 2011

Banana Cupcakes with Chocolate Ganache


I love it when I have super ripe bananas the same day that I happen across a delicious banana cupcake recipe on one of my favorite blogs. It's destiny. Really. Because this banana cake is absolutely perfect. Light. Moist. Banana-ey. These cupcakes are good enough to stand alone.


But what takes a cupcake to the next level? The frosting of course! Well I had very good intentions to make the vanilla pastry cream that was intended to top these cupcakes. However, limited time resulted in a completely different topping. Again, it was destiny. Because who doesn't love banana and chocolate? Especially when it's chocolate ganache. The ganache is so silky and smooth and melts in your mouth.


This recipe is for sure a keeper. And I look forward to the next batch of ripe bananas so I can make the cupcakes again with vanilla pastry cream. Check out the Brown Eyed Baker's blog for the recipe. See below for the chocolate ganache recipe. So heavenly!


Chocolate Ganache
from Sweet Melissa Baking Book by Melissa Murphy

6 ounces best-quality semisweet (58%) chocolate
1/2 cup heavy cream
1 tablespoon light corn syrup

1. Coarsely chop the chocolate and place it in a medium bowl.
2. In a small saucepan over medium heat, heat the heavy cream until scalding, or until the cream is steaming and tiny bubbles have formed along the edges. Do not boil.
3. Pour the hot cream over the chocolate. Let stand for 5 minutes, then whisk until smooth. Stir in the corn syrup.