Sunday, November 20, 2011

Sweet Pepper Soup and Herb Parmesan Crostini


I have not been a huge soup person in the past and have only made soup at home once in a while.  The weather has officially turned cool and I've been craving soup lately. I have made three soups in the last three weeks.  The first was a butternut squash soup from Cooking Light.  It was ok, but I didn't deem it blogworthy.  The second soup was chicken noodle from Cook's Illustrated.  A good solid soup, but I forgot to photograph it.  Guess that means I have to make it again.  And the third soup was this sweet pepper soup.  You will notice that I didn't reference a recipe source for this one, because it was really an amalgmation of a few recipes I came across and I'm going to deem this one my own since it was vastly different from any of the individual recipes.   


What I love about all this soup making is how easy it is.  Especially since I am not making my own stock and using store bought stock or chicken base and water.  I've been making the soup the night before we want to have it for dinner.  I have noticed this extra time allows the soup flavors to develop overnight making it even better the next day. 


I created this soup out of necessity of not wanting to waste 6 sweet bell peppers sitting in my fridge for over a week.  I was very happy with the result.  Hubby said this soup would be great with a grilled cheese sandwich and I have to agree.  We had the soup with herb parmesan crusted crostini which is great to dip in and soak up all the sweet pepper goodness.

Enjoy!


Sweet Pepper Soup

Serves 4

Ingredients:

2 tablespoons olive oil
1 large sweet onion, chopped into a medium dice
2 small carrots, chopped into 1/2 inch pieces (about 1/2 cup)
4 large garlic cloves, cut in quarters
1/4 cup dry white wine
6 sweet bell peppers, seeds and stems removed and chopped into 1 inch pieces
3 cups water
4 teaspoons chicken base (if you are using chicken broth instead, use 3 cups of low sodium broth)
1/8 teaspoon red pepper flakes
8 large basil leaves plus extra for garnish
2 tablespoons tomato paste
Salt and pepper to taste
Sour cream and feta cheese to top soup

In a dutch oven or large pot, heat olive oil on medium high heat and saute the onion, carrots and garlic until the onions are cooked, about 8 minutes.  Add wine and cook on high until only about a tablespoon of wine remains.  Add peppers, water, chicken base, red pepper flakes, basil and tomato paste.  Season generously with salt and pepper.  Bring to a boil, then cover and reduce heat to low and simmer for about 30 minutes until peppers are tender.  Use an immersion blender to puree the soup.  Alternatively, use a blender or food processor to puree the soup in batches.  Strain soup into a large bowl using a fine mesh strainer.  Don't skip this step if you like a smooth soup to strain out the skin from the peppers.  Serve with a small dollop of sour cream, a sprinkle of feta and freshly torn basil. 


Herb Parmesan Crostini

Ingredients:

1 baguettte
1/2 cup coarsely grated or chopped parmesan cheese
2 tablespoons butter, room temperature
1 1/2 tablespoons mayonnaise
1/2 teaspoon dried basil
1/2 teaspoon garlic powder
2 tablespoon fresh chives, minced (optional)
fresh cracked black pepper to taste

Preheat  oven to 375 degrees F.  Line a baking sheet with foil or parchment. 

Cut baguette on the diagonal crosswise into 1/4 thick slices.  Mix all ingredients together and lightly spread cheese mixture onto the slices and place face up on the baking sheet.  Bake for 10 minutes.  Turn the oven to broil and bake for an additional 2-3 minutes until crostini is golden brown.

Monday, November 14, 2011

Buckeyes


I totally cheated.  I not only made buckeyes back in September, I posted them.  I wasn't supposed to do that since Club: Baked was making them this week.  I know I'm bad.  But I'm going to pull the "Mom" card here.  I went in search of chocolate treats to make my Mom for her birthday and I choose two from Baked Explorations.  Marshmallow chocolate cups and buckeyes.  They made a great birthday gift and I couldn't resist posting them a little early.  Hopefully my fellow bakers will forgive me.

I really can't truly call my candies buckeyes since I didn't leave that classic exposed peanut butter eye on top.  To be honest I think that buckeyes look totally unappealing.  How do I say...they remind me of man parts...that I never imagined I would be mentioning on a food blog.  I'm totally uncomfortable that I just said that.  Maybe I'm a little prude, but I went with the fully covered up look, by dipping the entire candy in silky dark chocolate and drizzling a swirl of chocolate to pretty them up a bit. 


No matter what these candies look like, I can say they are delicious. They are like Reese's Peanut Butter Cups, but better.  The peanut butter filling has that sweet peanut butter flavor with a slightly gritty texture.  Gritty in a good way.  That texture comes from finely ground graham crackers which was something I didn't expect to find in this recipe.  Dip in your favorite chocolate and try to resist the urge to eat them 3 at a time. 

This recipe is most definitely a keeper and would make a great addition to your holiday goodie tray.  It's easy to make and even easier to eat. To see how what real buckeyes look like, head over to the Club: Baked site and check out posts from my fellow bakers.  To get the recipe head over to Karen's site, Cookies Cakes and More.

Enjoy!

Sunday, November 13, 2011

Ooey Gooey Caramel Pumpkin Blondies


See that caramel peeking through the top?  That's ooey gooey goodness.  I was completely mesmerized by the words "ooey gooey" when I spotted this recipe on the Tasty Kitchen site about 2 weeks ago.  I bookmarked it and like many things, promptly forgot about it.  Sometimes I worry about my memory, or lack of.  Fast forward 2 weeks.  I picked up a large can of pumpkin puree at the store over the weekend, not sure what I would use it for.  But I figured a girl should have some pumpkin on hand in the month of November, you know, just in case.  Combing the depths of my memory did not send the light bulb off that I should make this recipe.  I was actually thinking a brownie might be nice on a cool Sunday afternoon.  I pulled up my brownies/blondies favorites folder online and that's when I saw the "ooey gooey" recipe.  The minute I spotted it, I knew these had to be made.  Especially since I had a hefty portion of caramel sauce left over from the previous week's caramel apple cupcakes.

I wouldn't necessarily describe this as a blondie.  It's more like a snack cake.  It's soft and cakey and has that ooey gooey caramel layer running through it.  The original recipe calls for chocolate chips and walnuts to mixed in with the ooey gooey layer, but I opted just for the chocolate chips.  I also added chocolate chips on top.  If you are a nut person, I think pecans would be great in this (I'm not really a walnut fan).  Though I generally avoid nuts in most desserts, I almost wished I had added pecans to at least half the pan.  These snack cakes are so soft and tender that a little crunch would bring a nice texture crunch. 

These keep well for about 5 days stored in an airtight container.  This served as my breakfast for at least 4 days this week.  Good stuff!

Enjoy!

Ooey Gooey Caramel Pumpkin Blondies (with Chocolate and Walnuts)
from Lauren's Latest via Tasty Kitchen

Ingredients:

For the blondies:
3/4 cup butter, softened
1 cup packed brown sugar
2 eggs
1 teaspoon vanilla extract
1 cup pumpkin puree
1 teaspoon cinnamon
1/2 teaspoon nutmeg
1 3/4 cup all purpose flour
1 teaspoon baking soda
1/4 teaspoon salt

For the filling:

1/2 cup chopped walnuts
1/4 cup semi sweet chocolate chips
1 – 14 oz. package caramels, unwrapped
1/4 cup heavy cream

Preheat oven to 350 degrees F. Lightly grease 9×13 pan with non stick cooking spray and set aside.

In a medium bowl whisk the flour, cinnamon, nutmeg, baking soda and salt together.  Using a mixer, cream butter and sugar until light and fluffy. Add in eggs, vanilla and pumpkin and mix on low until combined. Slowly incorporate the dry ingredients into the batter. Mix until just incorporated. Spread 2/3 of the batter into the prepared pan and spread evenly. Sprinkle nuts and chocolate chips on the batter.

Make the caramel filling by placing the unwrapped caramels and the cream into a medium heat proof bowl. Microwave on high in 20 second intervals until caramel is smooth and completely melted, stirring in between intervals.

Pour melted caramel over the chocolate and nuts. Spread the caramel layer evenly with an offset spatula, butter knife or spoon.  Place dollops of remaining batter on top of the caramel layer. Gently spread the dollops out to try and get a smooth layer of batter. Don't worry if some of the caramel is showing though.

Bake for 25 minutes or until edges are golden and toothpick comes out clean when inserted.
Cool completely before serving. Serve with vanilla ice cream or whipped cream.

Monday, November 7, 2011

Slow Cooker Apple Butter


I didn't plan to post 3 apple recipes in a row.  It just sort of happened that way.  I'm going to roll with it and call this apple week. I have to say, I'm loving all things apple right now. I think the culmination will be my Grandma Edna's apple pie recipe around Thanksgiving.   It's one of those non recipe recipes.  You know, a little of this, a little of that?  But it is hands down my all time favorite apple pie. This apple butter is very reminiscent of those beloved apple pie flavors.

Hubby came home when the apple butter had been in the slow cooker for about 4 hours or so and the entire house smelled of apple goodness.  He wondered what I was making....apple butter I told him.  But when he saw the finished product, he said, "that doesn't look like butter".  I tried to explain to him it doesn't actually contain butter, but it takes on a thick spreadable butter like consistency.  He still couldn't seem to get beyond the name and told me I should stop calling it butter, since there is no butter! Oh, honey, you can call it whatever you want.  This non butter butter is like a thick applesauce with an intense apple pie flavor. 

Apple butter is great way to pizazz up your toast or English muffin.  You can put it on graham crackers drizzled with caramel sauce for a snack like I did (I had some left over from the caramel apple cupcakes from earlier in the week begging to be used up).  We also had apple butter for breakfast, stirred into homemade oatmeal.  I'm kind of embarrassed to admit, it was my first time making homemade oatmeal (instead of using one of those Quaker oats packets). Now that I know how easy it is, I will be making it again over the coming winter months.

Apple butter is easy to make.  You start with cut up apples and juice in a large pot and cook it down until the apples are tender.  Then you blend the cooked apples into applesauce.  You can use a blender or an immersion blender to puree your apples into sauce.  What is an immersion blender, you ask?  It's a handheld stick blender that you use right in the pot you are cooking in to puree your food.  This handheld device does all the work a blender would do but you don't have the headache of transferring hot food to a blender in batches.  It's fantastic for making soups, sauces and apple butter of course.  If you are considering new gadgets for your holiday wish list, I highly recommend it.  Ok, now that my PSA on immersion blenders is over...Your pureed applesauce goes into the slow cooker and you stir in sugar and spices and let the slow cooker do its thing for 8 to 10 hours.  Part of the cooking time in the crock pot should be uncovered to allow the excess juices to boil down.  I wasn't so patient and think mine could have used another hour or so uncovered.  You can store the apple butter tightly covered in the fridge for a couple of weeks, or you can preserve it and give apple butter to your friends and family for the holidays.  The recipe yields 7-8 one half pints of apple butter. 

Enjoy!

Slow Cooker Apple Butter
from seriouseats.com

6 pounds of apples, peeled, cored and cut into 1 inch pieces (I used honey crisp)
2/3 cup of apple cider or apple juice or water (I used apple juice)
1 cup packed brown sugar
1 cup granulated sugar
2 teaspoons cinnamon
1/2 teaspoon ground ginger
1/2 teaspoon nutmeg

Combine apples and cider (juice or water) in a large heavy bottomed pot.  Bring the mixture to a boil and reduce to simmer and continue cooking for about 30 minutes or apples are tender.  Puree the apple mixture with an immersion blender (or if using a regular blender, remove the center piece of the lid to allow the heat to escape when blending).  At this stage you will have applesauce. 

Transfer the apple sauce to a crock pot and stir in the sugars and spices.  Turn the crock pot to low and cook for 8 - 10 hours, until the mixture thickens and can hold its shape.  You can test the apple butter by placing a dollop on a small plate and put the plate in the freezer for about 5 minutes, or until the plate no longer feels warm on the bottom.  If the apple butter slides down the plate, it's not ready.  Note: I had to cook the applesauce for 10 hours with the last 90 minutes removing the lid from the crock pot to allow the excess juice/liquid to cook off.  The recipe doesn't specify whether to put the lid on the crock pot or not, but it was my assumption that it should be cooked covered. 

Store in an airtight container in the refrigerator for 3-4 weeks.  Or you can easily preserve your apple butter.  Click here for instructions on preserving.  The butter should be preserved while it's still hot and then processed in your pot or canner for 20 minutes. 


Tuesday, November 1, 2011

Caramel Apple Cupcakes


"It tastes like fall."

That is what my uber picky particular Hubby said when he tasted these cupcakes.  For those of you who don't know my Hubby or are new to the blog, that, my friends, is what I like to call a rave review!  Because tasting like fall is a good thing.  And he is absolutely right, these cupcakes do taste like fall.  The flavors have all the goodness of fall, with apples, cinnamon and other warm spices along with a delicious buttery caramel flavor pulling it all together. 

Caramel Apple Cake was Melissa from the Lulu the Baker's pick for this week's Club: Baked baking assignment.  And the timing couldn't be better coming right around Halloween.  Who doesn't love a caramel apple?  The recipe as written from Baked Explorations is a massive 3 layer cake that can be presented in a few impressive ways.  Below is a picture of how the cake appears in the book.


I also came across this amazing presentation from the Great Cake Company.   Jaime made the cake look like a giant caramel apple, stick included!  You have to pop over to her site to see her gorgeous cake.  It's really stunning.

If you have a party to go to this fall, this cake would surely be a crowd pleaser.  It would also make a nice addition to a Thanksgiving dessert round up.


This monster cake was too big for just Hubby and me so I halved the recipe and ended up 12 standard size cupcakes and 12 mini cupcakes...still way more than enough for the 2 of us!  I ended up giving some to my neighbor who has 4 year old twin girls and a friend helped take a few more off our hands. For the twins I decorated the tops of the cupcakes with caramel circles and made them look like spider webs (much like the photo above from the book).  I placed a spider ring in the middle of each cupcake.  Now I'm regretting that I didn't take any photos...laziness does not pay off!  Anyway, when I brought the cupcakes over the girls were immediately excited about the spider rings and licked the frosting off and put the rings on.  I chatted for a bit with my neighbor and her girls.  I had a conversation with one of the twins that went something like this,

Where do you live?
I live 2 doors down.

What's your name?
Gloria

Do you have any daughters?
No, sweetie, sorry I don't

Can you make some?
Um...I can make cupcakes 

Kids are hilarious. 

Now, on to the cupcakes.  Three components make up this tasty dessert.  Apple spice cake.  Caramel buttercream.  Caramel sauce.

The apple spice cake is soft, light and moist and really delicious.  It could stand all on it's own.  With a simple apple glaze or even a dusting of powdered sugar and this would be a great cake (you could do 1/3 of the recipe to get an 8 inch cake).  I do have one minor comment about the cake..the apple flavor seemed to fade a little bit the day after I baked it.  The apple flavor was very pronounced, no mistaking, this is apple cake on day one.  On day two, it was more like this is a really good spice cake...is there a hint of apple in there?  I used store bought apple sauce, instead of making my own.  I also substituted 1/2 cup (of the 2 cups) of the apple sauce, for homemade apple butter I had made the same day.  I wonder if the spices in the apple butter were too much?  I would have thought the apple butter would give it a more "apple-y" flavor.  Next time I might use the applesauce recipe posted on the Great Cake Company blog as she mentions the use of boiled cider in her applesauce and that it gives an intense fresh apple flavor.  There is also a recipe for homemade applesauce in Baked Explorations.


The caramel sauce was pretty dreamy.  I made the full recipe for this component figuring I might use the left overs to top ice cream. A few the other bakers in the group seemed to have issues with the sauce being a little on the thin side.  I found it to be somewhat thin, but after sitting on the counter for an hour or so it thickened slightly and was just right.  The only issue I had with the caramel sauce was one of my own doing.  I tend to read through recipes quickly and that's what I did here.  They recommend cooking the caramel until it is a rich amber color or you can wait until the mixture reaches 300 degrees on a candy thermometer.  I just saw 300 degrees, so I took the sauce off the heat once it reached 300 and added the butter and cream.  Then I realized that my caramel was very pale in color.  I hadn't waited for it to take on the right color.  So I threw it back on the flame and cooked for another 5 minutes or so and it gained a small amount of color.  I didn't want to risk overcooking it, so I ended up with a pale caramel.  Though pale, it's still super yummy.  I think you could get away with reducing the butter by half in this recipe and still get a good result.  Note, I'm saying that without actually having tried it.  But I might try that next time.

Lastly, there was caramel buttercream....this was like no frosting recipe I've ever made.  It started with boiling a mixture of sugar, FLOUR, milk and cream until thickened.  I would never imagine flour to be in frosting, but that's what I love about Club: Baked...learning new things.  And this was a great thing to learn, because this frosting was awesome.  It was smooth and silky with just the right amount of sweetness.  I generally don't care for buttercreams because I find them to be overly sweet and buttery tasting.  I'm all about butter, but I don't want my frosting to taste like butter. 

The trick to this frosting is patience.  I had read in the P&Q that some bakers had trouble with the frosting and others suggested continuing to beat the frosting until it reached the desired consistency.  So I took that into account when I made it.  The boiled sugar, flour, milk cream mixture goes from the stove top to your stand mixer where you mix on high until the frosting cools.  This took maybe 8 minutes or so....I kept feeling the outside of the bottom of the mixing bowl and when there was no more warmth, I moved on to adding the butter and caramel sauce.  Then I let it beat for probably another 6-7 minutes.  At first it seemed thin but, slowly, it became more and more fluffy and eventually resembled frosting!  Really delicious frosting.


I'm not going to lie, this cake is not a let's throw this together in a hour kind of cake.  It's quite a bit of work and a lot dishes.  But the result was absolutely worth the effort.  You could make it a little more palatable by breaking up the work and making the caramel sauce the day before (as well as the applesauce, if you are doing homemade). This recipe is moving into the keeper file for certain. 

To get the recipe, head over to Lulu the Baker. Thanks for choosing such a fabulous recipe! To see how other Club: Baked bakers did with their cakes, click here.

Sunday, October 30, 2011

Apple Pie Muffins


Living in Southern California makes it a bit challenging to discern any transition from one season to the next.  I did put on a sweater one day this week, but that was more to tolerate the frigid zone that is my office.  Plus it was overcast outside so I thought I could justify it.  But the temps were in the 60's, which was the coolest daytime temperature this week.  The temps have climbed up to the 70's and low 80's this weekend.  I shouldn't complain.  It's not snowing here like it is in the northeast part of the country.  Anyway, it really isn't the weather that defines the seasons here.  For me it is the food that tells me what season it is.  And over the last few weeks I've been cooking and baking with some of my favorite fall ingredients, like pumpkin, butternut squash, sweet potatoes and apples.

These apple muffins caught my eye when I spotted them on My Baking Addiction and I knew I needed to make them.  They have large chunks of apple and crunchy crumb topping.  I'm always a sucker for a crumb topping.  I used gala apples, because that is what I had on hand and I found the muffins to be a bit too sweet.  I have a feeling if I had used the tart granny smith apple that the recipe calls for the sweetness would balance out.  If you use a sweet apple I recommend reducing the brown sugar in the muffin recipe by 1/4 to 1/2 cup.  Despite the extra sweetness, I really enjoyed these muffins.  They are definitely reminiscent of apple pie.

Do you ever freeze your muffins?  If you have more muffins than your household can eat within a couple of days, try freezing them.  Once the muffins are completely cool, individually wrap them tightly in plastic wrap.  Place the individually wrapped muffins in a freezer storage zip top bag and remove excess air.  When you want to eat a muffin (or 2), just take the wrapped muffin out of the freezer before you head to bed the night before and set it on the countertop.  It will be completely thawed and ready to eat in the morning.  It's a great way to prevent muffins from going to waste and to have a nice treat without having to bake again.

Enjoy!


Apple Pie Muffins
from My Baking Addiction

Makes 12 muffins

Ingredients

Muffin:

2 1/4 cups all purpose flour
2 teaspoons pumpkin pie spice (or use cinnamon)
1 teaspoon baking soda
1/2 teaspoon kosher salt
1 egg
1 cup buttermilk
1/2 cup butter (1 stick), melted and cooled
1 teaspoon vanilla extract
1 1/2 cup packed brown sugar
2 cups chopped granny smith apples, about 1/2 - 3/4 inch chunks

Topping:

1/2 cup packed brown sugar
1/3 cup all purpose flour
1/4 cup rolled oats
1 teaspoon ground cinnamon
3 tablespoons butter, melted

Directions:

Preheat oven to 375 degrees F.  Line muffin tin with paper cupcake liners and set aside.  In a large bowl whisk 2 1/4 cups flour, pumpkin pie spice, baking soda and salt.  In a small bowl, whisk the egg, buttermilk, 1/2 cup melted butter, vanilla and 1 1/2 cups of brown sugar and stir until sugar is dissolved.

Pour the buttermilk mixture into the flour mixture and gently stir until just combined.  Gently fold in the apples.  Fill muffin liners nearly to the top.

Make the topping by combining 1/2 cup brown sugar, 1/3 cup of flour, rolled oats and cinnamon in a small bowl.  Drizzle in 3 tablespoons melted butter and mix until combined.  Distribute all the top mixture evenly across the muffins.  Don't be shy!

Bake for 25 minutes or until tops spring back or a toothpick inserted into the muffin comes out clean.  Cool in the muffin tin on a wire rack.


Monday, October 24, 2011

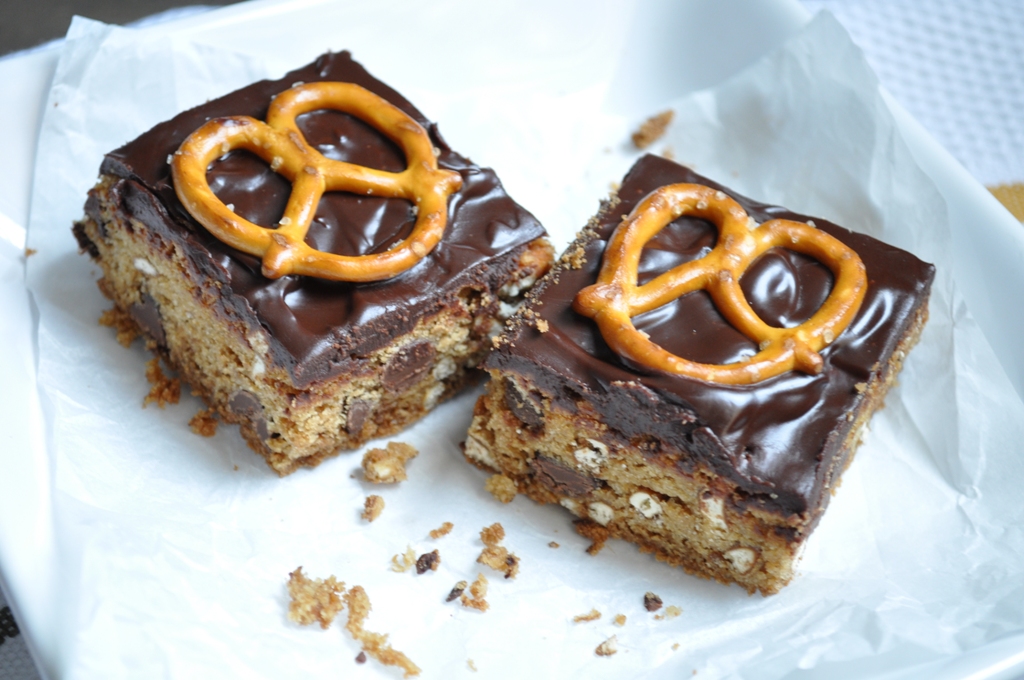
Chocolate Chip Pretzel Bars


Secret Recipe Club time again!  Which means yet another month has flown by.  I am so not ready for the rapidly approaching holidays...

Wondering what Secret Recipe Club is?  It is a monthly online cooking and baking group where each participant is assigned another person's blog and the assignments are kept secret, much like a Secret Santa.  You browse the blog you were assigned, and choose a recipe to make and post about.  Everyone "reveal" their posts on the same day.  It's a great way to get know a blog you might not be familiar with and to try out a new recipe.

I was excited to see my assigned blog was Jamie's Cookin' with Moxie.  I know Jamie from two baking groups, Sweet Melissa Sundays and most recently, Club: Baked.  What I love about Jamie is her energy.  When I read her posts she makes me smile.  I imagine her to be bursting with energy and excitement with a big smile on her face.  And you can tell she channels that energy through food.  She's an Italian girl, originally from Long Island, NY and comes from a big family.  She loves to cook with her friends and family and says that "that cooking and baking creates the best memories!"  I couldn't agree more!  Be sure to check out Jamie's site...she moved to her own URL and has a whole new look and feel, along with a new blog name (her former blog was Random Acts of Food).


As always, I struggled to choose what recipe to make.  Too many tempting choices!  Again, I ended up going the sweet route this month because I wanted to make something to take to my family pumpkin carving gathering this weekend.  Her recipe for Chocolate Chip Pretzel Bars sounded like a a good choice, knowing that my family loves a salty and sweet treat. 

I stayed pretty true to her recipe with a couple of minor modifications.  I omitted the chocolate sprinkles, and instead decided to up the chocolate factor and top these bars with chocolate ganache and a whole pretzel.  I had originally planned to top these bars with a milk chocolate ganache to bring a little extra sweetness to the salty pretzels.  But unfortunately I ruined some perfectly good milk chocolate and it seized up.  So I turned to my chocolate stash and the only chocolate I had enough of was a bittersweet dark chocolate. So I went with it.  I'm a big dark chocolate fan, but I was afraid it might be a little too dark for my nieces and nephew.  Luckily I made 2 desserts for pumpkin carving...the pretzel bars and pumpkin cupcakes with cream cheese frosting (post coming soon) so I'm hoping everyone will find something the like that will satisfy their sweet tooth. 


These bars are super easy to make and put a fun twist on a chocolate chip cookie with salty pretzel crunch.  My bars were done in 30 minutes, but I think they still may have been slightly over cooked.  Next time I would check at 25 minutes.  I am planning to try this recipe again using with the milk chocolate ganache.  I think that would bring just the right balance of salty and sweet!

Now let's see if we can take sweet our time before November Secret Recipe is here!


Chocolate Chip Pretzel Bars
from Cookin' with Moxie (originally from foodandwine.com)

Ingredients:

2 cups all purpose flour
1 teaspoon baking soda
1/2 teaspoon salt
1 1/2 sticks unsalted butter, softened
1 cup packed light brown sugar
1/2 cup granulated sugar
2 large eggs
2 teaspoons vanilla extract
1 1/2 cups of coarsely chopped pretzels
12 oz chocolate chips
2 tablespoons chocolate sprinkles (optional) - I omitted

Preheat oven to 350 degrees F.  Line a 9 x 13 metal baking pan with parchment paper, allowing the paper to hang over the edges by 2 inches all around.  This will help you remove the bars from the pan once they are cooked.

In a medium bowl, combine flour, baking soda and salt and whisk.  In a large bowl or your stand mixer, beat the butter and both sugars at medium speed until light, about 1 minutes.  Beat in the eggs and vanilla.  Turn the mixer to low slowly add the dry ingredients until just combined.  Stir in the pretzel bits and chocolate chips.

Spoon dough into your prepared baking dish and use a spatula to evenly spread the dough.  If you are using sprinkles you would add them on top now.  Bake for 30 - 35 minutes or until golden and just set.  Transfer the pan to a rack and let cool completely.

Run a knife around the sides of the pan and lift out the bar using the parchment paper as handles.  Cut into 24 squares and serve.


Chocolate ganache:
from Sweet Melissa Baking Book

6 ounces of good quality chocolate, coarsely chopped (I recommend milk chocolate for this recipe)
1/2 cup heavy cream
1 tablespoon light corn syrup

Place chocolate in a heat proof medium bowl.  Heat heavy cream in a small saucepan until it is scalding or bubbles form around the edges.  Pour heated cream over the chocolate.  Do not stir.  Let stand for 5 minutes.  Cover with plastic wrap.  Slowly stir the chocolate and cream together after 5 minutes until fully combined.  Stir in corn syrup.  Let stand for at least 10 minutes to thicken a bit. 

To assemble bars with chocolate ganache and whole pretzels:

Pour ganache over your cookie bar before removing it from the pan and cutting it.  Place 24
whole pretzels spread evenly in the pan, running 4 down the short side and 6 across the long side.  Place the pretzels in even rows for easy cutting.  Allow the ganache and pretzels to set for about 30 minutes.  Cut into squares and serve!