Monday, August 26, 2013

Somerset Easter Biscuits (Raisin Spice Cookies)


I LOVE tea and cookies.  Wow, I feel like I sound about 95 years old when I say that.  Eh, who cares!

I wasn't always a tea and cookies kind of girl.  Over the last couple of years tea has become a morning (and afternoon) ritual that I look forward to and rarely miss.  No doubt I've always liked cookies, but I mostly leaned towards the very sweet ones...you know chocolate chip, snickerdoodles, ginger snaps.  I wasn't much into lightly sweetened or crunchy cookies like shortbread, biscotti or tea cookies.  Part of me thinks I didn't "like" them just because they weren't what I was used to.  I'm glad to say I broke out of my cookie comfort zone to now enjoy cookies of all kinds.  :)


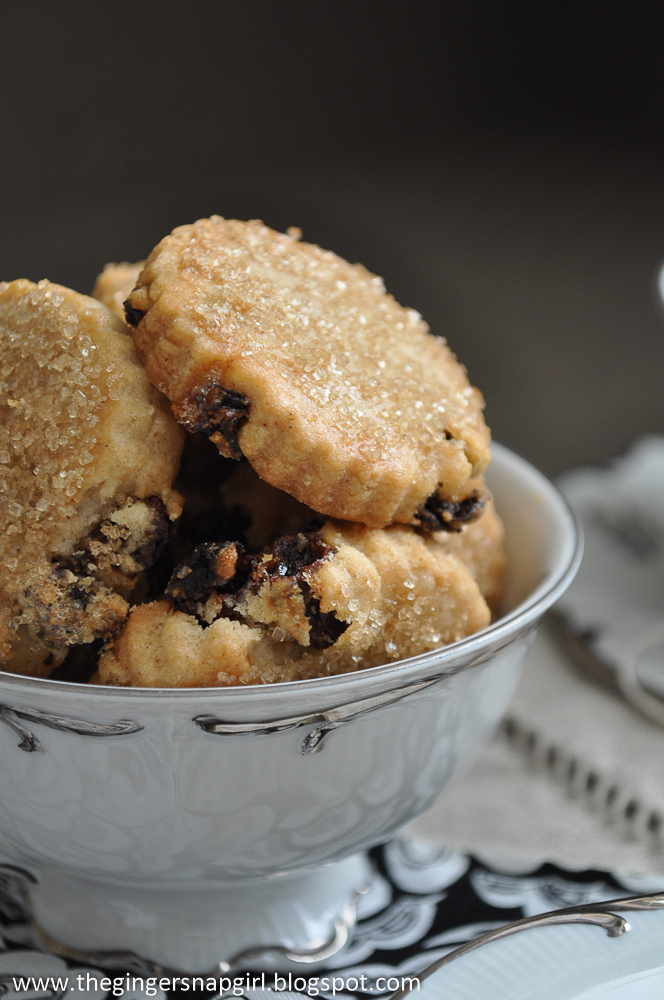
I first had Somerset Easter Biscuits (raisin spice cookies) when my best friend made me a batch as part of a tea and cookies inspired birthday gift.  The cookies are lightly sweet and ever so slightly spiced with cinnamon, allspice, clove and ginger.  Studded with raisins, a crumbly texture and an extra crunch from the turbinado sugar on top...they make for a perfect tea (or coffee if that's your pleasure) cookie. 

It's impossible to eat just one.


Don't you just love the sugar sparkling on top?

I'm so glad I finally got a chance to make these special little cookies. I made a double batch and packed most of them up to send in my August Operation Baking GALS shipment to some of our hardworking troops in Afghanistan (along with these and these and a variation of these). 


But, I had to save 1 or 2 12 for myself.  I enjoyed a few afternoons of tea and cookies, a very nice break during the long midday stretch.  ;)

I'm pretty smitten with these babies.  Definitely a recipe I will make again and again. 

Enjoy!

Somerset Easter Biscuits
adapted from The Great British Book of Baking

125 grams unsalted butter at room temperature
75 grams sugar
1 egg, yolk and white separated
200 grams all purpose flour
A good pinch of salt
A good pinch of baking powder
1/2 teaspoon mixed ground spice (such as pumpkin pie spice)
1/2 teaspoon ground cinnamon
50 grams raisins
1 teaspoon citrus zest (such as orange)
Turbinado sugar for sprinkling

Line 2 baking sheets with parchment paper and preheat oven to 400 degrees F.

In the bowl of a stand mixer beat butter until creamy.  With mixer on add slowly add in the sugar and continue to meet for about 2 minutes until light and fluffy.  Turn mixer to low and add the egg yolk until combined. 

In a medium bowl, sift flour, salt, baking powder and spices.  Add flour mixture in 3 batches to the butter mixture with mixer on low.  Add zest and raisins and mix until just combined.  Turn dough out onto a lightly floured surface and roll about 1/4 inch thick.  Using a 2.5 inch fluted cookie cutter, cut out cookies and place on baking sheet about an inch apart. 

Bake for 10 minutes until lightly golden and firm.  Meanwhile whisk the egg white until slightly frothy.  Remove cookies from oven and lightly brush one cookie with egg white and then top generously with turbinado sugar.  Repeat with all cookies.  Return to the oven and bake an additional 3 to 5 minutes until tops are golden and crunchy.  Allow cookies to cool on baking sheet for a few minutes and then transfer to a wire rack to cool completely.

Store in an airtight container for up to a week.


Monday, August 12, 2013

New York Times Chocolate Chip Cookies


Okay, okay.  The wait is over! 

Finally, I present you the New York Times Chocolate Chip Cookies. 


For those of you who are long time readers, you know I've been searching for the best, the ultimate, the perfect chocolate chip cookie for some time now.  There are seven chocolate chip cookie recipes on the blog, and a few more that I never got around to sharing.  The reality is I have yet to meet a chocolate chip cookie I don't like.  The idea of choosing just one cookie as "perfect", "the best" or the "ultimate" is unrealistic.  Each has it's own characteristics that make it worthy of a glass of ice cold milk. 


I've been intending to try the New York Times recipe for.....2 years!  I'm a little slow but I'm glad to say I got there. This cookie is definitely up at the top of the chocolate chip cookie food chain.  In fact, I've made the recipe twice in the past month.  I have a feeling it will make a few more appearances this year. 

What makes it so special?  It's chewy in the center and slightly crisp around the edges, which is signature of top notch chocolate chip cookie (in my opinion).  It's a big cookie...especially if you follow the recipe, it comes in around 5 inches.  The first time I made them as directed and the second time (pictured here) I went a little smaller, around 3 1/2 inches.  Either way, it's a thick hearty cookie.  It has a great depth of flavor--that brown sugary caramel flavor that pairs so perfectly with dark chocolate. 

The first time I made them I took them to a birthday bash at a friend's house and the cookies were gobbled up in record time.  There were several "oooohs" and "ahhhhs" so I'm pretty sure they were well received.  ;)

A couple of notes, I made the first batch with part semi sweet chocolate chips and part milk chocolate.  I like the combo of the two types of chocolate and will likely do that going forward.  Feel free to use the chocolates that you like best.

Overall it's an AWESOME cookie!  If you haven't tried it yet, don't wait 2 years like me! 


Enjoy!

New York Times Chocolate Chip Cookies
from New York times adapted from Jacques Torres

Yields 18 five inch cookies

2 cups minus 2 tablespoons cake flour (8 1/2 ounces)
1 2/4 cup bread flour (8 1/2 ounces)
1 1/4 teaspoons baking soda
1 1/2 teaspoons baking powder
1 1/2 teaspoons coarse (kosher) salt
2 1/2 sticks (1 1/4 cups)
1 1/4 cups light brown sugar (10 ounces)
1 cup plus 2 tablespoons granulated sugar (8 ounces)
2 large eggs
2 teaspoons pure vanilla extract
1 1/4 pounds bittersweet chocolate disks or chips (at least 60% cacao) (I used 12 ounces of semisweet chocolate and 8 ounces of milk chocolate)
Sea salt

Sift flours, baking soda, baking powder and salt into a medium bowl and set aside.

Cream butter and both sugars in the bowl of a stand mixer fitted with the paddle attachment on medium speed until very light and fluffy, about 5 minutes.  Turn mixer to low and add eggs, one at a time until combined.  Add vanilla.  Keeping mixer on low, add the dry ingredients in 3 batches until just combined.  Stir in chocolate pieces.  Cover the dough with plastic wrap pressed against the surface and refrigerate 24 - 36 hours.

When you are ready to bake remove the dough from the refrigerator and allow to stand at room temperature for about 20 minutes, or until dough is scoopable.  Preheat oven to 350 degrees F and line a baking sheet with parchment paper.  Scoop six 3 1/2 ounce balls of dough (about the size of golf ball) and arrange on the baking sheet.  Sprinkle lightly with sea salt (I omitted this).  Bake for 18 to 20 minutes until golden brown but still soft in the center.  Allow baking sheet to cool on a wire rack for about 10 minutes.  Transfer cookies to a wire rack to cool completely.

Cookies are best the day they are baked.

Monday, August 5, 2013

Spring Rolls


Chocolate chip cookies or spring rolls?  Cookies or spring rolls? 

Big decisions going on over here! 

I am sure you are thinking those two options really aren't even from the same planet.  And they aren't.  I've been dropping hints recently that I would be posting the ever so popular New York Times chocolate chip cookie soon.  I really anticipated "soon" would have been here by now. 

But I just couldn't get behind something decadent and sweet this week.  Words I never thought I would write. Things have been a little Twilight zone lately--but in a good way!  

The past week was busy...I officially started in my new job with 4 days of travel, seeing old friends, meeting new ones, getting to know a new client and sending off a co-worker and mentor into a well deserved retirement.  All this activity translated into 5 solid days of eating every single meal out.  I haven't stepped on the scale yet, but it can't be good. Very doubtful I made it through the week unscathed. 


Given the many over indulgences of the past week, I had to choose the spring rolls.  No, I didn't make them this weekend, but just the thought of them is making me feel lighter already. 

I've made these spring rolls several times over the past few months.  My best friend turned me on to the recipe and it's now one of my go to light meals.  Spring rolls are almost like a salad wrapped up in a nice little bundle.  They are...

Easy to make
(once you get the rolling part down...don't worry if you tear the wrapper, it's forgiving)
Light
Fresh
Crunchy
Creamy
Refreshing
Low calorie
Delicious!
and
Healthy

Yep, food can be both delicious and healthy!  Who knew? 

It took a little coaxing, but I even got Hubby on board with this pure veggie delight!


A few notes...I have tried a couple of variations of this recipe by adding in additional elements like red pepper and mango.  The red pepper is okay, but doesn't really add anything special to the rolls.  But.  The addition of mango is AWESOME.  It brings in a juicy sweetness that pairs perfectly with the creamy avocado, fresh herbs, crunchy cucumber and carrot and the soy dipping sauce.  So tasty.  My photos are without mango as I didn't have any on hand this time.  But DO give mangoes a shot if you decide to make these spring rolls!  You could easily substitute peach or nectarine (white or yellow) if you can't find mango.   

I also made some adjustments to the dipping sauce adding extra soy sauce, brown sugar and red pepper flakes.  Feel free to add or subtract according to your own tastes. 

The original recipe calls for using 2 pieces of rice paper for each roll, however I find it's unnecessary.  The reason they suggest two, is to prevent the roll from breaking during the construction process.  To me, it's a waste of a few extra calories especially when the rice paper itself isn't the star of the flavor show.  With a little practice, using one paper does the job just fine.  Rice paper can be found at your local Asian food market or most large grocery stores. 

This tasty, fresh, light, healthy spring roll is calling your name! 

Enjoy!

Spring Rolls
adapted from Williams Sonoma

Makes 10 rolls

Dipping Sauce:
Juice from 1/2 lime
2 tablespoons canola oil
1 tablespoon rice vinegar
1/4 teaspoon Dijon mustard
1 tablespoon soy sauce
1 teaspoons brown sugar
Pinch of red pepper flakes

Whisk all ingredients together and set aside.

Rolls:
10 rice paper rounds (6 or 8 inches) - Or 20 rice papers if using two per roll
10 green lettuce leaves, such as bibb, butter, red leaf or green leaf lettuce
2 avocados, peeled, pitted, and cut into 1/2 inch thick strips
Fresh basil leaves (10-20 leaves)
Fresh mint leaves (10-20 leaves)
2 carrots cut into thin matchsticks (or coarsely grated)
1/2 - 3/4 English cucumber, seeds removed, cut into thin strips (about 4 inches long)
1 large mango cut into 1/2 inch strips (about 4 inches long) (optional)
2-3 green onions thinly sliced

To assemble rolls be sure all your ingredients are cleaned, cut and prepped before starting.  Fill a pie plate with warm water.  Place a clean kitchen towel next to the plate.  Dip 1 sheet of rice paper in the water for a couple of seconds, until the entire surface is just softened.  Place the softened paper on the towel.  (If using 2 rice papers per roll, use a second towel to pat the surface of the first round dry and then dip a second paper in the water and place on top of the first). 

Place one leaf of lettuce about 1/3 of the way up the bottom of the rice paper (closest to you).  Lay 1-2 leaves of both basil and mint across the lettuce.  Arrange carrots, cucumber, avocado and mango in rows on top of the herbs, keeping all the filling within the parameters of the lettuce leaf.  Sprinkle with green onions.

Lift the bottom of the rice paper up and over to just cover the filling gently and tightly tuck it under the filling.  Fold the sides of the rice paper towards the center creating a mini burrito.  Continue to roll tightly until a cylinder is formed.  Place the roll seam side down on a plate or cutting board.  Serve whole, or slice in half and serve with dipping sauce.

Note: If not serving immediately place a barely damp paper towel over the rolls until ready serve, up to 2 hours.