Showing posts with label main dish. Show all posts

Monday, December 3, 2012

Apple, Cranberry, Feta Salad with Candied Pecans


We put up our Christmas tree this weekend.  It's a fake tree.  My first fake tree.  Turns out Hubby is allergic to real trees and was pretty much miserable last year.  I was kind of bummed that we had to go the artificial route.  I've had real trees my whole life.

But you know what? 

Our fake tree is AWESOME. 

It's easy to assemble.
It's pre-lit with 500 lights so no need for me to spend hours stringing lights.
It fits perfectly into the small space we have to put a tree. 
It doesn't make a mess leaving dead needles everywhere. 
It doesn't need to be watered.
The branches bend so you can arrange your ornaments to hang just how you like them.
And, it looks real!

Now all I have to do is get a Christmas tree scented candle and I'll have my tree smell too.  A small trade off.

Even though we already have our tree up, I'm a bit discombobulated with the timing of the holidays this year.  Thanksgiving felt like it came early which has subsequently thrown everything else off.  This is definitely the earliest we've had a tree up and running.  And I felt a totally panicked last week that we hadn't even thought about holiday shopping, even though it's completely normal for us to wait until early December to start.  But it's all good and I'm going with the flow and enjoying the season. 

In the spirit of the holidays, I've embraced an ingredient somewhat new to me this year.  The cranberry.  Cranberries have an extreme tartness that has turned me off in the past.  The turning point started with the Can It Up challenge for November--where I had the task to can something using cranberries.  It was my first time using fresh cranberries and I made these cranberry orange preserves.  It was a big success.  And it seems like it's been a flurry of cranberry ever since. 

Starting with this salad.  I'm loving this salad.  Normally when I make salad at home, 99% of the time it's the basic garden variety type--lettuce, tomato, cucumber, onion, peppers, maybe a mushroom or two.  But when I go to a restaurant, I always order the non garden variety type.   Like salad with fruit, nuts, beets, a little goat cheese or blue cheese.  I'm not really sure why I rarely make this type of salad at home.  No need to dwell in the past though.  I've made this salad no less than 3 times in a week.  Even Hubby is eating it (a modified version anyway).  It's sweet, it's tart, it's crunchy, it's salty.  It's yummy.  It's fall on a plate.


This salad would be a great side dish to a holiday meal, or to savor any day of the week as your lunch.  This is more of an ingredient list than a recipe.  Tweak it and make it your own. 

Happy holidays!

Enjoy!

Apple, Cranberry, Feta Salad with Candied Pecans

Lettuce (such as spring mix, butter lettuce or romaine)
Apples, thinly sliced (I used honey crisp)
Dried cranberries
Feta cheese
Green onions, thinly sliced
Salted candied pecans
Your favorite vinaigrette (such as balsamic)

Put it all together and voila!

Monday, November 12, 2012

Turkey and Sweet Potato Shepherd's Pie


So the dieting isn't going so well.  Remember my simple calorie counting strategy?  Apparently it would actually help if I was actually counting (and logging) my calories.  Like everyday.  Turns out estimating calories in my head is probably not very accurate.  Since October 1st I've lost 3 pounds and gained back 2.  Not quite the results I hoped for.  Time to refocus. 

I'll be getting some healthy inspiration from my best friend Crystal's new blog, Both HalvesCrystal and I go way back.  We have been BFF's since our sophomore year in high school.  Back in the day we both used massive quantities of hairspray and may have been known to coordinate outfits on occasion.  Though we've pretty much abandoned hairspray and no longer wear matching outfits, we do have a common love of food, and more specifically, baking.

Crystal has been baking and blogging with me for the past year and half with Club:Baked.  She recently gave her blog a complete makeover and really focused her point of view.  Both Halves is about embracing and balancing a love of traditional desserts with a love of healthy clean eating.  The mast head on her blog says it all...3 beautifully stacked blocks of butter on the left and a bundle of fresh mint on the right.  She's posting raw (vegan) desserts that definitely intrigue me (an area I have a lot to learn in).  Like this totally unbaked Raspberry Ganache Fudge Cake.  Hello chocolate.  Desserts aren't the only thing on the blog menu.  I also have my eye on this healthy Italian Rabe recipe and I'm looking forward to more inspiration from my girl! 


Believe it or not today's recipe is pretty healthy, despite the fact it comes from Paula Deen (no offense Paula).  It's a Thanksgiving take on Shepherd's Pie.  The bottom layer is ground turkey, carrots, parsnips, celery and onion surrounded by a sauce of chicken stock, tomato paste and a bit of flour to thicken it.  The top is a light fluffy sweet potato mash.  It's a nice pre-cursor for the flavors to come in just a week and half when Thanksgiving arrives.  Which I can't wait for by the way.


This dish can be made ahead and baked when you are ready to eat.  It serves 8 so there are plenty for leftovers for us.

Enjoy!

Turkey and Sweet Potato Shepherd's Pie
adapted from Paula Deen

Serves 8

3 tablespoons butter
1 tablespoon olive oil
2 1/2 pounds of sweet potatoes, peeled and cubed (1-1 1/2 inches)
Salt
2 large carrots, peeled and diced
2 stalks of celery, diced
1 parsnip, peeled and diced
1 large onion, diced
2 tablespoons of freshly chopped thyme
2 tablespoons of freshly chopped rosemary
1 pound of ground turkey (Paula uses 2 lbs)
1/4 cup tomato paste
2 tablespoons Worcestershire sauce
2 tablespoons of flour
2 cups low sodium chicken broth
4 ounces of softened cream cheese
1 egg, lightly beaten
1 10 ounce bag of frozen peas

Preheat oven to 375 degrees F.  Spray a 9x13 baking dish with cooking spray.

Place cut sweet potatoes in a medium sauce pan and cover with cold water and add salt to taste.  Bring to a boil and reduce to simmer for 15-20 minutes or until potatoes are tender.

Heat a large skillet over medium heat and add 1 tablespoon of butter and olive oil.  Add carrots, celery, parsnips and onions and cook for about 8 minutes or until vegetables are tender.  Season with salt and pepper.  Add ground turkey and cook until lightly browned and cooked through.  Season generously with salt and pepper.  Stir in tomato paste, Worcestershire sauce, flour and chicken broth and cook for 5 minutes or until sauce thickens.  Add frozen peas and stir.

Meanwhile, drain the water from the potatoes and add to a large bowl.  Add in cream cheese and remaining 2 tablespoons of butter and use a hand mixer to turn the sweet potatoes into a mash.  Add some of the hot potato mixture into the eggs, to temper the eggs so the hot mixture doesn't scramble them.  Season with salt and pepper.

Place meat mixture in the bottom of your prepared baking dish.  Evenly spread sweet potatoes over the meat mixture.  Place the dish on a baking sheet and bake for 35-45 minutes or until shepherds pie is bubbling and top is lightly golden.


Saturday, July 21, 2012

Meatball Marinara


Hubby's been on a pasta making kick which in turn has made me take an interest in making a great sauce for his fresh made pasta.  In my early cooking days I thought the best way to make a good marinara was to buy a jarred sauce and doctor it up with things like peppers, mushrooms, onions, garlic and sometimes ground beef.  Those sauces were okay, but they were not anything that really gave you that wow factor. Coming up with a homemade marinara sauce that's wow worthy has been on my cooking bucket list for a while now...

I'm happy to say, I've found "my sauce"! 

I sort of threw this recipe together based on a You Tube video I watched (and eventually made the recipe ...to be seen here soon) and two other recipes I found online.  I didn't have all the ingredients for any one the recipes, so I made up my own combining these recipes and using what I had on hand.  Many timesSome times when I experiment in the kitchen, I am not always overwhelmed in a positive way by the results.  The marinara gods were with me, though, and this recipe has that special something something I've been looking for. 

Isn't homemade pasta pretty?

What makes this sauce special is actually the meatballs.  The Italian sausage flavor from the meatballs, perfume the sauce with a mild spice that takes the sauce to the next level.  And if you think turkey meatballs are "boring", I assure you these are not.  In fact, I really want to make this for my dad and not tell him the meatballs are turkey.  He pretty much believes turkey is NOT substitutable for beef.  But I'm pretty certain he'd like these.  The meatballs are tender and the Italian sausage flavor comes through, but doesn't over power.  It really is just right.  At least for me, Hubby and our niece who helped us make the most recent batch.  This recipe is most definitely a keeper.

I remembered to add some fresh grated parmesan...Mmmm

Note - If you are a vegetarian and don't plan to make the meatballs, I recommend following the sauce recipe and adding 1/4 to 1/2 teaspoon of cayenne pepper (depending on your spicy tolerance) to bring a little heat.  Also note, I haven't tired this myself, but this is what I would do based on tasting the sauce before the meatballs go in.   

We've been enjoying the sauce and meatballs over fresh made pasta, though dried pasta would work well too.  And it makes fabulous leftovers for a meatball sandwich! 

Enjoy!

Meatball Marinara
from The Ginger Snap Girl

Serves 6-8

For the marinara sauce:

3 tablespoons olive oil
8 roma tomatoes, cut in 4 slices lengthwise
4 cloves of garlic smashed with a pinch of kosher salt to form a paste
1 medium onion diced
2 14 ounce cans diced tomatoes
1/2 can (3 oz.) tomato paste
1 1/2 tablespoons brown sugar
1 teaspoon salt
1/4 teaspoon black pepper
1 teaspoon dried basil
1/4 cup white wine (or use chicken broth if you don't have wine)
1 cup chicken broth

Heat dutch oven or large sauce pot on medium high heat and add olive oil.  Add tomato slices in a single layer (slightly overlapping is okay) and season lightly with salt and fresh cracked pepper.   Cook in oil for 3-4 minutes until the tomatoes start to get tender.  Flip tomatoes over and add garlic and cook on medium high for 2 more minutes.  Stir the tomatoes and garlic.  You should smell garlic and the tomatoes should start to break down.  Add minced onions and cook until tender about 3-4 minutes.  Add remaining ingredients and stir until combined.  Bring to a boil and reduce heat to low and simmer the sauce.  Cover and cook for 20 minutes. 

While sauce is cooking, make the meatballs (see meatball recipe below).

When the sauce has cooked for 20 minutes give it a taste.  Does it need a little more salt?  Sugar? Pepper?  Add additional seasoning as needed (I've made it twice and added just a touch extra salt at this point).  Use an immersion blender to blend in sauce until smooth (there will still be some chunks, that's okay).  If you don't have an immersion blender, you can puree the sauce in batches in a stand blender and return sauce to the pot.  Add meatballs making sure each meatball is covered in sauce.  With heat on low, cover and cook 30 more minutes, until meatballs are cooked through but still tender, stirring sauce and meatballs every 7 to 10 minutes.  Remove cover and continue cooking on low for 15 minutes. 

For the meatballs:

1 lb ground turkey
1/3 lb mild (or sweet) Italian sausage
1 egg
1/2 cup panko bread crumbs
1/2 cup finely chopped onions
1/3 cup fresh grated parmesan cheese
1 tablespoon fresh parsley finely chopped
1 teaspoon salt
1/2 teaspoon dried basil

Mix all ingredients in a medium bowl until thoroughly combined and Italian sausage is even distributed.  Using a medium cookie scoop (about golf ball size) scoop out meatballs onto a baking sheet lined with foil.  Once all the meatballs are scooped, use your hands to roll into rounded balls.  Once all the meatballs are rolled, gently place each meatball in the sauce.

Serve over 1 pound of your favorite store bought or home made pasta.  Garnish with fresh grated parmesan cheese.

Saturday, April 14, 2012

Barbecue Chicken Salad


Have you ever had barbecue chicken salad at California Pizza Kitchen?  It's one of my favorite entree salads to order out a restaurant.  I've had it at other restaurants and I think the CPK salad is hands down the best version.  All the flavors complement each other...sweet, tangy, crunchy, cheesy.  It's a filling (a half order is plenty for me or if Hubby wants to share we get the full order) and oh so delicious meal.

Hubs and I eat salads for dinner (as our entree) at least 1 or 2 times a week.  Most of the time it's a basic salad with romaine lettuce, tomato, cucumber, onion, red pepper, sometimes mushrooms, topped with grilled shrimp or chicken.  I sometimes add a sprinkle of feta or cheddar cheese and or some croutons if I have them.  Our favorite salad dressing is one I get in the produce section at my grocery store by Litehouse.  They have a lite ranch dressing that is low in calories and doesn't taste like a "light" ranch dressing.  I was getting a little bored with our basic salads so I started thinking about alternative options...

I had ranch dressing and barbecue sauce in the fridge and chicken in the freezer and thought why not make barbecue chicken salad at home?  I didn't consult a recipe for this one.  I went from memory and crossed my fingers. 

You start by baking the chicken in barbecue sauce.  Once it's cooled, chop it and toss it in more barbecue sauce.  There is one other cooking component to this recipe.  I like to roast sweet corn and it's easy to do right on the stove top.  I keep frozen white sweet corn on hand at all times (I have found the C&W brand to be the sweetest).  To roast, drizzle a little olive oil in a non stick pan and throw in the frozen corn (don't thaw) and cook about 10 minutes on medium high heat, stirring once in a while until the corn takes on a roasted, caramelized color on some of the kernels.  If fresh corn is in season that would be even better, just toss your husked corn cob right on the grill and turn every couple of minutes until that charred color starts to appear (also about 10 minutes).


The rest comes together easily.  While your chicken and corn are cooking, prep the rest of the ingredients. 

Tip of the day - Freeze Your Chips!

One of the ingredients in the salad is crushed tortilla chips.  I have a tip to share for storing chips.  Once you've opened the bag, use a chip clip to close the bag and store it in your freezer.  This works great for both tortilla chips and potato chips.  In our two person household it can take a while for us to eat up a bag of chips before they go stale.  The chips will keep nicely in the freezer for up to 3 months. 

*****

So how did my version of barbecue chicken salad compare?  Both Hubby and I gave it two big thumbs up.  In fact I've made it twice already and it's officially been added to our salad rotation.  I'm loving it! 

The salad is very similar to my beloved CPK version.  I just went to the CPK website to compare ingredients and I came pretty darn close.  The only thing my version didn't have was jicama and basil (which I didn't really miss).  At CPK avocado is an add on ingredient for extra money.  Since avocados were on sale at the market, they were a definite add in my version of the salad. 

Oh, and I can't forget to tell you, the squeeze of lime takes this salad up a level.  It gives it a little tang that goes nicely with the creamy ranch and sweet barbecue sauce from the chicken.  Don't skip the lime!

Enjoy!

Barbecue Chicken Salad
from The Ginger Snap Girl, inspired from California Pizza Kitchen

Serves 4 entree portions

2 large boneless, skinless chicken breasts (about 1 pound)
1/4 cup plus 1/3 cup barbecue sauce (I used Lucille's)
1 large head of romaine lettuce, washed, air dried, and cut into 1-2 inch pieces
1 tablespoon of finely chopped cilantro (optional)
1 cup frozen petite white corn
1 teaspoon olive oil
1/2 cup black beans, drained and rinsed
1 large avocado, peeled and sliced into chunks
2 cups cherry or grape tomatoes, halved
4 green onions, thinly sliced on the bias (at an angle)
1/2 cup grated monterey jack cheese
12 round tortilla chips, crushed
Ranch dressing, about 1 cup (I used Litehouse lite ranch dressing, found in the refrigerator section of the produce section)
1 lime cut into 4 wedges

Preheat oven to 350 degrees.  Lightly spray an 8 inch baking dish with cooking spray. Spread half of the 1/4 cup of barbecue sauce on the bottom of the baking dish.  Place chicken breasts on top of the sauce and spread the remainder of 1/4 cup of sauce on top of the chicken breasts.  Bake for 30 minutes, or until cooked through and clear juices run out of the chicken.  Transfer chicken from the baking dish to a cutting board and allow to cool for at least 15 minutes.  Once chicken is cooled, cut into 1 inch chunks and place in a medium bowl.  Toss the cut chicken with 1/3 cup barbecue sauce.

While the chicken is baking, heat a small nonstick skillet over medium-high heat and add olive oil to the pan.  Add the frozen corn (do not thaw) to the pan and stir.  Allow corn to cook over medium heat for about 10-12 minutes, stirring occasionally.  You want to allow the corn to roast and get lightly browned.  You can also grill fresh corn on the cob if it's available.  Remove corn from heat and allow to cool.

In a large bowl toss the lettuce with the ranch dressing.  Add cilantro and toss to evenly distribute.  Divide lettuce amongst 4 entree portion bowls.  Top lettuce with tomatoes, black beans, roasted corn, avocados, cheese and green onions.  Divide barbecue chicken amongst the 4 bowls and sprinkle each evenly with crushed tortilla chips.  To finish place a lime wedge in each bowl.  Don't forget to squeeze the lime over the salad....it's what makes it!

Sunday, April 1, 2012

Simple Shrimp Scampi


Hubby's birthday was in early March.  Birthdays are pretty low key around here.  For me, I'm looking for a mouthwatering dinner with my Hubs.  And of course, cake.  Plus extra cake for breakfast the next day.  We usually go out to dinner for my birthday.  For my Hubby it's even lower key.  He just wants a good homemade meal.  That's it.  No cake.  No pie.  No cookies.  Kinda a birthday party pooper if you ask me.  So I asked my better half what he wanted for his birthday dinner this year.  He said, homemade turkey meatballs with scampi type sauce, roasted sweet potatoes and roasted parmesan zucchini.  The two sides would be no problem.  But, scampi meatballs, huh?  Weird.  Thankfully it wasn't hard to talk him into traditional shrimp scampi since he loves shrimp. 

We eat shrimp at least once a week, sometimes twice.  My favorite way to prepare it is marinated in Italian salad dressing and then grilled (though I don't seem to have that preparation on the blog for some reason).  We eat shrimp straight up with veggies on the side, as a protein in salads and over pasta.  For all the shrimp we eat, I'm a little surprised I have never made shrimp scampi.  Scampi is a luscious and pungent white wine sauce perfumed with aromatic garlic and herbs (we love garlic by the way).  The reason I've shied away from making scampi is because I assumed that it was loaded with a stick or two of butter.  It only took a quick look at my Cook's Illustrated Cookbook to find the right recipe.  And to my surprise, it was relatively light on the butter with just 3 tablespoons divided amongst 4 servings.  Plus the recipe had "simple" in the title.  Simple is good.  And in this case, simple is also delicious.

The dish comes together quickly.  Definitely in the realm of a 30 minute meal. If you buy shrimp already peeled and deveined it's even quicker.  I like to buy frozen uncooked peeled and deveined shrimp to keep on hand at all times.  You never know when you need to make shrimp!


For Hub's birthday dinner I served the shrimp scampi over a toasted flat bread brushed with olive oil (bake in a 350 oven for 8 to 10 minutes until lightly toasted).  You could also use a crusty loaf of french bread, split down the middle.  The lemony, garlic wine sauce soaks into the bread.  It's like garlic bread and shrimp scampi all in one.  Delicious!  Unfortunately I didn't get to photo the bread version.  I made the scampi again a couple of weeks later and served it over pasta.  I felt the sauce was much more subdued in the pasta as compared to the bread version.  Though good with the pasta, I thought the bread with scampi sauce was a "Wowza!" dish.  I'll take seconds please!

Enjoy!

Simple Shrimp Scampi
from Cook's Illustrated Cookbook

Serves 4
2 tablespoons olive oil
2 pounds extra large shrimp (21 to 25 per pound), peeled and deveined
3 tablespoons unsalted butter
4 cloves garlic, minced
2 tablespoons fresh squeezed lemon juice
1 tablespoon dry vermouth or dry white wine (I used wine)
2 tablespoons minced fresh parsley
Pinch of cayenne (I omitted)
Salt and pepper

Heat 1 tablespoon of the olive oil in a 12 inch skillet over high heat, until just smoking.  Add half of the shrimp and cook about 1 minute, stirring occasionally until opaque.  Transfer to a bowl and repeat with remaining oil and shrimp, transferring the cooked shrimp to the bowl.

Turn heat to medium low and add 1 tablespoon of butter to the skillet.  Add garlic and cook until fragrant while stirring continuously, about 1 minute.  Remove the pan from the heat and add the lemon juice and vermouth or white wine.  Return the skillet to the heat and whisk in the remaining 2 tablespoons of butter.  Add parsley and pinch of cayenne and season with salt and pepper to taste.  Add the cooked shrimp and it's juices back to the pan and stir to combine.  Serve immediately. 


Tuesday, February 14, 2012

Mushroom and Herb Chunky Tomato Sauce


I had every intention of getting this post published last Thursday night, desperately trying to stay on the schedule I committed to at the beginning of the year.  As you can see, that just didn't happen.  A busy week at work and preparing for a trip to Chicago, while fighting a cold, got in the way. 

Preparation for this trip was a little more involved because we had to get the house ready for my sister who graciously agreed to babysit our three kitty cats while we were away.  This is the first multi-day trip Hubby and I have taken since our newest feline family member, Oliver, joined us last June.  We have been on a couple of local trips, but those don't count since we we took little buddy with us. 
Oliver is technically still a kitten and quite frankly he can't be trusted when left alone for long periods of time.  I've mentioned before he loves to act quite a bit like a dog, eating toilet paper, rooting around in trash cans and even fetching.  His newest trick is pulling the drain stopper out of the bathroom sink and carrying it around in his mouth like a bone or the prey he just conquered.  He carried the thing all the way downstairs to show Hubby and I what he did last week. 

"Look guys! Look what I found!  Isn't it cool?"

He was so proud, I just couldn't be angry with him.  But I must admit, I am completely perplexed at his choice of "prey". Of all the potential things he could have gone after in the house, how did he decide the bathroom sink drain plug was the way to go?   An answer I'm sure I'll never know. 

But isn't he just adorable?  I may be a little biased. 

What I do know for certain is our little guy still needs a watchful eye, so I was thrilled when my sister agreed to supervise the three musketeers.  Thanks Katie (& Luis)!

These three have a rough life huh?

From top to bottom: Kit Kat, Oliver and Chloe
With our kitties well taken care of, we set off for the mid west last Friday morning.  Luckily we landed in Chicago just in time for a snow storm. Guess that's what we get for visiting the windy city in February!  This trip was busy with family activities (Hubby is from Chicago),  catching up with friends (we lived in Chicago for a brief 3 1/2 year stint), lots and lots of eating and trying to squeeze in some time in the city.  Internet connectivity was spotty, so my hope of finishing this post when we arrived was put off a few days.  Despite the chilly weather, we have had a great time.  We spent Monday afternoon at the Art Institute in downtown Chicago and we managed to eat at our our favorite sandwich place, Potbelly's, 3 days in a row!  (I really wish Potbelly's would come to California.)  I do love Chicago.  But I don't miss the weather.  Next time we'll come back in the fall, when the temperature is a little more moderate for this wimpy California girl.

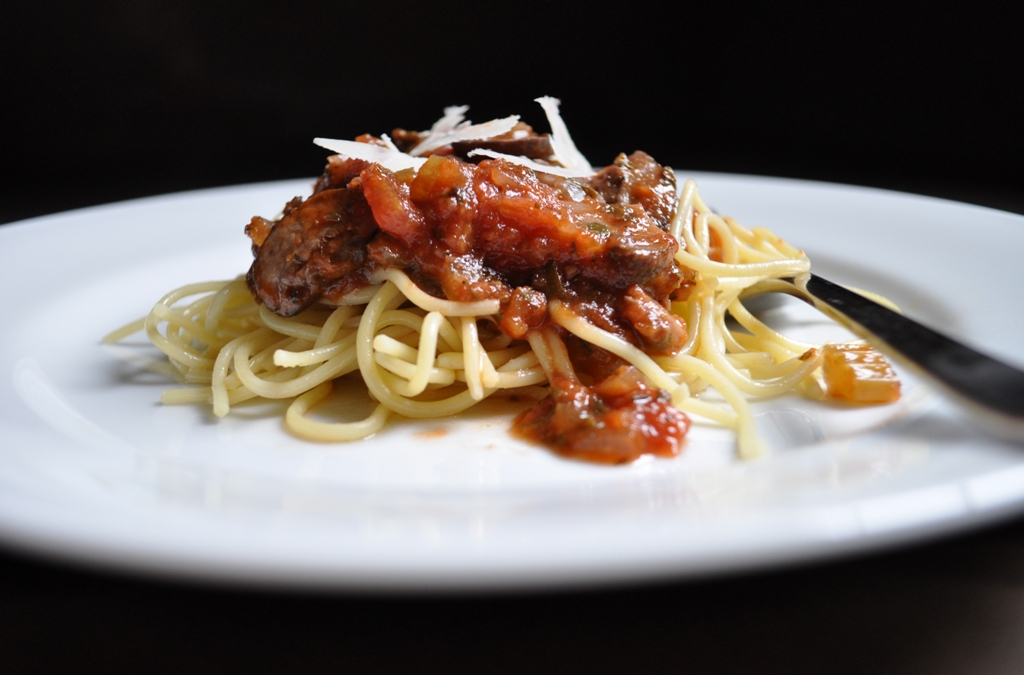
Now that I've brought you up to speed on our kitty cats and our trip, you probably want to hear about the food?  I saw this recipe for mushroom and herb pasta sauce on Sally's blog, A Food Centric Life and it caught my eye for 2 reasons.  One, it looked like a warm, rich, hearty sauce.  Two, I had all the ingredients in house already and it would be a great way to use up a lot of left over parsley (that otherwise would have ended up in the garbage).  I also liked that this chunky sauce was meatless (though I am certain it would taste pretty amazing spooned over homemade meatballs).


The sauce lived up to my expectations of being hearty and flavorful.  Hubby gave it a thumbs up too! And it was easy to make (once you get all the chopping out of the way).  The sauce is very versatile in that you can tweek it to your liking.  If you like more garlic, throw in a couple of extra cloves.  If you like other veggies, such as red peppers, toss those in too.  I did a few tweeks myself, which are noted in the recipe below.  You could easily freeze the sauce in ziploc bag and defrost it in the fridge the evening before you want to get a quick meal together. 

I definitely plan to make this sauce again.  We served it over thin spaghetti topped with a few shavings of fresh Parmesan cheese, alongside a simple green salad.  But it doesn't have to be limited to just pasta or a pure vegetarian approach.  As mentioned above, it would be great with meatballs or for a meatball sandwich.  It would also pair nicely with a panko crusted eggplant or chicken cutlets, Parmesan style.  So many options!

Enjoy! 

Mushroom and Herb Chunky Tomato Sauce
Adapted from A Food Centric Life

Yields about 1 1/2 - 2 quarts sauce

2 tablespoons olive oil
1 1/2 cups finely chopped fresh parsley, about 1-2 bunches (it was one for me)
1/2 small onion, finely diced
1 shallot, finely diced (I added to the original recipe because I had some shallot to use up)
3 celery ribs, finely diced
2-3 cloves of garlic, minced
8 ounces mushrooms, cleaned, trimmed and thinly sliced
1 28-ounce can of crushed or diced tomatoes
1 28-ounce can of tomato puree
1 teaspoon sugar (I added this to the original recipe because my tomatoes had a very acidic bite)
1 teaspoon dried basil
1 teaspoon dried oregano
1 teaspoon salt
1/2 teaspoon fresh ground black pepper
1/4 teaspoon red pepper flakes (I omitted)
1/2 cup dry red wine

Heat oil in large saucepan or a dutch oven.  Add parsley, onion, shallot and celery and saute until just tender, about 5 minutes.  Add garlic and cook for an additional minute.  Add all remaining ingredients (mushrooms through wine) and bring to boil.  Reduce to low and simmer covered for 45 minutes.  Remove cover and continue to simmer uncovered for an additional 20-30 minutes, allowing some of excess liquid boil off.  Serve with pasta, chicken cutlets or meatballs.

Thursday, January 26, 2012

Pumpkin Ice Cream


Last Sunday I made mushroom lasagna.  It was the first recipe I tackled from my new Cooking Light subscription.  It was creamy, it was mushroomy, it was shalloty and garlicky.  All flavor elements that I love, love, love.  It was a bit labor intensive.  A lot of chopping.  A lot of bowls and pots and pans.  A lot of different steps.  Since it's a little involved to make it's best made on a day when you aren't in a rush. 

So why am I telling you about mushroom lasagna when there is a photo of ice cream above?  Because today's post was supposed to be mushroom lasagna.  I've been debating in my head all week...Post it?  Don't post it ?  I don't know.  It tasted fine.  It was even good--ish.  But I didn't love it.  And I don't think I'll make it again given the level of effort involved.  If I did make it again and I would change some small things, but I don't think they would be enough to turn this dish around into the "love it" category.  Though I didn't love it, I've seen it pop up on some other food blogs with a little lovin'.  You can check out their experiences and get the recipe from their sites if you want to give this dish a go.  And just because, I am sharing a photo.  I didn't want them to go to waste after all.


After I finally decided what to do about posting the mushroom lasagna, I dug into the photo archives on my computer to see what would fill the blog void.  I came up with a few contenders, but finally settled on pumpkin ice cream.  I made this ice cream last fall when I was in a pumpkin kind of mood.  Going back through my photos (which I didn't love when I took them...which is why this post was so delayed) my pumpkin senses were roused.  Pumpkin should not be relegated to only a specific season.  You have to give in to the pumpkin cravings when they whisper in your ear.  Especially if they tell you to stream in melted chocolate into your pumpkin ice cream to get a pumpkin chip ice cream. 


I did half the batch plain and half with chocolate bits.  The ice cream is easy to put together and has a lightness about it all the while pumpkin flavor really shines through.  The texture is creamy and freezes nicely.  It doesn't turn icy or too hard when frozen for an extended period. 


To make your ice cream even more special, sandwich it between 2 homemade ginger snap cookies.  Pumpkin and ginger are great flavor partners. This is my favorite ginger snap recipe.  Tracey over Tracey's Culinary Adventures shared  some great tips on how to neatly portion out your ice cream for sanwiching.  I can't seem to find her specific post that talks about it, but the basic concept is to spread slightly softened ice cream on a baking sheet that will fit in your freezer.  Spread it to the thickness you want in your cookie sandwiches and return it to the freezer.  Once it's set up, use a cookie cutter to form the ice cream to perfectly match your cookies.  It's an especially handy tip if you are using unique shaped cookies.  Or you can wing it like I did and just spoon some softened ice cream on your cookie and try to clean up the edges.

Is a pumpking craving whispering in your ear?

Enjoy!


Pumpkin Ice Cream
from Williams-Sonoma

Yields 1 quart of ice cream

Ingredients:

1 cup fresh pumpkin puree or canned pumpkin puree (not pumpkin pie puree)
1 tsp vanilla extract
2 cups heavy cream
3/4 cup firmly packed dark brown sugar
5 egg yolks
1/2 teaspoon ground cinnamon
1/2 teaspoon ground ginger
1/4 teaspoon salt
Pinch of freshly grated nutmeg
1 tablespoon bourbon (I omitted it and added an extra 1/2 teaspoon of vanilla extract)

Directions:
In a small bowl whisk pumpkin puree and vanilla and cover and refrigerate for at least 3 hours or up to 8 hours.

In a heavy 2-quart saucepan, combine 1 1/2 cups of the cream and 1/2 cup of the brown sugar and cook over medium heat. Cook until small bubbles form around the edges of the pan, about 5 minutes.

Meanwhile, in a bowl, combine the egg yolks, cinnamon, ginger, salt, nutmeg, the remaining 1/2 cup cream and the remaining 1/4 cup brown sugar. Whisk until smooth and the sugar dissolve.

Remove the cream mixture from the heat. Gradually whisk about 1/2 cup of the hot cream mixture into the egg mixture until smooth. Pour the egg mixture back into the pan. Cook over medium heat, stirring constantly with a wooden spoon and keeping the custard at a low simmer, until it is thick enough to coat the back of the spoon and leaves a clear trail when a finger is drawn through it about 4 to 6 minutes. Do not allow the custard to boil. Strain the custard through a fine-mesh sieve into a bowl.

Place the bowl in a larger bowl partially filled with ice water, stirring occasionally until cool. Whisk the pumpkin mixture into the custard. Cover with plastic wrap, pressing it directly on the surface of the custard to prevent a skin from forming. Refrigerate until chilled, at least 3 hours or overnight.

Transfer the custard to an ice cream maker and freeze according to the manufacturer's instructions. Add the bourbon during the last minute of churning. Transfer the ice cream to a freezer-safe container. Cover and freeze until firm, at least 3 hours or up to 3 days, before serving.

Tuesday, January 17, 2012

Baked Turkey Meatball Bites


This past weekend we watched 3 of 4 NFL playoff games.  I'm not a sports girl.  Normally there is very little sports going on in our household unless the Chicago Bears or Cubs (from Hubby's home town) are in some kind of playoff or final game.  Chicago was not in any of the games we watched. But Hubby's Dad was in town and he follows football.  I won't lie, I have zero interest in the game of football.  What does interest me is an occasion to cook and bake.  And football watching is perfect for whipping up some finger foods.  Seems like we've been on an appetizer kick lately.  Our New Years Eve eve was an appetizer feast.  And so was day 1 of football watching.  I tried out two new recipes, roasted red pepper crostini and these baked turkey meatballs.  Both were a hit with Hubby and his Dad. 

As I was getting everything together for the game, Hubby came into the kitchen and grabbed a finished meatball hot off the baking sheet.  He said, "these are really good!"  Score!  Hubby is a big fan of turkey as an alternative to beef.  It's been a slow conversion for me, but I am finally getting to a place where I don't mind using ground turkey in place of beef.  And in many cases I'm really starting to like it. 

These meatballs fall into that category.  They pack a lot of flavor with onions, garlic and Parmesan cheese.  I really like using fresh herbs in meatballs because they bring a bright flavor that you don't get with dried herbs.  In this recipe I used fresh Italian parsley.  Next time I will add basil in too. 

What I like about this recipe is it's a good base recipe and you can add flavors to suit your tastes.  I served them with barbecue sauce, but I think they would also be great with your favorite marinara sauce or even a basil pesto.  I also like that these meatballs are baked and not fried, making them a fairly healthy option.

The meatballs are easy to put together once you get the chopping out of the way.  If you have a small cookie scoop it's a cinch to portion out equal size meatballs.  Basting the meatballs with sauce for the final 5 minutes of baking gives them a nice color and a lightly glazed crust.  You can serve them straight from the oven with some extra sauce on the side.  Or you can throw them in a small crock pot or a medium saucepan with some extra sauce to keep them nice and warm until your party starts.  Stick a toothpick in them and these bite size meatballs are ready to go.

Our appetizer trend continued on day 2 of the football bonanza.  However they came from the restaurant/bar where we set up camp for the last of the 4 games.  Apparently none of the teams my father-in-law picked to win, won.  Sorry Jerry!

At least we were well fed. 

Enjoy!

Baked Turkey Meatball Bites
adapted from bakespace.com

Yields about 42 small meatballs

Ingredients:

1 pound lean ground turkey
1 egg, lightly beaten
3/4 cup breadcrumbs (plain or seasoned)
3 tablespoons freshly grated Parmesan cheese
1/2 cup finely diced white or sweet onions
2 tablespoons finely chopped fresh flat leaf (Italian) parsley
3 cloves of garlic, minced
1 teaspoon kosher salt
1/4 teaspoon freshly ground black pepper

1 cup of your favorite barbecue sauce, divided into 1/4 and 3/4 cups.  You could also use marinara sauce in place of barbecue sauce.

Directions:

Preheat oven to 350.  Line 2 baking sheets with foil and spray with non stick cooking spray. 

In a large bowl, combine all ingredients except barbecue sauce and gently mix together until fully combined.  Using a small cookie scoop or a tablespoon, portion out 1 1/2 inch size meatballs and gently roll them between your hands to round them out.  Place on baking sheets about 1 inch apart.  Bake for 8 minutes and turn meatballs using a metal spatula.  Return to the oven and cook for an additional 6 minutes.  Remove sheets from oven and lightly brush each meat ball with 1/4 cup of the barbecue sauce.  Return to oven and cook for an additional 5 minutes.

Warm the remaining 3/4 cup of barbecue sauce in small saucepan or in a small bowl in the microwave.  Serve immediately.  Or you can add the sauce along with 1/4 cup water to a small crock pot and add the meatballs to keep warm for a party.


For other healthy Super Bowl snacks check out the round up on Eat Yourself Skinny.

Tuesday, January 3, 2012

Blue Cheese Wedge


Every year my family gathers at my Aunt's house for a Christmas Eve feast and celebration.  Most every year we have the same delicious meal...prime rib with horseradish cream sauce, twice baked potato casserole, a salad, a veggie and dinner rolls.  And every year it's my job to bring the salad.  Though we have a similar meal each year, I always hem and haw about what kind of salad to bring.  What will most people like? (This year there were 16 adults and 8 kids).  I mean let's be real, the salad is not the star of the meal.  It's an accompanying side show.  But I always want it to be just right.   

As I was thinking about what salad to bring, I was inspired by my Grandma.  When Hubby and I spent a few days with my Grandparents this past Thanksgiving, they took us out to dinner one night at Sullivan's Steakhouse.  If you've never been to Sullivan's, it's a treat.  It's a traditional steakhouse with most everything served a la cart.  Except the salad.  A blue cheese wedge salad comes with each entree.  It's a big wedge and the dressing is cheesy and creamy with a bit of tang, which is what makes it different from most blue cheese dressings I've had in the past.  Grandma said one of the reasons she liked coming to Sullivan's was for the salad.  Forget the steak and fork over the wedge!

I consulted Bing and searched for a copy cat recipe of Sullivan's famous blue cheese wedge.  And I think this is pretty darn close.  The dressing gets its tang from the buttermilk, sour cream and red wine vinegar.  It's rich and creamy from the mayonnaise, olive oil and blue cheese.  And it's rounded out with minced garlic and freshly cracked black pepper.     


I love the cool crisp iceberg lettuce drenched in cheesy dressing.  The Sullivan's wedge is served simply with lettuce, dressing and tomatoes.  I added sliced green onions and bacon pieces to the salad I served on Christmas Eve (bacon not pictured above).  I think the addition of the fresh mild green onion and salty crisp bacon finish off the salad nicely.

A mark of a good recipe is if I will make it again.  This salad hits the mark.  In fact I've already made it once since Christmas Eve.  I'm sad to say Grandma didn't get to taste the dressing to give her seal of approval because she came down with a bad cold the morning of Christmas Eve.  But luckily she will get to taste it next year since I have officially decided this salad is "the one."

This one's for you Gram!


Blue Cheese Wedge Salad
adapted from foodiekitchen.com

Serves 4-6

Ingredients

Dressing:
7 ounces crumbled blue cheese
2/3 cup mayonnaise
1/3 cup buttermilk, well shaken
1/4 cup red wine vinegar
3 tablespoons sour cream
2 tablespoons oil
1 1/2 tablespoons sugar
1/2 teaspoon minced garlic
1/4 teaspoon freshly ground black pepper

Salad:
1 large head of iceberg lettuce, with core removed, washed and chilled
6 ounces crumbled blue cheese
3 diced seeded plum tomatoes
6 green onions thinly sliced, white and green parts

Place all the dressing ingredients in a food processor and process until you reached the desired consistency.  Process longer if you want a smoother dressing.  I left mine with a little bits of blue cheese in it.  Refrigerate for 24 hours or up to 3 days.

To prepare the salad, cut the head of lettuce in half.  Cut each half in 3 wedges, or 2 if the head is small.  Place the wedges on chilled salad plates.  Spoon about 1/3 cup of the dressing over each wedge allowing the dressing to run over the sides.

Sprinkle each wedge with tomatoes, green onions and crumbled blue cheese, divided equally among each salad.  Finish with a crack or two of freshly ground black pepper. Serve chilled.

Optional: Brown 1/3 pound of bacon until crisp in a frying pan, on a baking sheet in the oven or in the microwave.  Crumble bacon into small bits and sprinkle over each wedge.

Tuesday, December 27, 2011

Beef Brisket with Pomegranate Sauce


I'm not a vegetarian.  Duh, there's a big hunk of meat pictured above.  But I don't cook meat all that often, especially large cuts.  I took a quick look at my blog stats and only 5% of my posts contain beef or pork and another 5% are devoted to chicken.  The stats are also pretty low for seafood.

I think a New Year's resolution is going to be devoting a little more time to protein based posts.  I normally don't buy into the whole New Year's resolution thing, but I really do have a lot things I want to accomplish in 2012 and maybe if I put some of these goals in black and white, I will be less prone to procrastination.  Okay, probably easier said than done.  Who are we kidding that I can change a lifetime of procrastination with the mere statement of a resolution.  But I can dream, right?

The weekend before Christmas Hubby and I had 2 couples over to enjoy a meal and help us decorate our Christmas tree.  We had a great time and ended up with a beautifully decorated Christmas tree. 

But I have to be honest, I have a love/hate relationship with entertaining.  Which, in part, ties back to my procrastination tendencies.  I love having people over.  I love cooking and baking.  I love putting all the little touches on everything from the food to lighting strategically placed candles and tea lights and picking out place mats.  But I tend to completely stress myself out during the process.  Especially the closer the clock gets to my guests arrival time.  I try, try, try to plan ahead (as much as my procrastinating self will let me) and make lists and start preparing really early in the morning.  Inevitably I always feel rushed in the final hour, and have moments of panic when I think, it won't all get done.   No matter if I start at the crack of dawn, or give myself a few extra hours of sleep, I always end up in the same rushed state...every time.  And every time, some how, some way, it does all get done.

One would think this beef brisket cooked in a crock pot would be the perfect dish to ease my stress.  That might be the case if I started cooking it the day prior to the event.  Instead, I went shopping for a 5 pound slab of brisket the morning of.  Store number 1 had a brisket...one.  It was 13 pounds (and they would not sell it in smaller portions).  No good.  We called ahead to store number 2 (while standing in the aisle of store number 1) and were told, yes of course, we can order you a 5 pound brisket and it will be here by Tuesday!  Um, thanks, but no.  We just headed to store number 3 with a prayer and a list of other items we needed to pick up.  The entertaining God's were with us because Costco came through and sold brisket in 5 pound increments!  Score!

This recipe really is easy.  I would recommend an anti-procrastination approach and cooking it overnight the night before you want to serve it.  Then you can pull out the meat and refrigerate it.  What is so great about refrigerating it is you can slice the chilled meat into nice neat slices (instead of the brisket falling apart into shreds of beef), a tip I picked up from In Erika's Kitchen where I found this tasty recipe.  Then you can warm the meat up back in the crock pot a couple of hours before you serve your dinner. 

The pomegranate sauce makes this brisket really special.  It is a rich, onion-y, slightly sweet sauce with a wonderful depth of flavor from the pomegranate juice and dried cranberries.  It's pretty darn delicious.  It looks like a thick brown gravy, but the cool part is it is not a traditional gravy requiring butter and flour to thicken it.  You simply puree the juice and cooked down onions and dried cranberries and reduce it in a saucepan to the desired flavor and thickness.

We served the beef brisket with roasted sweet potatoes with red onions and a wonderful salad our friend Sharon brought with granny smith apples, dried cranberries, green onions, sunflower seeds and feta cheese tossed in balsamic vinaigrette.   A recipe I've already tucked away for future use.

Beef brisket with pomegranate sauce would be great dish to make for the final night of Hanukkah.  Happy 8th night of Hanukkah!  It would also be nice for a New Year's Eve meal.  Or you could make this for New Year's Day football watching or Super Bowl and serve the meat shredded with the sauce on King's Hawaiian Rolls for a brisket slider.  

Enjoy! 

And here's to anti-procrastination in 2012!


Beef Brisket with Pomegranate Sauce
from In Erika's Kitchen

1 quart pure pomegranate juice
1 5 pound flat cut brisket, cut in half (to fit in crock pot)
1 teaspoon salt
1 tablespoon olive oil
3 red onions chopped
2 beef bouillon cubes
2 tablespoons tomato paste
1 teaspoon ground cumin
1/4 cup brown sugar
1 cup dried cranberries or dried cherries

Bring pomegranate to a boil in a medium saucepan and cook until reduced by about 1/3.

Meanwhile, begin preparing brisket.  If you wish trim off some of the fat, now would be time.  Be sure to leave some of the fat on as this gives the brisket flavor and helps to keep it moist.  Sprinkle salt on both sides of brisket and brown in a hot skillet on both sides until seared.  Transfer the brisket to your slow cooker (fat side up).  Add oil and onions to the same skillet and cook about 5 minutes until the onions started to brown a bit, about 5 minutes.  Place onions in the slow cooker on top of the brisket.

Add the beef bouillon, tomato paste, cumin, brown sugar and cherries to the reduced pomegranate sauce and stir.  Pour sauce mixture over the onions and brisket.  Turn your slow cooker to low and cook for 8 hours until brisket is tender. 

Remove meat and set aside on a plate or cutting board.  Transfer liquid and onions to medium sauce pan and puree using an immersion blender (or transfer to a standard blender) until smooth.  Cook until sauce reduces by about 1/4 to further intensify the flavors.  Check the season and add salt if needed. 

Slice or shred brisket and pour sauce over the top.  Note to get nice clean slices of brisket you can refrigerate the meat and then slice and reheat with sauce in the slow cooker.

Wednesday, October 12, 2011

Filet of Beef with Horseradish Sauce


Can you say ultimate leftovers?  This sandwich was made from left over filet of beef tenderloin with creamy horseradish sauce that Hubby and I made for our Mystery Dinner this past weekend.  Mystery Dinner is our fun new monthly activity that Hubs and I came up with as way to try new dishes at home and work together in the kitchen with a glass of wine in hand.  This month's dinner started with this 44-clove garlic soup and ended with creme brulee (to be posted on Friday).

And in between, our eyes rolled in the back our heads and closed, along with some grunting noises and murmurs like, "Mmmm", "Wow!", "Oh my God!," as we ate this filet of beef.  It was AMAZING.  It was melt in your mouth delicious. By far, the best beef we've ever made at home.  Tender, juicy, flavorful.   Heavenly, really.  I don't know if this was the wine talking, but I couldn't have been more happy with how this turned out.  And the horseradish sauce was a nice cool, creamy and spicy accompaniment.  Horseradish and beef are destined for each other. 


This was so easy to make and the ingredients couldn't be more simple.  Filet of beef, butter, salt and pepper.  That's it!  Seriously.  Goes to show you that delicious meals don't have to be complicated.

This recipe comes from Ina Garten's Barefoot Contessa Parties cookbook.  Her original recipe calls for a 4 to 5 pound tenderloin but since it was just the two of us, we purchased the smallest one behind the butcher's counter at 2 pounds.  We halved the rest of the ingredients and kept the cooking time and temperature the same.  From what I understand, tenderloins are typically the same width and a larger filet is just longer and not thicker, so I didn't adjust the time in the oven.  The tenderloin goes onto a baking sheet in a 500 degree oven for exactly 22 minutes for rare and 25 minutes for medium rare.  We went with 22 minutes and it was perfect!  I recommend using an oven thermometer to verify your oven is up to temperature. 

I will say that filet of beef is not something that we buy every day.  In fact we have never bought a whole tenderloin before.  I've always wanted to make a tenderloin though, and Mystery Dinner was the perfect opportunity.  We went to our favorite butcher where we know they have the freshest, highest quality products and we forked over the credit card.  It better be high quality at $27.99 a pound!  But the splurge was worth every penny.  So incredible!  Did I mention how amazing this was? 

This would make a great special occasion dinner, like New Years Eve, Valentines Day or why not Columbus Day?  Treat yourself!

I wish I had snapped a photo of this gorgeous tenderloin the night we made it, but I have decided that I really can't stop and do a mini photo shoot in the middle of our Myster Dinner preparation.  Plus the lighting is no good at night.  But trust me when I say it was beautiful!

We got 3 meals out of the filet of beef (1 dinner and 2 lunches) which makes the price a little easier to handle.  We used  homemade dinner rolls slathered with plenty of horseradish sauce and stacked with beef for these tasty little sandwiches.  If only all leftovers were this good. 

If you are beef lover and have never tried to make a filet of beef tenderloin at home, you have to try it.  It really couldn't be easier! 


Filet of Beef
adapted from Ina Garten's Barefoot Contessa Parties

Serves 4

1 whole filet of beef (tenderloin), about 2 pounds, fat trimmed away and tied (your butcher will do this for you at no charge if you ask)
1 tablespoon butter, softened
1/2 tablespoon kosher salt
1/2 tablespoon fresh ground black pepper

Preheat oven to 500 degree F.  Line a baking sheet with foil.  Pat the filet dry with a paper towel.  Rub the beef with butter and sprinkle with salt and pepper on all sides.  Bake for exactly 22 minutes for rare or 25 minutes for medium rare.  Remove from oven and transfer beef to a cutting board and cover tightly with foil.  Allow it to rest 15-20 minutes at room temperature.  Remove strings and slice in thick slices, 1/2 - 1 inch thick.  Serve with horseradish sauce (recipe below).

Horseradish Sauce
adapted from Food.com

1/2 cup sour cream
1/8 cup mayonnaise
2 tablespoons prepared horseradish (more if you like it spicy)
1 tablespoon dijon mustard
2 teaspoons finely chopped fresh parsley

Combine all ingredients in a small bowl.  Cover and refrigerate for at least 30 minutes or until ready to use. 

Sunday, October 2, 2011

Baked Eggplant Parmesan


I have made some feeble attempts to cook with eggplant in the past.  This is my very first post with eggplant in it, which means my first successful eggplant dish.  Those folks over at Cook's Illustrated really know what they are doing.  They spend hours testing recipes up one side and down the other, figuring out the best way to get the most desirable outcome.  What I was missing from my previous eggplant attempts was salting the cut eggplant and allowing it to sit to remove excess liquid (apparently a basic step in preparing eggplant that I was not aware of).  This recipe also has a wonderful method for getting a nice crisp bread eggplant round without frying.


This recipe is no 30 minute meal so allow plenty of time to prepare it.  I made it on a leisurely Sunday afternoon so I wouldn't feel rushed. 

The recipe starts by cutting the eggplant into 1/4 inch rounds and coating them generously with salt.  They go into a colander over a bowl and sit to allow liquid to drain.  This process takes up to 45 minutes.  I used this time to make the sauce (the recipe recommends making the sauce while the eggplant bakes).  Once the eggplant releases about 2 tablespoons of liquid they get transferred to a triple layer of paper towels to further remove excess liquid.  Then the eggplant gets dredged in flour, egg and a breadcrumb mixture.  Instead of frying the eggplant to get a nice crispy coating, they go onto a baking sheet preheated to 425 degrees and lightly coated with olive oil.  The rounds go into the oven and with a little rotating and flipping, come out beautifully browned and crisp. 


I did a little tweaking with the sauce...I followed the directions as noted below but found it to be a bit acidic.  I added a bit of sugar and a bit of heavy cream to reduce the acid.  I also found the red pepper flakes to be too much heat for my taste and would cut the amount in half next time.  Though the sauce was tasty, I will play around with it a little more next time I make this.

The last step is to layer the crispy eggplant rounds with sauce and mozzarella cheese in a baking dish and go back into the oven to melt the cheese. 

The result?  Hubby and I both loved it.  It's warm.  It's hearty.  And most importantly, it's delicious!  Eggplant has a very mild flavor that pairs perfectly with marinara sauce and melted cheese.  If you have not tried eggplant, I urge you to give it shot.  It's good stuff!


Another approach would be to plate the crispy eggplant in individual servings, top with sauce and cheese and put it under the broiler for a few minutes until the cheese turns golden brown. 

This will be repeat dish in our house. And now that I know Hubs likes eggplant, a whole new avenue of recipes has opened up!

Enjoy!


Baked Eggplant Parmesan
from Cook's Illustrated from the New Best Recipe via Smells Like Home (via Ezra Pound Cake)

Ingredients

Eggplant:
2 medium eggplant (about 2 pounds), cut into 1/4 thick rounds
1 tablespoon kosher salt
4 cups breadcrumbs (I used 3 cups of panko crumbs and 1 cup of Italian Seasoned breadcrumbs)
1 cup finely grated Parmesan cheese (about 2 ounces)
Salt and freshly ground black pepper
1 cup all purpose flour
4 large eggs
6 tablespoons vegetable oil

Tomato Sauce:
2 cans diced or pureed or crushed tomatoes (14 1/2 ounces each) - I used diced
2 tablespoons extra virgin olive oil
4 medium garlic cloves minced (about 1 tablespoon)
1/4 teaspoon red pepper flakes
1/2 cup coarsely chopped fresh basil leaves
Salt and freshly ground black pepper

For baking:
8 ounces grated mozzarella (about 2 cups)
1/2 cup finely grated Parmesan cheese (about 1 ounce)
10 fresh basil leaves for garnish

Make the eggplant:
1.  Toss half of the cut eggplant rounds in a large bowl with 1 1/2 teaspoons of kosher salt.  Transfer the salt eggplant to a colander that is set over a a bowl.  Repeat with the remaining eggplant and salt.  Let the eggplant stand in the colander for 30 to 45 minutes or until the eggplant releases about 2 tablespoons of liquid.  Place the eggplant rounds on a triple layer of paper
towels.  Place another triple layer of paper towels over the eggplant and firmly press each slice to remove as much liquid as possible.  Wipe off excess salt.
2.  About 20 - 30 minutes into the eggplant draining adjust your oven racks placing one in the upper third and one in the lower third of the oven.  Place 1 large rimmed baking sheet on each rack and then heat oven to 425 degrees F.
3.  In pie plate or large shallow dish, combine breadcrumbs, Parmesan cheese and salt and pepper to taste.
4. Set aside a large baking sheet and place a wire rack over the top.  Combine the flour and 1 teaspoon black pepper in a large zip top bag and shake to combine.  In a second pie plate or large shallow dish, beat egg.  Place 8 to 10 eggplant rounds in the bag and and shake to coat.  Dredge each round in the eggs, evenly coating both sides.  Then coat the round in the breadcrumb mixture, evenly coating both sides.  Place each coated eggplant round on the wire rack and repeat with remaining rounds until they are all breaded.
5. Remove one of the preheated baking sheets from the oven and add three tablespoons of olive oil to the sheet, tilting to evenly coat the sheet with oil.  Place half of the breaded eggplant rounds onto the sheet in a single layer and set aside.  Repeat process with the second baking sheet and remaining eggplant rounds.  Return both sheets to the oven.  Bake until the eggplant is browned and crisp about 30 minutes, switching and rotating the baking sheets after 10 minutes and flipping the eggplant slices with a spatula after 20 minutes.  Do not turn oven off.

Make the sauce (I made my sauce while my eggplant was draining):
1. While the eggplant bakes, puree 2 cans of diced tomatoes in a food processor or blender until almost smooth.  If you are using pureed or crushed tomatoes, skip this step.
2.  Heat olive oil, garlic and red pepper flakes in a large heavy-bottomed saucepan over medium-high heat, stirring periodically until garlic is lightly browned (about 3 minutes).  Stir in processed tomatoes and bring sauce to a boil.  Reduce heat to medium-low and simmer until reduced and slightly thickened, about 15 minutes.  Stir in the basil and season with salt and pepper to taste.

Assemble:
1. Spread 1 cup of tomato sauce in the bottom of a 13x9 inch baking dish.  Layer in half of the eggplant slices, overlapping to fit.  Spread 1 cup of sauce over the eggplant and sprinkle half the mozzarella on top.  Layer the remaining eggplant and dot with 1 cup of sauce, leaving much of it exposed so it will remain crisp.  Sprinkle with remaining mozzarella cheese and Parmesan cheese.
2. Bake until bubbling and cheese is lightly browned, about 13 to 15 minutes.  Cool for 10 minutes and scatter basil leaves over the top. 

Friday, September 23, 2011

Chicken Piccata


It's been a busy week at work.  I rarely mention work on the blog, mostly because I when I blog I get to immerse myself in a different world that has nothing to do with work.   Like I can pretend that I don't really have a full time job in corporate America.  Don't get me wrong, I really like my job and adore the people I work with (and yes, my boss reads this blog...hi Amy).  But it's nice to get away to blog land several nights a week and think about all mouth watering sweet treats and savory eats that can be made.  Unfortunately this week has cut into my precious blog time and I'm a little behind with a backlog of 6 posts sitting in my drafts folder.  I also didn't get to spend as much time in the kitchen as I would have liked.  Something I plan to rectify on Saturday. 

Now, let's get on with the important business.  Chicken piccata.

Hubby LOVES chicken piccata.  He has a handful of dishes that he gravitates to and this is one of them.  I'm not sure why I've never tried to make it at home before.  But I'm glad I finally did.   A little wine, a little lemon juice and zest and a few capers and you have a delicious chicken dish. 


You start by pounding out chicken breasts out thin or about 1/4 inch thick all around (see instructions below on how to pound out the chicken).  Pounding out the chicken breasts allows them to cook evenly and quickly.  Lightly season the chicken and coat it in flour.  Be sure to season the chicken before you flour it.  I like to cook mine in a non stick stainless steel skillet (like All-Clad) because all the good bits of chicken that brown and stick to the pan get released when you pour in the wine and other sauce components.  More browned bits equals more yummy flavor. 

I served the chicken over mashed potatoes but next time I would use angel hair pasta.  I thought the wonderful lemony wine sauce got a little lost in the mashed potatoes.  The chicken would also be good with rice.  And I might also double the sauce component next time because the sauce was really delicious and I wanted more, more, more.  I'm kind of a sauce girl.

This recipe is a keeper!

Chicken Piccata
adapted from Eat Yourself Skinny

Serves 2-4
Ingredients:

1 pound chicken breasts, pounded out thin (see below for instructions)
1/3 cup plus 1 tablespoon all purpose flour
Salt and Pepper to taste
2 tablespoons of canola oil
2 tablespoons capers, rinsed
2 medium cloves of garlic, minced
1 cup low sodium chicken broth
1/2 cup dry white wine (I used 3/4 cup)
4 two inch wide strips of lemon zest (see below for instructions)
4 teaspoons lemon juice (I used 2 teaspoons)
1 tablespoon chilled butter

Getting Ready:

Pound out chicken:
Place a long piece of plastic wrap on a cutting board and place your chicken breast face down.  Plastic wrap should be long enough to fold in half and cover the chicken breast.  Using the smooth side of a meat mallet or a small heavy bottomed pan, slowly pound chicken starting in the center and working your way out.  You want to get an even thickness across the entire piece of chicken, just under 1/2 thick.  I like to cut my pounded out chicken into 2-3 pieces.  Repeat process with remaining chicken.

Zest lemon:
Use a sharp vegetable peeler to remove a wide strip of the outer skin of the lemon, being careful only remove the yellow part of the skin and not white part, which is bitter.

Prepare remaining ingredients for the sauce:
Squeeze lemon juice, rinse the capers, mince the garlic, measure the chicken broth and wine and measure out 1 tablespoon of flour and 1 tablespoon of chilled butter.

Start Cooking:

Make the Chicken:
Season chicken cutlets with salt and pepper.  Place 1/4 cup of flour in a shallow dish (large enough to hold a chicken cutlet).  Dredge chicken cutlets in the flour and shake off any excess.  Meanwhile, heat the oil in a large skillet over medium-high heat.  Place floured chicken in the heated oil and cook for about 3-4 minutes on one side and turn chicken and continue cooking for an additional 1-2 minutes, until just cooked through.  Remove chicken to a plate and cover the plate loosely with foil to keep warm. 

Make the Sauce:
Once chicken is removed from the pan, add the capers and minced garlic to the oil left in the skillet and heat to medium.  Cook for about 30 seconds being careful not to burn the garlic.  Stir in the remaining tablespoon of flour.   Whisk in broth, wine and lemon zest strips.  Be sure to scrape all the browned bits off the bottom of the pan for additional flavor.  Bring sauce to a simmer and cook for 10-15 until slighly thickened and reduced to approximately 1/2 cup.

Bring it all together:
Turn off the heat and remove strips of lemon zest.  Stir in lemon juice and 1 tablespoon of butter until fully incorporated.  Return the chicken cutlets to the pan with the sauce, including an juices from the chicken. Heat through for 30 seconds to a minute.

Serve:
Serve your chicken cutlets and sauce over mashed potatoes or angel hair pasta.