Showing posts with label Holiday. Show all posts

Monday, November 26, 2012

Cranberry Orange Preserves


Thanksgiving went by way too fast....Hubby and I arrived at Grandma's house on Tuesday night, with our cat Oliver in tow, ready to get up first thing on Wednesday morning for a full day of preparation to begin.  My cousin was also there to help so it was all hands on deck.  We...
  • made 6 pies--1 apple, 1 pecan and 4 pumpkin
  • made 3 salads--blueberry jello salad, 7 layer salad and prepped fruit salad with whipped cream and marshmallows to be put together the next day
  • made the base and topping for sweet potato casserole and traditional sweet potatoes with marshmallows, also ready for assembly the next day
  • peeled potatoes for mashed potatoes (and vacuum sealed them in a little water so they would be ready to go the next day--I love the idea of vacuum sealing them so you can avoid all that potato prep on Thanksgiving day when you are busy with a 1000 other things)
  • made 2 big pans of cinnamon rolls to be baked early Thanksgiving morning (looks like this one might be a new tradition)


Grandma had also done some serious prep before we got there...she made all the pie crusts and froze them (including making crust for turkey pot pies to be made from leftovers) and chopping all the veggies for the stuffing and the relish/veggie tray.  Not to mention all the shopping of course.  Grandma's been hosting Thanksgiving for a while now and has it all down to a science.  She makes it look so easy to pull together all these dishes, along with a traditional turkey (and a ham), for 20 people all by 1pm!  We eat early which means we have room for "second dinner" in the early evening where everyone is already anxious to break out the leftovers.  Yum.   

One of the treats that graced the Thanksgiving table this year were these cranberry orange preserves.  It was my first time working with fresh cranberries and I wasn't sure how the preserves would come out.  I'm happy to say my fears were unfounded and it was a big hit at the Thanksgiving table.  Even my 10 year old nephew couldn't stop talking about how much he liked the preserves.  It was really a nice accompaniment to the turkey and has officially turned me into a cranberry believer.  I gave away 6 of 7 jars to family members (had to keep one for myself so I could share it with you all!).


The inspiration for these preserves was Hima's Can It Up project over at All Four Burners.  Each month Hima announces an ingredient and all who are interested make a recipe featuring that ingredient that can be water bath canned.  Without Hima's pick of cranberries for November, I'm not so sure I would have taken the cranberry plunge.  Cranberries in the raw are extremely tart and somewhat bitter so I've always been hesitant to use them.  But I'm so glad I looked past that.  A little sugar (okay, a lot of sugar) and some other fruit transform these tart rubies into something really special.  So if you have a cranberry phobia, I encourage you to give these little beauties a try.  It would make a nice addition to your Christmas menu. 

I have a sneaking feeling these preserves will become another new Thanksgiving tradition right alongside those cinnamon rolls.

Enjoy!

Cranberry Orange Preserves
from The Ginger Snap Girl

6 cups whole fresh cranberries
4 cups apples, peeled and cut into 1/2 inch pieces (I used honeycrisp, but you could use any combination)
2/3 cup fresh squeezed orange juice
2/3 cup water
4 1/2 cups sugar
2 tablespoons fresh lemon juice
Zest of 2 oranges (about 1 packed full tablespoon)

Add all ingredients to a large pot and cook on medium, stirring frequently, until the mixture simmers.  Turn the heat to medium low and continue cooking until fruit is very soft and slightly thickened (this took about 20-30 minutes for me).  I like my preserves to have a smooth texture, so I used an immersion blender to puree the mixture prior to canning.  To check if your preserves have reached the right consistency, spoon a dollop onto a small plate and place the plate in the freezer for a couple of minutes.  Remove the plate from the freezer and turn it on its side.  If the preserves slide right down and look runny, you probably want to continue cooking.  If they hold their shape and only slide a little, you're good to go. 

To can your preserves, prepare jars, lids and rings by washing them with hot soapy water and rinse thoroughly.  Once you start cooking your preserves, fill a pot with enough water to fully submerge all the jars and turn heat to high (note I use the same pot for preheating the jars as I do for the actual water bath).  Heating the jars allows you to ladle in the hot preserves without cracking the jars.  In small pan also heat your lids.  Have a clean ladle and tongs ready.  Once your preserves are done cooking, remove a jar from the hot water with your tongs and drain excess water.  Hold the jar with a kitchen towel while you ladle in the preserves.  Fill jars leaving a 1/4 inch of head space.  Use your tongs to carefully lift a lid out of the hot water and place it on top of the jar.  Screw on the outer ring until firmly snug, but not too tight.  Set aside on a clean kitchen towel and repeat the process, filling all your jars.  Bring your canning pot of water up to a boil and submerge each jar in the water using tongs.  Make sure jars are covered by at least 2 inches of water.  Boil for 10 minutes.  Remove jars from water and set on a kitchen towel to rest, undisturbed for 24 hours. 

Makes 7 half pint jars

Monday, November 12, 2012

Turkey and Sweet Potato Shepherd's Pie


So the dieting isn't going so well.  Remember my simple calorie counting strategy?  Apparently it would actually help if I was actually counting (and logging) my calories.  Like everyday.  Turns out estimating calories in my head is probably not very accurate.  Since October 1st I've lost 3 pounds and gained back 2.  Not quite the results I hoped for.  Time to refocus. 

I'll be getting some healthy inspiration from my best friend Crystal's new blog, Both HalvesCrystal and I go way back.  We have been BFF's since our sophomore year in high school.  Back in the day we both used massive quantities of hairspray and may have been known to coordinate outfits on occasion.  Though we've pretty much abandoned hairspray and no longer wear matching outfits, we do have a common love of food, and more specifically, baking.

Crystal has been baking and blogging with me for the past year and half with Club:Baked.  She recently gave her blog a complete makeover and really focused her point of view.  Both Halves is about embracing and balancing a love of traditional desserts with a love of healthy clean eating.  The mast head on her blog says it all...3 beautifully stacked blocks of butter on the left and a bundle of fresh mint on the right.  She's posting raw (vegan) desserts that definitely intrigue me (an area I have a lot to learn in).  Like this totally unbaked Raspberry Ganache Fudge Cake.  Hello chocolate.  Desserts aren't the only thing on the blog menu.  I also have my eye on this healthy Italian Rabe recipe and I'm looking forward to more inspiration from my girl! 


Believe it or not today's recipe is pretty healthy, despite the fact it comes from Paula Deen (no offense Paula).  It's a Thanksgiving take on Shepherd's Pie.  The bottom layer is ground turkey, carrots, parsnips, celery and onion surrounded by a sauce of chicken stock, tomato paste and a bit of flour to thicken it.  The top is a light fluffy sweet potato mash.  It's a nice pre-cursor for the flavors to come in just a week and half when Thanksgiving arrives.  Which I can't wait for by the way.


This dish can be made ahead and baked when you are ready to eat.  It serves 8 so there are plenty for leftovers for us.

Enjoy!

Turkey and Sweet Potato Shepherd's Pie
adapted from Paula Deen

Serves 8

3 tablespoons butter
1 tablespoon olive oil
2 1/2 pounds of sweet potatoes, peeled and cubed (1-1 1/2 inches)
Salt
2 large carrots, peeled and diced
2 stalks of celery, diced
1 parsnip, peeled and diced
1 large onion, diced
2 tablespoons of freshly chopped thyme
2 tablespoons of freshly chopped rosemary
1 pound of ground turkey (Paula uses 2 lbs)
1/4 cup tomato paste
2 tablespoons Worcestershire sauce
2 tablespoons of flour
2 cups low sodium chicken broth
4 ounces of softened cream cheese
1 egg, lightly beaten
1 10 ounce bag of frozen peas

Preheat oven to 375 degrees F.  Spray a 9x13 baking dish with cooking spray.

Place cut sweet potatoes in a medium sauce pan and cover with cold water and add salt to taste.  Bring to a boil and reduce to simmer for 15-20 minutes or until potatoes are tender.

Heat a large skillet over medium heat and add 1 tablespoon of butter and olive oil.  Add carrots, celery, parsnips and onions and cook for about 8 minutes or until vegetables are tender.  Season with salt and pepper.  Add ground turkey and cook until lightly browned and cooked through.  Season generously with salt and pepper.  Stir in tomato paste, Worcestershire sauce, flour and chicken broth and cook for 5 minutes or until sauce thickens.  Add frozen peas and stir.

Meanwhile, drain the water from the potatoes and add to a large bowl.  Add in cream cheese and remaining 2 tablespoons of butter and use a hand mixer to turn the sweet potatoes into a mash.  Add some of the hot potato mixture into the eggs, to temper the eggs so the hot mixture doesn't scramble them.  Season with salt and pepper.

Place meat mixture in the bottom of your prepared baking dish.  Evenly spread sweet potatoes over the meat mixture.  Place the dish on a baking sheet and bake for 35-45 minutes or until shepherds pie is bubbling and top is lightly golden.


Saturday, December 24, 2011

Holiday Traditions New and Old

Merry Christmas Eve everyone!  Happy 5th night of Hanukkah!


The holidays are one my favorite times of year.  Mostly because it's okay to make and eat ridiculous amounts of cookies, treats and favorite holiday foods.  Hubby and I aren't particularly religious, but we do enjoy some of the traditions of both Christmas and Hanukkah and we've made some of our own traditions.

Note I cheated in this photo placing all the candles in the Menorah even though it's only night 5

Every year on one of the eight nights of Hanukkah we celebrate the miracle of lights by eating an entire meal comprised of homemade potato latkes.  This year Hanukkah and Christmas overlap so we have to be strategic about when we will indulge in this delicious meal.  I think it will be on Monday, the 7th night of Hanukkah this year.  Here's a peek at our latke feast from last year.  The photos are not the greatest, but this recipe is amazingly delicious.  It has a squeeze of lemon juice in it (to prevent the potatoes from turning brown I believe), but the tang from the lemon is what makes these little fried bits of goodness so delicious!


Last year I also made some Hanukkah sweets....cake truffles to be exact.  They are by no means a traditional holiday treat, but they are decadent little goodies that are fun to make and decorate and definitely bring home the spirit of Hanukkah.  You can use any type of cake and coating that suit your taste.  If you have not made cake truffles (or cake pops) yet I highly recommend them!


Also last year, I made Christmas red velvet and devil's food cake truffles.  They were a big hit and made it into this year's baking rotation.  Given the reviews, I think these will now officially be a staple in my cookie gift boxes.  Though technically not a cookie!  Don't hold it against me.  I have to give the people what they want.


The majority of holiday time in the kitchen is spent baking oodles and oodles of cookies.  I love cookies for a few reasons.

A. Cookies are delicious.
B. Cookies are fun.
C. Cookies have endless varieties, shapes, sizes and flavors to experiment with.
D. Cookies are portable.
C. Everyone loves cookies! 

If you don't love cookies, you might be an alien from another planet.  You might want to get that checked out.

I thought I would share a roundup of this year's cookie palooza as well as share some old favorites. 
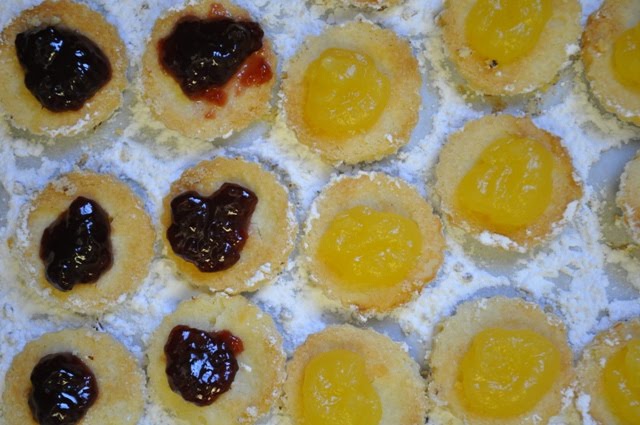
The most requested and commented on cookies are my two holiday staple cookies, Ginger Snaps and Raspberry and Lemon Linzers.  In fact I can't recall a year where I didn't make these two types of cookies.  I don't want a revolt on my hands. 


And each year I like to try a few new varieties.  When I was at my Grandma's house earlier this year I spent some time going through her recipe cards.  I found a few old recipes that I remember having as kid. 

One was a recipe my Mom would make called Jam Tarts.  They are tender crescents of cream cheese based dough filled with boysenberry jam and dusted in powdered sugar.  Recipe coming soon!


I also decided to try a new version of the tarts and filled some crescents with Nutella, coated with pearl sugar and drizzled with chocolate. 


The other family recipe I tried this year is called Mint Sticks, or Mint Brownie Bars.  This festive treat has a brownie based a layer topped with mint frosting and a drizzle of chocolate on top.  Recipe coming soon!


Chocolate Truffle Cookies (pictured below left) have become a new holiday favorite as of last year.  These really are like a truffle in cookie version.  A great choice for chocolate lovers. 

All the goodies get plated to go off to my Aunt's house to celebrate Christmas Eve.  Below is a peek of the cookie plates ready to go for tonight!  And another plate will be put together tomorrow for Christmas Day at my Dad's house.  One can never have too many cookies!


Hope you all have a fabulous holiday filled with good company, good food and tasty cookies of course!

Merry Christmas!
Happy Hanukkah!
Happy Kwanza!


Monday, December 19, 2011

Feliz Navidad Chocolate Cookies


Holiday baking (round 1) got into full swing 2 weekends ago at my house.  I make cookies like mad and Hubby is my kitchen elf/helper.  We put together cookie boxes for co-workers, friends and family.  It's become an annual tradition.  I have a couple of cookies that are a must make every year--Ginger Snaps and Raspberry and Lemon Linzers.   I have some cookies that rotate in and out each year, like Chocolate Chip Candy Cane, Chocolate Truffle Cookies, Cream Wafers and Cake Truffles.  I am always looking for new cookies to add to the rotating roster. 

When I was assigned Eliot's Eats for this month's Secret Recipe Club assignment I immediately went in search of cookies.  Luckily her site features several cookie recipes including an annual 12 days of Christmas.  When I spotted the Feliz Navidad Chocolate Cookies I thought they would be a fun twist on a standard chocolate cookie.  These cookies definitely have a little spicy punch with cinnamon, pepper and cayenne.  The cookies are soft and chewy with a chocolately bite.  I love the dusting of powdered sugar on top.  They made it into round 2 of the holiday cookie boxes. 


Secret Recipe Club is like Secret Santa for blogs.  Each month each participant is assigned another participant's blog....and it's a secret!  You browse the blog you are assigned and then choose something to make and blog it.   It's a great way to discover new blogs.  I enjoyed browsing Eliot's Eats.  It's a great blog focused on local eating, inspired by Barbara Kingsolver's journey with eating locally as documented in her book Animal, Vegetable, Miracle (a great book by the way).  I saw several recipes on Eliot's eats that will be checking back on, including several canning recipes when the spring and summer months are upon us.
 
But for now I just have to gear up for the third and final round of the cookie craziness next weekend.  And squeeze in some last minute shopping.

Are you all ready for the holidays?  

Feliz Navidad Chocolate Cookies
from Eliot's Eats originally adapted from Tim Love

1 cup all purpose flour
1/2 cup plus 1 tablespoon unsweetened cocoa powder
1 1/4 teaspoon cinnamon
1/4 teaspoon baking soda
1/4 teaspoon salt
Pinch of black pepper
1/8 teaspoon cayenne pepper
3 tablespoons butter, room temperature
3 tablespoons shortening
1/2 cup plus 1 tablespoon dark brown sugar
1/2 cup plus 1 tablespoons granulated sugar
1 teaspoon vanilla extract
2 large eggs
1/4 cup powdered sugar for dusting (or more if needed)

Preheat oven to 350 degrees and line 2 baking sheets with parchment paper.  In a medium bowl, whisk flour, cocoa powder, cinnamon, baking soda, salt and pepper and set aside.  In a stand mixer cream butter and shortening on medium speed.  Add in sugars and beat on medium speed until fluffy, about 1 minute.  Turn mixer to low and add in eggs one at a time and vanilla until fully combined.  Add in dry ingredients in batches until incorporated. 

Scoop out 1 to 1 1/2 tablespoon size balls with a spoon or cookie scoop place cookies about 1 inch apart on the parchment lined baking sheet.  Bake for 12 to 14 minutes (my were done at 12) until set.  Allow cookies to cool on baking sheet and transfer to a wire rack to finish cooking.  Dust with powdered sugar.


Sunday, November 27, 2011

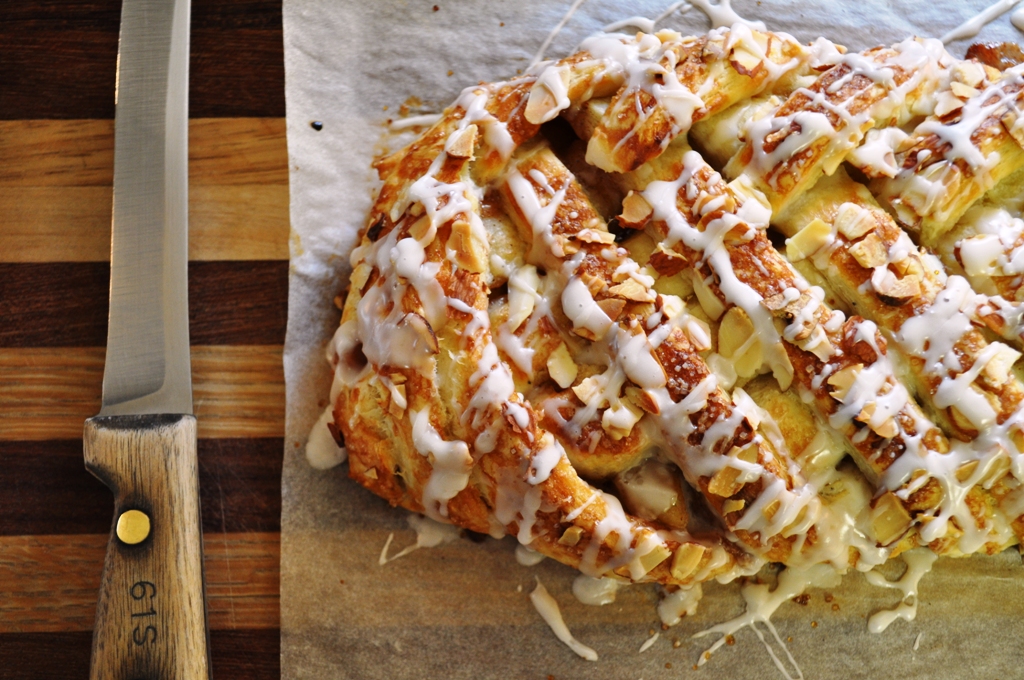
Apple Danish for Thanksgiving


This year we spent Thanksgiving with my Mom's family at my grandparents house in Palm Desert.  This year was extra special because Hubby and I and our newest cat, Oliver, made the hour and 45 minute drive Tuesday evening before Thanksgiving.  We went out early to help Grandma Jane cook and prep for the big day.

Yes, you read right, we took our cat.  I know, it's a little odd.  Oliver joined our family as a 4 month old kitten back in June.  He is a sweetheart, but he cannot be trusted to stay at home with the two big girl kitties.  He has an affinity for eating toilet paper, digging in trashcans and being a little too inquisitive.  Plus he has about 50 times the energy as the big girls and sadly they have zero interest in playing with the little guy.  This was actually Oliver's second trip to grandma's house (the first was in August--see photo below).  He doesn't love the car ride, usually spending the first half of the drive meowing his little head off, but once he's there he is a happy camper.  He purrs nonstop at grandma's and like everyone else, loves being there.

Hubby and Oliver on his first trip to Grandma's house in Aug 2011
(we drove at night for this most recent trip so we didn't get any photos)


Grandma has been doing our families Thanksgiving for my entire life.  My mom and aunt and I joked that none of us knows how to cook a turkey because Grandma always does it.  She puts on quite a spread and thinks of all her guests favorite dishes (even Oliver got a turkey day treat--a small rawhide stick wrapped with dried chicken--which he absolutely loved).  The big meal contains many dishes that grace most Thanksgiving tables, like turkey and stuffing (with an extra crispy crust on top), mashed potatoes and gravy, ham, sweet potatoes with toasted marshmallows, corn, cranberry and dinner rolls.  She also includes some other special dishes that aren't as traditional, like 7 layer salad (my personal favorite), blueberry pecan salad (my mom's favorite), ambrosia (my cousins favorite) and sweet potato casserole with crusted pecan topping (almost every one's favorite).  It's a feast of major proportions and I always look forward to digging in.  Grandma serves Thanksgiving dinner around noon.  Originally she did it early to accommodate the families that had to go two Thanksgivings in one day.  But no one has to tackle two meals in one day anymore.  So we do two at Grandma's.  The big feast at noon and what I like to call second dinner around 6 pm. I look forward to second dinner just as much as the main event.

There is never a shortage of sweets at Grandma's.  Every year she makes 3 kinds of pies...pumpkin, pecan and apple.  This year she let me make the apple pie using a favorite family recipe from my Dad's family.  I had a blast spending the day with Grandma in the kitchen prepping and baking.  She even helped me crimp my pie crust edges, a skill I am still working to master! 


Grandma also helped me develop the recipe for this apple danish filling.  I brought the leftover dough from my recent danish pastry making adventure.  We whipped up an apple pie like filling to fill the danish on Thanksgiving morning.  Between the two of us, I think we came up with a pretty awesome filling that is most definitely going on the recipe keeper list. 


The filling is sweet and tart, using 2 types of apples.  You can change up the apple mix to suit your tastes.  The danish is sweet with the icing on top so if you prefer a more tart filling, you can use all granny smith's.  A little cornstarch helps the filling thicken.  I recommend making it a day or two before you plan to bake the danish (you can also make the pastry dough ahead).  It sets up even more after chilling in the fridge.  This filling could be used with other dessert options, like an apple turnover using store bought puff pastry, it could be used to fill a crepe, top a cheesecake, or fill a tart shell.  This sweet breakfast treat is best served warm from the oven.


The apple danish was a big hit with my family.  I kept hearing, "Wow, you made this?"  Which makes me blush a little.  I am happy to report there wasn't a speck left over. 
 
Hope you all had a nice Thanksgiving and are gearing up for the holiday fun in December!

For the danish pastry recipe, including some step by step photos, click here.

Apple Danish Filling

Yields about 2 cups
Ingredients:

3 apples (I used 1 granny smith and 2 rome apples), peeled, cored and sliced in 1/2 inch wide by 1 inch tall chunks
1/2 cup granulated sugar
1 tablespoon cornstarch
pinch of salt
1 teaspoon cinnamon
1/8 teaspoon nutmeg
1/2 cup unsalted butter (1 stick), sliced in 1/2 pieces

Directions:

In a small bowl combine sugar, cornstarch, salt, cinnamon and nutmeg until thoroughly mixed.  Heat a medium sized skillet over medium heat and add butter.  Once butter is melted add the apples and sugar mixture. Bring mixture to a simmer and stir occasionally and cook for about 15 minutes or until apples are just tender but not mushy and the sauce is slightly thickened.   Allow mixture to fully cool before filling the danish pastry.  The filling can be made up to three days ahead.  Store in an airtight container in the refrigerator until ready to use.

Monday, November 14, 2011

Buckeyes


I totally cheated.  I not only made buckeyes back in September, I posted them.  I wasn't supposed to do that since Club: Baked was making them this week.  I know I'm bad.  But I'm going to pull the "Mom" card here.  I went in search of chocolate treats to make my Mom for her birthday and I choose two from Baked Explorations.  Marshmallow chocolate cups and buckeyes.  They made a great birthday gift and I couldn't resist posting them a little early.  Hopefully my fellow bakers will forgive me.

I really can't truly call my candies buckeyes since I didn't leave that classic exposed peanut butter eye on top.  To be honest I think that buckeyes look totally unappealing.  How do I say...they remind me of man parts...that I never imagined I would be mentioning on a food blog.  I'm totally uncomfortable that I just said that.  Maybe I'm a little prude, but I went with the fully covered up look, by dipping the entire candy in silky dark chocolate and drizzling a swirl of chocolate to pretty them up a bit. 


No matter what these candies look like, I can say they are delicious. They are like Reese's Peanut Butter Cups, but better.  The peanut butter filling has that sweet peanut butter flavor with a slightly gritty texture.  Gritty in a good way.  That texture comes from finely ground graham crackers which was something I didn't expect to find in this recipe.  Dip in your favorite chocolate and try to resist the urge to eat them 3 at a time. 

This recipe is most definitely a keeper and would make a great addition to your holiday goodie tray.  It's easy to make and even easier to eat. To see how what real buckeyes look like, head over to the Club: Baked site and check out posts from my fellow bakers.  To get the recipe head over to Karen's site, Cookies Cakes and More.

Enjoy!

Monday, December 27, 2010

Chocolate Truffle Cookies


I was browsing my favorite food blogs recently when I came across this on Baking Bites. I knew immediately this was my kind of cookie. Chocolate, with more chocolate and then even more chocolate. Mmmmm. I made up a batch on Christmas Eve to take to my aunt's house along with the other cookies that I normally bring. I'm so glad I did.

If you are a chocolate person, these cookies are for you! A rich flavor and fudgy truffle like texture. It's like brownie, meets cookie, meets truffle. Good stuff!

The dough gets rolled out in 1 inch balls and then coated in unsweetened cocoa powder.


Then bake for 10-11 minutes (the recipe calls for 10 but 11 worked for me). They will look just barely set when you take them out.


Once cooled they get a dip in powdered sugar. I also added a sprinkle of cocoa powder to distinguish them from the pecan short breads (mexican wedding cookies) that were also on my cookie tray. But I would leave off the cocoa powder next time. I like the clean look of the powdered sugar.


They were a hit with the family and will be moving into the annual Christmas cookie rotation. To get the recipe check out Baking Bites.

Sunday, December 26, 2010

Latkes!


The holidays are a time to indulge in those special decadent dishes that your waistline can't afford during your everyday life. One of our favorites is homemade Potato Latkes to celebrate Hanukkah. Unfortunately we were a little late celebrating this year and didn't have our latkes until the eve of Christmas Eve (Hanukkah ended on 12/8). But better late then never. They were delicious.


Latkes are potato pancakes fried in oil and are a Hanukkah tradition. Frying the pancakes in oil is symbolic of the miracle of lights. The short story is in 165 B.C. when Jewish soliders returned triuphant after battle to their holy temple in Jerusalmen that had been occupied by Syrian-Greeks, they proceeded to purify the temple through the ritual of lighting the Temple's menorah for 8 days. They only had enough oil for one day, but lit the menorah anyway. The miracle was that one day's worth of oil lasted for the full 8 days. For more details, click here.

I'm not Jewish, but my hubby is and I am happy to celebrate this thousands of years old tradition because I get to eat delicious fried potato pancakes. I found this recipe in the Gelson's Super Market newsletter the first year I started dating my hubby back in the late 90's. This recipe is fantastic and I think, hands down, is the best latke recipe I've had.

There are a few handy tips I'd like to highlight. Be sure to get as much liquid out of the potato mixture as possible. I put my potatoes and onion mixture in a clean thin kitchen towel and wring it out. You'll be amazed how much liquid comes out. Once the mixture is dry....place it back in your bowl and add in the remaining ingredients. I like my latkes small, thin and cripsy and golden brown. I take a large pinch of the mixture and squeeze out any excess liquid. Then I sort of flatten it out with my hand and place it in the hot oil.


I like to serve the latkes with a sour cream topping, though applesauce is traditional as well. In the early years I would make a whole Hanukkah meal, brisket, kugel and green beans to serve with our latkes. Now, we just have latkes for the meal. Who needs that other stuff?


Potato Latkes
Adapted from the Gelson's Super Market Newsletter

1 large onion peeled and grated
1 lb yukon gold potatoes peeled and grated
1 egg beaten
2 Tablespoons matzo meal (I add 1-2 additional depending on how wet the potato mixture is)
1/4 teaspoon black pepper
1/2 teaspoon kosher salt
1/4 cup (scant) lemon juice
Vegetable oil for frying

Combine grated potatoes and onions together. Place mixture in 2 batches in a thin, clean kitchen towel and wring out all the liquid. Do this a few times because there's a lot of liquid! Add remaining ingredients and mix well. Heat oil on medium high and drop about two tablepoons of mixture per latke in the oil. Press down with back of a spatula to flatten out. Fry about 3 minutes per side until golden brown and crispy. Place finished latkes on a wire rack placed over a paper towel lined baking sheet in a 200 degree to keep warm. Serve with Sour Cream Topping (see recipe below) or applesauce.

Sour cream topping:
Combine 1/2 cup of sour cream with 1/2 teaspoon of Lawry's seasoning salt and 2 Tablespoons of finely chopped chives or green onions.

Tuesday, December 21, 2010

Chocolate Chip Candy Cane Cookies


I love peppermint bark (who doesn't?). I love chocolate chip cookies (again, who doesn't?). Therefore, it's a given that I would also love chocolate chip candy cane cookies. I admit, I didn't think up this divine creation on my own. In one of my first real jobs after college, a co-worker brought these in for the holidays. After one bite I deemed her a cookie genius! She caved and easily turned over the very complicated recipe...

Wait for it.

Nestle Tollhouse Cookies with crushed candy canes stirred in.


Simple and brilliant. How did I not think of these before?


These are delicious, and I am certain Santa would like to have two or three of these with a nice glass of milk when he visits your house this Christmas.


Chocolate Chip Candy Cane Cookies
Adapted from Nestle Tollhouse Chocolate Chip Cookie Recipe

2 1/4 cups flour
1 teaspoon baking soda
1 teaspoon salt
1 cup (2 sticks) unsalted butter, softened
3/4 cup sugar
3/4 cup packed brown sugar
1 teaspoon vanilla extract
2 eggs
2 cups chocolate chips
3/4 cup crushed candy canes (about 12 full size candy canes)

Combine flour, baking soda and salt in a bowl and set aside. Cream butter, sugars and vanilla. Add in eggs 1 at a time. Gradually add in dry ingredients until combined. Stir in chocolate chips and crushed candy canes. Drop rounded tablespoons of dough onto a baking sheet (lined with parchment paper). Bake at 375 degrees for 9 to 11 minutes or until golden.

Monday, December 20, 2010

Ginger Snaps


Is Christmas really 5 days away? How did that happen?

Christmas can't go by without baking homemade ginger snap cookies. That would be criminal. The warm spices of ginger and cinnamon in a chewy molasses cookie sing Christmastime to me. Gingersnaps are a staple in my annual holiday baking tradition. Oh, and they are delicious.

The ingredients are simple. The dough is easy to make. And these cookies are WAY too easy to eat. You really can't eat just one. They have a chewy middle and an ever so slight crispness on the outer edge. Just how I like my cookies.

The dough needs to be covered and refrigerated for at least an hour up to overnight.


I like to use my trusty number 60 cookie scoop.


This recipe yields about 75 3 inch cookies.


These delicious spice filled treats make a perfect addition to a holiday cookie tray.


Go on. Go make them. You can thank me later.

Happy baking!

Ginger Snap Recipe
Recipe comes from a family friend and the original source is unknown

Ingredients:
1 1/2 cups butter softened
2 cups sugar
2 eggs slightly beaten
1/2 cup molasses
2 tsp baking soda dissolved in 1 T of boiling water
2 tsp ground ginger
2 tsp cinnamon
4 cups flour

Directions:
Mix butter and sugar until creamy. Add eggs, molasses and baking soda/water mixture. In a separate bowl whisk together the dry ingredients and slowly combine with the wet mixture. Chill for at least an hour (up to overnight). Roll into 3/4 inch to 1 inch balls and roll generously in granulated sugar. Bake at 350 for 10 to 12 minutes.

Sunday, December 19, 2010

Raspberry and Lemon Linzers


Sometimes I like to pretend that I don't have a job (Amy you should ignore this statement). That all I have to worry about is what new thing I will bake or cook. And this blog is my creative outlet to document my adventures and misadventures in the kitchen. It's true, this blog is my creative outlet. But I do indeed have a job (though I don't mention it much here in this forum). I spent much of this past week traveling for work and putting out fires as this month is our absolute busiest time of year. I am almost a week behind in posting here so you'll see a few posts go up one after another as I want to share these in time for the holidays.

The linzer. It's my favorite holiday cookie to eat. I can't say it's my favorite to make. There are quite a few steps involved...but the effort is worth the end result. After all...these really only make an appearance in my kitchen once a year. Plus I was able to incorporate a few new tips this year to make things just a tiny bit easier.


Making the dough is really simple. It has just a few ingredients and comes together quickly in a stand mixer. I dump out the dough onto plastic wrap and form it in a large square about 2 inches thick. I then cut it into quarters and form each section into a 6-7 inch circle that is about 3/4 inch thick. Wrap each disc in plastic wrap and refrigerate for about 45 minutes to an hour.

The next step is rolling the dough out to cut with a cookie cutter. The dough should be firm but still have a little bit of give when you press into it. Meaning it shouldn't be so firm that it can't be rolled out without cracking around the edges. You may need to let it sit out for 10-15 minutes before it's ready. Only take out 1-2 discs at a time.


Get out the flour and 2 large pieces of parchment paper about 12 x 18 inches.


Unwrap the first disc and place it on a lightly floured piece of parchment. Generously flour each side of the disc. Place the second piece of parchment on top of the dough. Begin rolling the dough out from the center with your rolling pin until it's 1/8 inch thick. Place the rolled out dough (parchment and all) on a baking sheet and refrigerate for at least 15 minutes (the longer is ok too...you want it to get nice and firm). This method makes the cookies easy to cut and peel back from the parchment to place on a prepared baking sheet.

The parchment dough rolling method is new to me this year and has really taken a great deal of frustration out of the process. Dough can be difficult to work with. In past years I rolled out the dough on my counter top and it often resulted in me not being able to pull up the cookie once it was cut. Parchment is a genius kitchen accessory! In fact I buy pre-cut sheets in bulk from a local restaurant supply store that is open to the public (a great resource to check out in your local area).


Remove the top piece of parchment and begin cutting out your cookies. I made bite sized linzers and used a 1 1/4 inch scalloped cookie cutter. Place the cut cookies on a parchment lined baking sheet. Once all your cookies are cut out, gather the dough scraps together and form them into a ball and set aside to combine with the scraps from the next disk of dough.


Now the cookies are ready for an egg wash and almond sugar topping. The egg whites should be whisked until they are frothy.


The almonds are finely ground in food processor (I like to use my Mini Prep) with granulated sugar.


Brush each cookie with egg wash.


And sprinkle the almond sugar topping on each cookie.


Half the cookies need a little window cut out of the top to showcase the filling. I use a micro diamond shaped cutter for these.


This is the second tip that I just figured out this year. That's not actually true. Let's step back to last year. My sister was staying with us and helping me bake. I cut the windows out and then did the egg wash and topping step. This makes for cut outs that are jagged and sometimes grow together to fill in the space when the cookies bake. After they cooled, I would spend time hollowing them out with a toothpick. It was a not so fun step in the process and often resulted in broken cookies (and I had been doing it this way for a few years). My sister casually said why don't you put the topping on the cookie and THEN cut out the window? I stared back at her a bit dumbfounded. I had no answer. So guess how I do it now? Thanks Katie!


Bake for 8-10 minutes. Once cooled group the cookies together on the baking sheet and generously dust with powdered sugar.


Now the fun part! Filling. I use seedless raspberry preserves and lemon curd (both from Dickinson's). Place several heaping spoonfuls of filling in a ziploc bag and squish around a bit to get the juices flowing. Snip off a small corner to and pipe a generous portion onto the bottom cookie.


Top with a window cookie and then eat one immediately so you can taste the fruits of your labor.


These keep well for at least 3 days at room temperature in a sealed container. In fact, I think these cookies get even better after 1 or 2 days. They almost melt in your mouth.


Raspberry or Lemon Sandwich Cookies (also known as Linzers)
Adapted from Jay Crowley's recipe published in the Chicago Tribune around 2002

2 sticks (1 cup) butter
2/3 cup of sugar plus 1/2 cup of sugar
2 eggs, separated
2 1/2 cups flour
1/4 tsp salt
1/2 cup ground blanched almonds (I just grind the almonds in my mini food processor)
Powdered sugar

Raspberry Preserves
Lemon Curd
(I like the Dickinson's brand for both)

1. Beat butter in bowl of electric mixer on medium until fluffy. Add in 2/3 cup of sugar until light and fluffy. Add egg yolks one at a time. Combine flour and salt in a small bowl and then add to butter mixture. Beat just until dough comes together. Divide dough into 4 sections and pat into a circle about 1 inch thick. Cover each section in plastic wrap and chill for at least 2 hours. Meanwhile, combine the remaining 1/2 cup of sugar with the almonds and set aside.

2. Heat oven to 375. Remove 1 section of dough and roll out dough to 1/8 inch thickness between two large pieces of floured parchment paper. Place the dough back on a cookie sheet and refrigerate for at least 15 minutes (if not longer). Remove top piece of parchment and cut into rounds with a 1-2 inch cookie cutter (you can use any size or shape) and place on a parchment lined baking sheet 1/4 inch apart (cookies don't really increase in size much so they can be placed close together). Repeat with remaining sections of dough.

3. Beat egg whites in a small bowl until frothy. Brush all the cookies with the egg whites and sprinkle almond/sugar mixture on top of each cookie. If you want to cut a decorative hole out of the tops of each cookie (so the jam can be seen) do it after you top the cookies with the almond sugar mixture. Remember to save whole rounds for the bottoms. Bake until very lightly browned, about 8-10 min. Cool on a wire rack.

4. Dust cookies with powdered sugar. Spread raspberry preserves or lemon curd on the bottom cookies and top with decorative cookie tops. Sometimes I make these without the decorative holes in the top to save time and an extra step.