Showing posts with label Sweet Melissa Sundays. Show all posts

Saturday, August 27, 2011

Sweet Melissa Sundays Top 10 Favorite Recipes!

In April 2010 I started participating in the weekly online baking group, Sweet Melissa Sundays.  The group had already been baking their way through the Sweet Melissa Baking Book by Melissa Murphy for about a year when I joined.  And the group posted the final recipe (of just over 100 recipes) on August 21, 2011.  In the past year and a half I've met some amazingly talented bakers and learned tons.  Before joining this group my baking repertoire consisted of mostly cookies, a few cakes or cupcakes and a pie here and there.   What I liked most about the group was being pushed outside my comfort zone.  Without the group I doubt I would have tried more than half the recipes that turned out to be some of my favorites. 

When I tasted each of the recipes below for the first time, I said, "wow".  For each and every one.  Literally, I said, "wow".  Out loud.  I love when you bite into something and you're not sure what to expect or think you know exactly what to expect, and you are pleasantly surprised and all you can say is "wow!" 

To wrap a year and a half of baking I wanted to put together a list of my favorites.  They are listed in order the group made them.  So without further adieu...

Chocolate Cake


This chocolate cake is the base for several recipes in the Sweet Melissa book.  It's incredibly moist and deep dark chocolaty.  I have an affinity for cakes made with sour cream and this one really knocks it out of the park if you are a chocolate lover.  I have made it several times and will continue to go to this as one of my top chocolate cake recipes. 


When I got my first turn to host a recipe for the group I had to go with Gingersnaps.  It only seemed right!  I was surprised at how much I liked these cookies, since I already have my own go to ginger snap recipe.  Melissa Murphy's version contains typical spices you might expect, like cinnamon, ginger and allspice, but what was really unique was the inclusion of white pepper.  Everything in my gut was telling me to omit the pepper, but I felt like I really had to do the recipe proper justice and follow it word for word.  And you know what?  The white pepper works!  It blends with other spices to make a perfectly sweet and mildly spicy cookie.  And it pairs beautifully with a lemon cream filling.

Blueberry and Almond Biscotti


What is a biscotti anyway?  It's essentially a twice baked cookie.  Round 1 is baked in a loaf form and then the loaf is sliced into the biscotti spears you are probably familiar with and those are baked again to get a nice crunchy texture.  I have never been a biscotti person.  Probably because I'm not a coffee drinker or a fan of crunchy cookies in general.  I had never made biscotti before and  I really didn't expect to like this.  I hate being wrong. But love it all at the same time because these biscotti are delicious and you don't need a hot beverage to enjoy them.  They also make great gifts since they keep well for several days. 

Melissa's recipe called for dried sour cherries, but I switched it up with dried blueberries instead.  What made this recipe for me was the lemon zest.  The lemon flavor is incredibly bright in this crunchy cookie, but not overly lemony.  This recipe opened my eyes to the possibility of making various flavors of biscotti (which I have on my to do list).

Sweet Almond Cake with Lemon Curd


Before joining SMS, I will be honest, most cakes I made were out of a box.  With the exception of carrot cake.  My family has a great carrot cake recipe that doesn't involve a box.  One day I'll get around to posting it on the blog.  What I didn't know was the various techniques used in making cakes from scratch.  This one calls for ground almonds and whipped egg whites in the batter.  You whip up the egg whites until they form stiff peaks (similar to making a meringue) and then gently fold the airy mixture into your cake.  I really don't know much about the science of baking, but I do know this cake is delicious with a lightly sweet almond flavor.  It has a lovely toothsome crumb from the ground almonds and a light moistness.  This cake would be a wonderful base for many fillings and frostings.  Speaking of fillings and frostings, the lemon curd and lemon mascarpone frosting that accompany this cake were not the stars for me.  I had to switch to lemon cream cheese frosting because I had trouble with the mascarpone.  This cake recipe, however, is on my list of keepers!

Mom's French Pancakes (aka Crepes)


Can you say yummy?  Can you say easy to make?  Can  you say "Oooh la la"! This recipe was another surprise winner!  I mean I knew I already loved crepes, I just doubted my ability to make these thin delicate little pancakes.  The ingredients are simple and the batter can (and is recommended) to be made the night before you make these little jewels.  I used a large non stick skillet and after making one or two crepes, really got the hang of it.  If you have not made crepes before, you must try them!  The options for filling them are endless....but my favorite combination is seen above.  Nutella and sliced bananas.  Simple.  Delicious!

Lemon Blueberry Buttermilk Pie


Though I am posting these in the order I made them and not in any preferential taste order, I will say this is a fantastic recipe and is among my top 3 favorites from the book (along with the chocolate cake and honey cream caramels).  I was completely blown away by the perfect marriage of lemon and blueberries amidst a creamy custardy filling.  And this pie is one of the easiest in the book to make.  Especially if you use a pre-made graham cracker crust from the grocery store (a slight diversion from the original recipe).  Melissa's recipe calls for traditional pie dough, but as I was making this pie for the second time for Mother's Day earlier this year, I had a crust mishap.  I used Melissa's all butter pie crust recipe and had major shrinkage occur.  Irreparable shrinkage.  At 11 pm on the eve of Mother's Day I went to the grocery store to buy a roll of Pillsbury pie dough, but at the last minute decided to go with a graham cracker crust.  You know the kind that you find in the baking aisle and comes in a foil pie tin with that cool plastic covering that doubles as a lid when you flip it over?  I have to say, I loved it!  I think this pie is even better than fantastic when made with a graham cracker crust.  Definitely a winner!

Pecan Frosting


I almost didn't make this recipe.  Melissa's original recipe is called Coconut Pecan Frosting, otherwise known as German chocolate cake frosting.  I really don't care for the texture of coconut and I'm generally not a fan of nuts in my dessert.  But the point of this group is going outside your comfort zone.  So I failed in that I didn't go completely outside my comfort zone.  I just took a small step.  I decided to simply omit the coconut from the recipe since that was the greater of two evils.  Imagine my surprise when I tasted the final product and loved it!  It really is less like a frosting and more like a candy topping.  My family loved it spread on graham crackers best.  But it would also make a delicious ice cream topping and it's not too bad with pumpkin cake either! 

Honey Cream Caramels


This was yet another goodie I had never made before.  I don't have anything against caramel candies.  I like them just fine, but there are a lot of other treats I would reach for first.  Luckily I didn't write this recipe off!  These caramels are soft and sweet and delicious.  I really didn't think I would like these as much as I did.  I kept going back to the kitchen and sneaking one more (I'm not sure who I was sneaking them from, but I felt a little guilty eating so many of these honey infused treasures).  This recipe is easy to make and caramels are another great giveaway treat because they store for up to two weeks in an airtight container.  They would also be delicious with a little sprinkling of sea salt before they completely set.  Honey Cream Caramels will be making it into my holiday baking rotation this Christmas!

Strawberry Rhubarb Preserves


Melissa shares a master preserves recipe that shares general ratios of fruit to sugar, acid, etc. and then has recipes for 5 different flavor variations.  This is one of those recipes that was widely praised by many members of the group.  I was able to make three variations, plum preserves, white nectarine cinnamon preserves and of course strawberry rhubarb. 

I feel like a broken record here, but preserves or jam was something I had not made before joining this group.  And I was surprised at how easy they are to make and delicious.  There's something special and very satisfying about making toast in the morning and slathering it with your own fresh made preserves.  I also took the leap into the canning world with these preserves.  Yet another great goodie to give away as a gift.  Of three preserve variations I made, the strawberry rhubarb was my hands down favorite!  The tartness from the rhubarb is a perfect match to the sweet strawberry.  And it makes a great filling for a crumble bar

Brown Sugar Vanilla Ice Cream


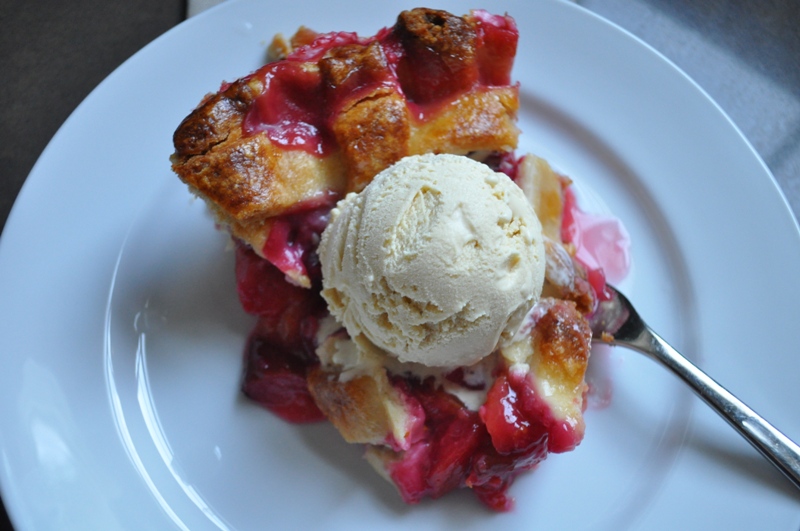
I didn't actually make this recipe along with the group.  They made it long before I even knew Sweet Melissa Sundays existed.  And to be honest, vanilla ice cream is not something that really excites me.  There are so many delectable ice cream flavors in the world to choose from.  But I found I was in need of an ice cream to pair with this Plum and Raspberry Pie with a Sweet Almond Lattice.  This pie was incredibly tart and needed a nice sweet ice cream to balance it out.  I decided to give Melissa's recipe for Brown Sugar Vanilla Ice Cream a shot since I would be serving to others who don't share my lack of excitement over vanilla.  Also, I had recalled reading in various posts from my fellow SMS bloggers, how delicious this ice cream was.  And they were right!  It's got a depth of caramel like flavor from the brown sugar and is the perfect accompaniment to a fruit pie or tart.  Yet another pleasant surprise!

I made 40 recipes with the group and a few more on my own outside the group. There are many more the group made before I joined that I would still like to try...like Butter Toffee Crunch, Lemon Icebox Cake with Strawberry Sauce, Sweet Almond Bread Pudding with Raspberry Sauce, Caramel Apple Turnovers with Sweet Ricotta Filling, and Fallen Chocolate Souffle Cake to name a few. 

It's been a great ride and I've learned a very important lesson...don't judge a dessert by it's ingredient list!  Even if you are unsure if it would be your thing or if you think it sounds too hard or complicated, give it a go.  You might just be surprised yourself!

I want to extend my thanks to all the fabulous SMS bakers.  You girls rock, sharing great ideas, encouragement and support!  I loved checking out everyone's creations on Sunday mornings.  Special thanks to Karen of Karen's Cookies Cakes & More for maintaining the site and keeping everyone on schedule.  She has spearheaded a new baking group called Club: Baked to keep us busy and learning new things.  This group started on July 1, 2011 and we are baking our way through Baked Explorations by Matt Lewis and Renato Poliafito.  This group bakes twice a month and so far there have been some pretty stinkin delicious recipes.  We really just got started so please feel free to join our baking adventure!

Tuesday, August 9, 2011

Sweet Melissa Sundays: White Nectarine Cinnamon Preserves


I'm a little late posting this week's Sweet Melissa Sundays recipe pick.  The funny thing is I made these preserves and cookies about 4 months ago, yet I still managed to post late. The best laid plans...We had a busy weekend involving a midnight trip to the vet (our kitty, Kit Kat, is doing just fine now), driving to LA to have breakfast with my family and hosting my 7 year old niece for a weekend sleep over and lots of kid friendly activities.  We had an action packed and fun weekend.  I am now just getting back to my computer and catching up on email and blogging. 

Back in April I was on a preserves kick and made and canned Melissa's strawberry rhubarb preserves, (a double batch of) strawberry preserves and these white nectarine cinnamon preserves over the course of two weekends.  Between the three batches, I ended up with nearly 20 jars of preserves! Several were earmarked as gifts for Mother's Day, sharing with friends and I still have 5 or so on hand. 

The white nectarines actually came from last August when they were ripe at the season's peak.  I saw a flat of them at Costco and knew that we would eventually be making peach and cinnamon preserves for Sweet Melissa Sundays. I figured that nectarines could easily be swapped out for the peaches.  I chopped them up and spread them in a single over a foil lined baking sheet and put them in the freezer.  Once frozen, I removed them from the baking sheet and loaded them into a ziploc bag for future use.  Freezing your own fruit is a great way to enjoy fruit at it's peak, even when it's not in sesaon.


These preserves reminded me of apple butter.  The coloring, consistency and warm cinnamon flavor was very similar to apple butter.  I decided to take the little bit of preserves that wouldn't fill up a whole jar, and made jam thumbprints.  I did a quick internet search and found a recipe on All Recipes.  The cookie itself wasn't especially noteworthy so I haven't posted the recipe, but the preserves were tasty.  I am in search of another thumbprint cookie recipe so I can use up a little more of the preserves I still have on hand.  If you  have a good one please let me know in the comments section!


Melissa's base preserves recipe is easy to make and is one of my favorite in the book. Thanks to Tessa of the Cookin Chemist for hosting our second to last recipe for Sweet Melissa Sundays.  Pop over to her site for the recipe.  To see how other SMS bakers fare this week click here.  In two weeks Karen of Karen's Cookies Cakes & More will host our final SMS recipe, Hot Pepper Gingerbread Muffins with Orange Maple Butter.  I can't believe the final recipe is just around the corner.  It's been a great ride baking with all the talented SMS bakers!  I will be posting my top 10 favorite SMS recipes later this month.  There have been some really fantastic recipes that I will continue to use again and again. 

Sunday, July 10, 2011

Sweet Melissa Sundays: Plum and Raspberry Pie with a Sweet Almond Lattice


This is my second and final time hosting a recipe for Sweet Melissa Sundays.  The group has nearly baked their way through every recipe in the Sweet Melissa Baking Book.  Only 3 recipes remain after this one with our final posting date on August 21st.   I'm sad to see the group near its end, but also excited because we've recently embarked on baking our way through a new book, Baked Explorations.  Club: Baked kicked off it's first recipe on July1st and we are baking twice a month, posting on the 1st and 15th.  To join the fun head over to the Club: Baked site and get in touch with Karen.

Now, on to the important business.  Pie. 

I will admit that I selected this recipe to host before fully reading it through.  Mind you, I didn't have a lot of choices since we are down to the last handful of recipes.  But I had a moment of dread when I finally did read through the recipe.  It had a lot of steps and a couple of non standard (in my kitchen) ingredients.  Tapioca pearls and almond paste.  I did find the almond paste, but not the tapioca pearls.  I ended up using more cornstarch in place of the tapioca, which worked out just fine.  The tapioca helps with thickening the fruit filling, but the cornstarch did the job. 


This pie is best made over two days to reduce stress and mess in your kitchen.  Day one make the base crust and the almond lattice.  Cover both in plastic wrap and refrigerate overnight.  Day two wash and cut the fruit, make the filling, assemble the pie and bake.  I baked my pie for the full time called for in the recipe but had to lightly cover it with foil to prevent over browning of the lattice crust. 


How did it turn out?  Pretty.  And tart.  Too tart for my taste.  But still pretty.  I've never been a fan of the skin on plums.  I like the flesh of the fruit, just not the skin.  This recipe calls for leaving the skins on and I was hesitant to do that.  So I decided to compromise and leave only half the skins on.  I should have gone with my gut.  Unfortunately the pie was overly tart, despite the fact the inner part of the plums was sweet. 

The almond lattice was delicious, though.  And so was the crust.  This was my first time making Melissa's Flaky Pie Crust and it turned out great!  I would definitely make it again.  It didn't have the issues I have seen in the past with her all butter pie crust shrinking.  The almond lattice would make a great top pie crust for a number of fruit pies, such as cherry or blueberry.  It's tasty and beautiful, with the bright fruit oozing up around the basket weaved sweet almond pastry. 

A quick note about the almond lattice.  It's delicate and requires a little special attention.  You start by rolling out the dough between lightly floured parchment.  The dough is transferred to a baking sheet and cut into long strips with a pizza cutter.  Then the baking sheet goes into the refrigerator for at least 20 minutes, if not longer.  Don't try to separate the strips until after the dough comes out of the fridge, nicely chilled.  Here's where you have to work quickly...the strips can be challenging to remove without breakage.  I used a small spatula to coax each strip off carefully in one piece.  The colder the dough, the easier it is to work with.  I would even recommend placing both your partially assembled pie and the strips back in the fridge if things get too warm. 


I made this pie for Father's Day and served it with Melissa Murphy's Brown Sugar Vanilla Ice Cream.  The ice cream was wonderful and sweet which toned down the tartness of the pie. 


If I make this pie again I would definitely omit the plum skin.  Looking forward to seeing how every one's pies turned out.  Thanks for baking along!


Plum Raspberry Pie with a Sweet Almond Lattice
by Melissa Murphy from Sweet Melissa Baking Book

Ingredients

Flaky Pie Crust:
Note you only need 1/2 the pie crust recipe.  I made the full recipe and froze half the dough.
2 3/4 cups all purpose flour
1/2 teaspoon salt
5 tablespoons cold unsalted butter cut into 1/2 inch pieces
1/2 cup plus 2 tablespoons cold vegetable shortening cut into 1/2 pieces
6-8 tablespoons ice water

Sweet Almond Lattice:
1 cup all purpose flour
1/4 cup sugar
1/8 teaspoon kosher salt
4 tablespoons (1/2 stick) cold unsalted butter cut into 1/4 pieces
3 tablespoons almond paste cut into 1/2 inch pieces
1 large egg yolk
1/2 teaspoon vanilla extract
1/4 teaspoon almond extract
2 tablespoons ice water

Egg Wash:
1 large egg
2 tablespoons heavy cream
Pinch of kosher salt

Plum Raspberry Filling:
1/2 cup sugar
2 tablespoons cornstarch
2 tablespoons tapioca pearls finely ground (you can use a spice grinder)
2 3/4 pounds black or red plum (about 8 plums), washed, pitted and cut into 1/2 inch slices
Zest from 1/2 orange
1 dry half pint fresh raspberries

Directions

To make pie crust:
Place your butter and shortening in the freezer while you prepare the rest of the ingredients.  Prepare a glass of ice cold water.  In a medium/large bowl whisk together flour and salt.  Drop cold pieces of butter into flour mixtures and quickly toss to coat butter in the flour.  Work fast so the heat from your hands doesn't make the butter soft or warm.  Use a pastry blender (or 2 knives) and cut the butter into the flour until large pea size pieces form, turning your bowl 1/4 turn after each cut.  Toss shortening pieces into mixture and lightly coat with flour.  Use pastry blender to cut the shortening into the dough until large pea size pieces form.  Form a well in the center of the flour mixture and add ice water, starting with half the water and gently pull flour into water using a fork.   Dough will start to come together and add remaining water.  Dough is ready when you pinch it and it holds together.  Add additional water if needed.

Turn dough out on a lightly floured surface and form 2 equal size discs.  Wrap each disc in plastic wrap and refrigerate for 45 minutes to an hour.  After the dough is chilled, roll out one of the discs on a lightly floured surface using a rolling pin until 1/4 inch thick.  Gently transfer dough to a 9 inch pie plate.  Take excess dough and fold underneath itself so it lays on the rim of the pie plate with going over the edge.  Crimp the edges and refrigerate the dough until firm, about 30 minutes.

To make Almond Lattice:
Using a food processor, pulse flour, sugar and salt until combined.  Add butter and almond paste and pulse until mixture is course.  In a small bowl whisk the egg, vanilla, almond extra and water.  Add wet mixture to the flour mixture and pulse until the dough appears uniformly moistened and crumbly.  Turn dough out onto a lightly floured surface and form a disc about 6 inches in diameter.  Wrap in plastic and chill for at least 20 minutes. 

Use a rolling pin to roll the dough between 2 large pieces of parchment paper lightly sprinkled with flour.  Roll into a round 11 inches across.  Remove top piece of parchment and cut dough into 3/4 inch wide strips using a pizza cutter or sharp chef's knife.  Transfer the dough still on the parchment to a baking sheet and refrigerate at least 20 minutes. 

To make egg wash:
In a small bowl, whisk egg, heavy cream and salt together.

To make the filling:
Whisk cornstarch, sugar and and tapioca flour in a small bowl.  In a large bowl toss the plum and zest together.  Gently fold in the raspberries.   Sprinkle sugar mixture over the fruit and stir gently to combine.  Transfer the filling to the unbaked pie shell.

To finish the pie:
Preheat oven to 350 and line a baking sheet with foil or parchment.  Remove lattice strips from the refrigerator and carefully separate each strip and lay it across the pie weaving a crisscross pattern.  Press the strips together gently where the strip meets the pie crust dough to join them together.  Gently brush egg wash over the lattice and pie crust edges.  Place the pie on your prepared baking sheet.  Cover the pie loosely with foil and bake for 30 minutes on the center rack of your oven.  Uncover the pie and continue baking for 90 minutes or until the fruit is thick and bubbling.  Cool on a wire rack until pie is room temperature before serving.

Thursday, June 30, 2011

Brown Sugar Vanilla Ice Cream


You know what vanilla ice cream is good with? Chocolate sauce. A lot of chocolate sauce.  Or strawberry sauce.  Or strawberry sauce and chocolate chips.  Or crushed up Oreos.  I have never in my life ordered vanilla ice cream when given other flavor options.  Vanilla is absolutely my last pick in the ice cream world.  Sorry all you vanilla fans, but I think it's a little boring.

I love ice cream and enjoy it most on it's own. I don't want any pie or cake to get in the way (and in reverse, when I'm eating pie or cake, I don't want any ice cream to compete with my cake or pie).  But as with most things in life, there are a few exceptions to this rule.  Like ice cream cake (mint chip ice cream with chocolate cake from Baskin Robbins).  And I also made an exception when I baked a Plum and Raspberry Pie for Father's Day thinking a nice sweet vanilla would pair well with this (what turned out to be very tart) fruit pie.  And it did!  (Post on the pie coming in about 2 weeks.)

I will note the 2 issues I had making this.  Both are most likely attributable to user error.  One, I could not get my custard to reach 180 degrees.  It would not budge past 160 on my candy thermometer.  After nearly 40 minutes of stirring (when it's supposed to take 10) I decided to call it a day.  The mixture had thickened slightly and if the temperature didn't come up after 40 minutes, I figured it never would.  Two, I failed to read the entire recipe through before embarking on this the day guests were coming over for Father's Day.  It takes 8 1/2 hours to make....which of course I didn't have.  I had about 6 hours before dessert was tentatively scheduled to be served and I decided to forge ahead.  It turned out great despite the shortened freezing time. 

This vanilla ice cream is pretty exceptional.  That is saying a lot coming from a chocolate girl.  See, this vanilla ice cream is different.  It's brown sugar vanilla. And I like brown sugar.  So I guess it is safe to say I also like this vanilla ice cream.  The brown sugar gives it almost a caramel flavor. I even think this ice cream might make a repeat appearance in my kitchen.  But don't be surprised if it's served with a little chocolate sauce and maybe some peanut praline.


Brown Sugar Vanilla Ice Cream
by Melissa Murphy from Sweet Melissa Baking Book

2 cups heavy cream
1 cup skim milk
1/2 cup firmly packed light brown sugar
1/8 teaspoon salt
1/4 cup dry skim milk powder
5 large egg yolks
1/2 vanilla bean, split and seeds scraped, reserving the seeds and pod
1/2 teaspoon pure vanilla extract

Bring 3 inches of water to a simmer in a large pot.  Select a large bowl and fit it inside the pot so the bowl is not toucing the water.  Remove the bowl and whisk all the ingredients together until fully combined.  Place the bowl back over the water and stir continuously for 5 to 10 minutes until mixture is thick enough to coat the back of a spoon and has reached 180 - 185 degrees on a candy thermometer. 

Meanwhile, prepare an ice bath in a bowl large enough to fit the bowl with the custard mixture.  Once custard is ready, place the bowl in the ice bath for 15-20 minutes.  Strain mixture into a smaller bowl or container with a lid and refrigerate for 4 hours or overnight.  Pour the cooled mixture into an ice cream maker and process according to the manufacturer's instructions (mine takes about 30 minutes).  Transfer ice cream to a freezer safe container with a lid and freeze for another 4 hours or overnight prior to serving.

Yields 1 quart

Sunday, June 5, 2011

Sweet Melissa Sundays: Pear and Blackbery Pie with Gingersnap Crumble


I almost didn't make this pie.  Even though I had bought a 6 pound bag of pears at Costco last weekend with the intention some would be used for this pie.  Then I remembered that I had a mini pie crust in the freezer from when the group made ginger pumpkin pie last year.  I also had some gingersnap cookie dough balls in the freezer too.  I had everything I needed and no real excuse.  Then I read Dawn's rave review and I knew it had to be done.  Thank you Dawn of Growing Up (And Having Fun) After 40 for hosting this delicious recipe!

I'm glad I got over my laziness and made this tasty pie.  The recipe calls for cranberries but I used blackberries because I had them on hand.  The pears have a very mild flavor and the berries added a nice tartness to this very sweet pie.  The gingersnap crumble adds a nice crunch and the spices pair well with the pears and berries.  This recipe is definitely a keeper. 


There are several steps to make this pie come together.  It would be best to make it over 2 days.  On day 1 make the pie crust, place it in your pie pan, cover with plastic wrap and refrigerate.  Make and cool the gingersnaps, process in the food processor to grind and place in an airtight container.  On day 2 assemble the pie filling and the ginger snap crumble topping then bake.


To get the recipe head over to Dawn's site.   To see other SMS baker's pies click here.

Sunday, May 22, 2011

Sweet Meslissa Sundays: Peanut Praline


Redemption!  I successfully made brittle.  Last time I attempted Melissa Murphy's brittle recipe it was a failure.  Many of the other SMS bakers have struggled with her recipe too which resulted in seeking out alternative recipes.  Hanaa has a brittle recipe that has worked really well for her and Margot tried a similar recipe that was also a success.  Like Tess of Cookin' Chemist, I decided to use Margot's recipe (minus the cayenne pepper) and low and behold, the product was a tasty, perfectly edible and delicious brittle.


So what does brittle have to do with Peanut Praline?  Melissa Murphy suggests grinding up homemade brittle to use as a praline topping for ice cream.  It's a brilliant idea.  I took half the brittle and broke into large pieces and placed it inside a large ziploc bag.  I zipped the bag, placed it on top of a cutting board and used my meat mallet to pulverize the brittle, leaving a few small pieces for extra crunch.  It's a wonderful ice cream topping.  My only regret is I didn't have chocolate ice cream at home, so I had to go with vanilla.  The praline adds a caramel, salty, cinnamon flavor with crunchy texture that takes plain ice cream to another level.   Luckily I have lots of left over praline so I can try it with other ice cream flavors.
    

Thanks to Ruby of I Dream of Baking for hosting this week's recipe. To see how other SMS bakers did this week click here.


Peanut Brittle
by Margot at Effort to Deliciousness adapted from Allrecipes.com and About.com
1 cup sugar
½ cup light corn syrup
¼ teaspoon salt
¼ cup water
1 ½ cup peanuts
2 tablespoons butter, softened
1 teaspoon baking soda
½ teaspoon cinnamon
½ teaspoon cayenne pepper

Line a baking sheet with parchment paper and spray with nonstick cooking spray. Combine the baking soda, cinnamon, and cayenne pepper together in a small bowl and set aside. Also set aside the two tablespoons of butter.


Combine the sugar, salt, corn syrup, and water in a medium saucepan fitted with a candy thermometer over medium heat, stirring until the sugar is dissolved. Continue to cook the candy mixture, stirring frequently, until the thermometer reads 275 degrees, then add the peanuts and stir to combine. Keep cooking, still stirring frequently, until the thermometer reads 300 degrees.

Once the thermometer reaches 300 degrees, remove the pan from heat; immediately stir in butter and the baking soda/spice mixture. Pour the candy onto the prepared sheet and spread with a greased spatula. Cool the brittle completely and then break into pieces, either by hand or with a knife on a cutting board.

Sunday, April 17, 2011

Sweet Melissa Sundays: Strawberry Rhubarb Preserves and How to Can


Last year I made my first homemade jam (preserves) with the Sweet Melissa Sundays baking group.  I was very impressed at how easy it was to make and how awesome the end product turned out.  Who needs store bought jam when you can make your own?  Some of the girls in the group had canned their jam and I was determined to can my own next time the group made preserves. 


I couldn't be happier with this month's pick by Tracey of Tracey's Culinary Adventures to make Strawberry Rhubarb Preserves.  Both strawberries and rhubarb are in season and I love how these two flavors compliment each other.  Rhubarb is actually quite tart on its own...but pair it with strawberries and bit of sugar and it adds a wonderful zing to the preserves.  This recipe also has orange juice, orange zest and granny smith apples in it.  The juice and zest (I also added lemon zest) add another depth of flavor and the apples serve as a natural pectin, or thickener, and the taste of apple is really undetectable in the end product.


The jam is amazingly delicious and very easy to make.  It just takes a little peeling, chopping, slicing and zesting. 


All the ingredients go into a large pot and come to a boil.  Once the mixtures comes up to 212 degrees on a candy thermometer (mine only took 5-7 minutes to reach temperature) you continue cooking at that temperature for 25-30 minutes, or until the jam is thickened.  To test the thickness of the jam, Melissa Murphy offers an easy tip.  Spoon a small dollop of jam on a small plate and place it in the freezer for about a minute.  Once the jam is just cooled, if it runs down the plate, it's not ready yet.  If it holds it's shape it is good to go.  It's important not to overcook the jam because you can end up with an overly thick texture once the jam chills in the refrigerator.  Since I planned to can the jam I made the full recipe and it took about 25 minutes to get to the right thickness.  Check out that gorgeous ruby red color.  It has a bright lovely flavor and if you are hesitant about trying rhubarb this is a great way to do it.
 

So that's the easy part. If you want to stop there you can store your jam in an airtight container in the refrigerator for up to 2 weeks.

Or you can preserve your preserves and take on canning.  Have you ever canned anything before?  It is a little more involved than I realized.  Probably didn't help that I don't have any canning tools and I just made do with what I had in the kitchen.  If I had to do it again I would at least invest $6 in jar tongs.  There are many other tools to simplify canning, but if you are only going to do it on rare occasion, you may able to get by without most of them depending on what you have in your kitchen.  Check out  http://www.canningsupply.com/  for every canning accessory you could ever want. 


The key to successful canning is good preparation.  The preserves need to be canned while they are still hot so this means there is some serious coordination involved.  Don't get me wrong, it's not difficult.  But if you are a procrastinator like me, planning ahead might not be your forte.  The whole process took me about 2 hours and 45 minutes from start to final clean up (including time for dishes).  Some of that time was devoted to reading and re-reading the instructions about 42 times because I didn't really know what I was doing.

My stove was was at maximum capacity.  In the photo below the lids were heating in the small pot on the back left burner, the jars were heating in the skillet on the back right burner, the water was simmering in the canning pot on the front right burner and lastly, my preserves were cooking on the front left burner.


If you are thinking of taking canning on, below I've detailed what you need to can, what you need to make the preserves and how to bring it all together.  I didn't fully grasp all that needed to be prepped ahead of time, so I thought it would be helpful for those new to canning to see it all laid out from beginning to end.  For the preserve recipe head over to Tracey's site.  Check out the SMS blogroll to see how everyone else did with their preserves.


Here's what you need for the canning process:

UPDATED 4/19/2011 with some tips I learned from my fellow bloggers and some additional thoughts I had after the original post.
  • Jars, lids and rings washed (only the rings need to be dried)...these can be bought in a flat of 12 at your local grocery store for $8.50 - $12.00 depending on what size jars you get.  I used 1/2 pint, or 8 ounce jars.
  • Small sauce pan to heat the lids
  • Pot or deep skillet to heat jars in (jars don't need to be steralized if the processing time in the water bath is at least 10 minutes according to this site) OR you can wash and heat your jars in your dishwasher, however, this process must be timed with when your preserves will be finished cooking)
  • Large (canning) pot with a lid to fully submerse jars in
  • Jar rack (I didn't have one so I used my multi pot with a pasta drainer insert which worked just fine...see photo above)
  • Tongs (preferably jar tongs...which I didn't have and used standard kitchen tongs that proved difficult to handle and not disturb the seal on the jars)
  • Magnetic lid lifter (I didn't have one so I used kitchen tongs to handle the hot lids which worked well)
  • Ladle to spoon the preserves into the jars (I used a 1/4 cup ladle)
  • Spatula to stir and remove air pockets in the jam
  • Wide mouth funnel if you have it (I didn't have one and didn't have much trouble getting my jam into the jars since my ladle was relatively small)
  • Several kitchen towels (to place hot jars on and use to hold hot jars while you fill them)
Here's what you need to make the preserves:
  • Preserve ingredients
  • Cutting board and knife
  • Measuring cup
  • Zester
  • Candy thermometer
  • 8 quart pot
  • Wooden spoon
  • Potato masher
Here's an overview of what I did:
  • Washed the jars, lids and rings and dried the rings (the jars and lids go into pots to get heated prior to filling so no need to dry them)
  • Washed my strawberries, rhubarb, orange and lemon and set aside on a cutting board
  • Filled a small saucepan with water and put in the lids and placed it on the stove on low heat
  • Filled a large pot with water and placed it on the stove on medium high heat....I used my "multi-pot" which has an insert for pasta.  This served in place of a canning rack.
  • Filled a deep skillet with enough water to go halfway up the sides of the jars and placed it on the stove on medium/low heat.
  • Filled 7 jars (only ended up using 5 for this recipe) with an inch or two of water to keep them from falling over and placed them in the skillet of water to heat.  The jars need to be hot so they can accept the hot preserves without cracking
  • While all my pots and pans were heating I turned to preparing the preserves and...
  • Hulled and sliced strawberries and sliced the rhubarb
  • Peeled and sliced granny smith apples
  • Zested and orange and lemon and juiced the orange
  • Measured out sugar
  • Placed my fourth and final (8 quart) pot on the stove using the last available burner on my stove and turned it on high.
  • Secured the candy thermometer to the 8 quart pot and added all the ingredients
  • Stirred occasionally and let the ingredients reach 212 degrees then cooked for an additional 25 minutes
  • Halfway through the cooking time I used a potato masher to mash and break down the fruit to make for a smoother jam.  Note...this is where I tasted the jam.  I decided to add an additional 1/4 cup sugar because it was more tart than I like.
  • Tested the thickness by placing a dollop on a plate and putting it in the freezer for about a minute...the jam was not runny and had a nice thickness, meaning it was done!
So here's where the coordination comes in....at this point your lids should be submersed in hot water and ready, your jars should be partially submersed in hot water and ready and your large canning pot should be simmering and ready for the jars of jam.  You should have your spatula and tongs ready and your kitchen towels laid out.  Your ladle should be ready and all the pots and tools should be placed on your stove and workspace where you can easily access everything.  Back to the steps...
  • Used tongs to empty the water from the first jar and moved it over to my kitchen towel
  • Held onto the hot jar using another kitchen towel and ladled jam into the jar until about 1/4 inch from the top
  • Removed air bubbles with a few turns of the spatula in the filled jar
  • Cleaned any excess jam from the jar rim and groves with a damp paper towel
  • Removed a hot lid from the lid pan using tongs and placed it over the jar allowing the sealing element on the lid to come in contact with the rim of the jar
  • Twisted on a ring to close the jar and placed it to the side while I repeated the process with the remaining jars
  • Transferred filled and sealed jars to the canning pot for submersion, making sure there was 1 inch of water covering the jars....what I actually did was use my tongs for this....what I should have done was to remove the pasta insert and place the filled sealed jars in the bottom and returned it to the simmering water
  • Turned heat up on the canning pot to bring water to a full boil and let the jars "process" for at a full boil for the time specified on the instructions that come with your jars or listed in the recipe you use.  I only processed for 5 minutes, but think it should have been 10.  Once processing time is finished, turn off the heat and let jars stand in the hot water for 5 minutes before removing.
  • Lastly, I removed the jars from the pot by pulling out the pasta insert and used a kitchen towel to grab each jar at the base and moved to a kitchen towel to set.  I attempted to use tongs at first, but I realized this may disturb the seal on the jar.
  • The jars need to rest undisturbed for 12-24 hours.  I let mine rest for 12 hours and tested the lids to ensure a proper seal.    
  • If the lids don't flex when pressed in the center, the seal is good.  You should also try to remove the lid with your fingertips.  If the lid stays in place the seal is good.  If the lid flexes up or down when pressed in the center the seal is not good.  If the lid is not sealed within 24 hours you can reprocess the jar using the instructions in the step by step guide link just below or you can refrigerate it.
  • Sealed jars can be stored for up to one year in cool, dark place.
For a step by step guide on how to can preserves click here.  The site also has a link for you to download a PDF to print off, which I highly recommend. 

With a little planning and preparation canning can be easy and very rewarding.  I understand why people can mass quantities...next time I would double the recipe.  Happy canning!

Sunday, April 3, 2011

Sweet Melissa Sundays: Honey Cream Caramels


My Kitchen Aid stand mixer and I are best friends.  We hang out together often and know each other well.  We've been together for 9 years now, so we have had a lot of time to learn all the little intricacies of one another.  I can whip up a batch of cookies in no time at all with my trusty friend and sometimes I feel like I could do it with my eyes closed.   We are pretty tight. 

My candy thermometer and I on the hand, are just getting to know each other.  We've only been together less than a year and I'm still a little leery of this guy.  I'm not quite ready to go steady yet, but I look forward to an occasional date.  The dates are usually fun (but sometimes are a flop) and always involve something new and exciting!  This week we had an awesome date making Honey Cream Caramels. 

The date got off to a slow start.  Boiling sugar is always a little scary and it involves an incredible amount of patience and attention.  Sounds like like a typical man, right?  Anyway, the ingredients are simple.  Sugar, honey, heavy cream, salt, corn syrup and a tiny bit of butter come to a ferocious boil in medium to large heavy bottomed saucepan.  Make sure your pan is big enough because you don't want this magma like sugar to boil over.  My, gurgling, bubbling, sometimes sputtering, caramel lava took about 25 minutes to come up to "firm ball" temperature (250 degrees) on the candy thermometer.  All the while you have to stir the mixture continuously.  I was beginning to wonder if it was ever going to make it.  I'm not very patient.  Plus I always think my candy thermometer is playing hard to get by laying low.  But then our date took an exciting turn and finally my guy came through and delivered those last 15 degrees!  The minute the caramel hit 250 degrees I removed the pan from the heat, stirred in some vanilla extract and poured the delicious golden magic into a prepared 8x8 ceramic baking dish.  Wow!  We did it! 

Okay candy thermometer...I'll think about taking our relationship to the next level.    

Meanwhile I had to exercise more patience as the caramel cooled and set up.  I decided the best thing to do was wrap it up and let it sit overnight because I didn't have good lighting to take photos anyway.  My giant caramel took a little coaxing to release from the buttered pan.  I also buttered my cutting board and my knife and got to work cutting it into bite size pieces.


I found it easiest to pull a very sharp chefs knife through the caramel (instead of using a chopping motion).  Once it was in strips, it was easy to cut into about 1 inch pieces.  I used the width of my thumb as a general guide to cut each piece.


8 strips of caramel quickly multiplied into about 82 pieces of caramel!


I cut 4 1/2 by 4 inch pieces of wax paper to wrap each caramel in.  It was a bit time consuming wrapping 80+ pieces of candy, but I also found it therapeutic and satisfying to hand wrap each treat.  There's something nice about it that I can't quite find the right words for, so you'll just have to take my word for it.


So the most important question has finally arrived....how did the honey cream caramels turn out?  Pretty fabulous.  The caramel is soft, but not too sticky, and it practically melts in your mouth.  The honey flavor comes through and blends beautifully with the creamy caramel.  You could easily turn this into a salted caramel with a sprinkle of fleur de sel before the caramel fully sets. 


What's nice about these is you can make about 7 dozen in one batch and package them up in little cellophane bags and give them away as gifts.  They keep up to 2 weeks wrapped and stored in an airtight container.  This recipe is a winner and will be making it into my holiday treat rotation. 


Thanks to Carmen of Baking is My Zen for this week's Sweet Melissa Sundays recipe pick.  You can get the recipe over on her site.  To see how my fellow SMS bakers did with their caramels click here.

Sunday, March 6, 2011

Sweet Melissa Sundays: Chocolate Pudding


Chocolate pudding baked in the oven?  Definitely a first for me.  Making pudding that didn't come from a box is also a first for me.  When I read through this week's Sweet Melissa Sundays recipe for chocolate pudding it sounded a lot like a pot de creme.  Melissa Murphy describes it as "so thick and creamy on your tongue, one of the richest desserts I have ever eaten--and one of the best."  Sounds like my kind of dessert.


I decided to half the recipe because hubby won't eat chocolate desserts.  But my friend was in town visiting from Chicago and she helped me make it and helped me eat it.  The half recipe ended up making 4 small ramekins of pudding.  The only modification I made to the recipe was to use 72% cacao chocolate.  To account for that I added a touch more sugar. 

The result?  I don't think it turned out quite the way it was supposed to.  First off, mine was not as silky and creamy as I was hoping.  I think I may have overcooked it because the texture of the top of the and outer edges was much more dense then the pudding at the bottom of the ramekin.


Will I make this again?  I'm torn.  I was really sold on Melissa Murphy's description of this dessert.  I might give it another shot after reading about the great success from my fellow SMS bakers.  In the meantime I have some other tasty chocolate creamy desserts I want to try out like the Triple Chocolate Pudding on Tracey's Culinary Adventures and the Chocolate Pot de Creme on A Cooking Life. 

Thanks to Leslie of Lethally Delicious for picking this week's recipe.  Pop over to her site for the recipe.  To see how other SMS bakers did with their pudding click here.

Sunday, February 20, 2011

Sweet Melissa Sundays: Earl Grey Tea Truffles


The Sweet Melissa Sundays baking group is now posting every two weeks.  For some reason it feels like more than two weeks passes in between.  I will be making my very best effort to bake each of the remaining weeks this year as we are nearing the end of the book.  This week, Nina of Nina's Cupcakes selected Rum Truffles.  I'm not so big on liquor in my sweet treats so I did another truffle this week--Early Grey Tea Truffles.  The group made these back in November 2010 but I didn't get a chance to make them then. 

I love the aroma and the flavor of earl grey tea so this seemed like a natural choice for this week.


The first time I made truffles was with the Sweet Melissa Sundays group in May 2010.  We made peanut butter truffles.  My first go round was a little rough and had to be trashed.  But the second time was much more successful.  I love the idea of rolling truffles in various toppings for a different twist.  This round of truffles was no exception.  Melissa Murphy's recipe calls for rolling the truffles in cocoa powder.  I did that.  But I also thought almonds would be a nice pairing with early grey.  And I also chopped up a cookies and cream candy bar in my food processor for the third coating.


I made half the recipe and it yielded about 42 truffles.  Some will be going to work and I will be sharing some with my Grandfather.  And of course a few have been set aside for me to enjoy with a nice cup of hot tea.  The aroma of earl grey tea comes from the bergamot orange rind.  Something I didn't know before today.  Apparently the bergamot orange is a sour fruit, but it's rind gives off a wonderful sweet aroma. 

These truffles are a silky deep dark chocolate with the light flowery bergamot scent.  A very tasty, sophisticated and decadent treat. 


I thought they would have paired nicely with a coating of shaved white chocolate to bring a little more sweetness.  Unfortunately I didn't have any white chocolate in house.  I would definitely make these again.  They would make a nice gift for a chocolate or tea lover.


For the Early Grey Tea Truffles recipe click here.