Friday, July 13, 2012
Guacamole
My Husband is from the midwest, the Chicago suburbs to be more specific. Apparently Mexican food wasn't one of the food genres that his family ate. It was more of a meat, potato, veg situation. And the veg did not include avocados (though technically a fruit). Hubby moved to Southern California to finish out his college years in the late 90's. A place where you can find an abundence of little taco stands and Mexican restaurants. We first met during my last semester of college, his second to last. When I found out that Hubs didn't really do Mexican food, I took it as a personal challenge to introduce him to some of my favorite local Mexican inspired flavors, including guacamole.
I have a funny story to share that really doesn't have anything to do with guac, but recalling the humble beginnings of Hubs and my relationship reminded me of this. The first time I met my Hubby's family (including Mom, Dad, sister, aunts, cousins, etc.) was when Hubs and I were graduating from college(even though we finished school a semester apart, they only hold one walking ceremony per year). His whole family came to town for the graduation and one evening we were planning to have dinner with his Dad. I suggested we go to a steak house. His Dad with a surprised expression said, "You eat steak?". With a somewhat puzzled look I said, "Yes, of course!" He replied something to the effect of, "oh I thought most California girls were vegetarians." Ha! Stereotypes run the gamut I guess with all us granola crunching, liberal, veg heads in So Cal. Which couldn't be further from the way I grew up.
But let's get back to stereotyping my Hubs with his midwestern meat and potato ways. For the record, he doesn't eat that much meat, but he is a total carb junkie, namely pasta and bread. Over the years, I've gotten Hubs to eat at Mexican restaurants and he always orders the same thing, fajitas. Okay, it's a start. He does venture into the occasional burrito if we are more of casual dining place. But Mexican food is by no means his favorite.
I cannot pinpoin where and when it happened, but my avocado hating husband magically started eating and enjoying guacamole. First at family events (guac has always been a popular dip). Then even at restaurants. He actually asks me to make guacamole. Which I'm more than happy to do. But please note, despite is fondness of guac, he still stands strong on not liking avocados that are not mashed up with onions, spices and herbs. When I tried to serve him an avocado cup salad in place of a side salad for dinner one night, he ate everything off the avocado and handed me his naked avocado.
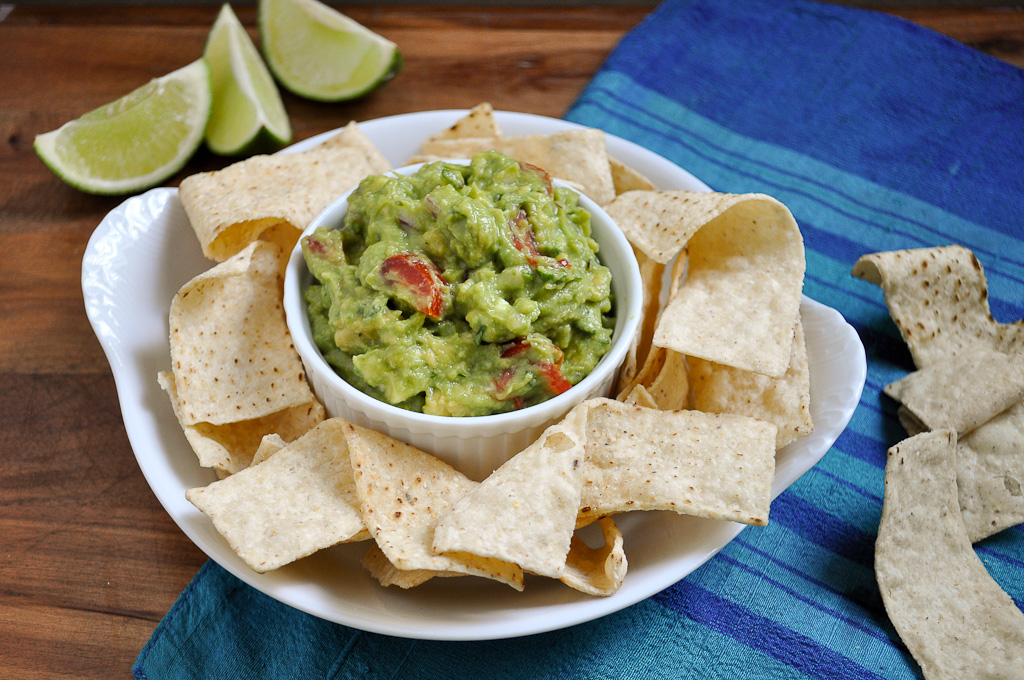
Small victories though. Maybe in the next decade he will embrace the avocado in all its creamy rich goodness. In the meantime, we'll keep eating guac!
As the heat indexes continues to soar across the nation, I wanted to share something requiring no cooking or baking. This guacamole is easy to make and very tasty. It's a mild version, so if you like to heat things up add in half (or whole if your're really brave) finely diced jalapeno and/or a few dashes of hot sauce.
Enjoy!
Guacamole
from The Ginger Snap Girl
4 ripe medium avocados
1/2 cup finely diced red onion
Juice from 1 1/2 limes
1/2 teaspoon salt (I use fine sea salt)
1/2 teaspoon garlic powder
1/4 teaspoon freshly ground black pepper
3/4 cup of finely chopped tomato, seeded (I use grape tomatoes and squeeze out the excess juice and seeds)
1 tablespoon of finely chopped cilantro
To cut your avocado, hold the avocado standing on its long end and run your knife through the top middle cutting lengthwise around the pit until you come full circle. Place the avocado in both hands and twist to reveal two halves. To remove the pit, hold the avocado pit side up on your cutting board and take the fat end of a chef's knife and give it a little whack it into the dead center of the pit. Be careful here! You don't want to lose any digits! Once the knife is in the pit, twist the knife around to release the pit.
Scoop out avocado with a spoon or peel away the skin. Place the peeled, pitted, avocado halves in a medium bowl. Using a fork lightly mash the avocado until you have large chunks. I like to keep my guac somewhat chunky. Stir in remaining ingredients and taste for seasoning. You may need to add more lime juice or salt and pepper depending on your preferece. Serve immediately with chips or fresh veggies.
If you want make your guacamole ahead, I recommend doing so the day you want to serve it, a few hours ahead. Take your finished guacamole and place plastic wrap directly on the surface on the guac, pressing down so that no air is between the plastic and the dip. Air makes guac turn brown pretty quick. Place another sheet of plastic over the top of the bowl (or close with a lid if you have one).
Saturday, July 7, 2012
French Toast and the Bread Maker

Hubby has taken a serious interest in bread making. When he first started on this journey about 6 months ago, I kind of figured it would be short lived, maybe a few weeks. But it seems his new found forage into the world of bread is turning out to be more of an undiscovered passion. Hubby is a science guy at heart, which is very much required to get exactly the right combination of flour, yeast, salt and water...the basis of nearly all bread recipes. Hubby has been doing quite a bit of research on bread. I use good old fashioned cookbooks and of course food blogs when I want to take on a new food project. Hubby has a tablet and You Tube. I don't know how many videos he's watched on bread making, but he's been checking out everything from home bread bakers to master bread makers in France, night after night. Apparently I've been in the dark about the variety of volume of content on You Tube.
The first type of bread he tackled was the baguette. I want to say he made baguettes at least every other day for 2+ weeks, until he got it down. And he wasn't just making one baguette each time, it more like 4 - 6. That's a lot of baguettes. They all got taste tested, but many ultimately ended up in the trash. It was impossible for us to eat or store the amount of bread he was making. And unfortunately, it's best eaten the day it's baked, so giving it away to friends, neighbors or passers by was a challenge. Some of the baguettes turned in to croutons and others got sliced up and placed in the freezer for who knows what? More croutons. Maybe bread pudding? Bread crumbs? Suggestions are welcome!
After all those baguettes, he can now make them with ease. Although I think he longs to have access to the types of ovens used in France that provide the proper steaming capabilities required to get that wonderful crusty exterior that "makes" a baguette. In the meantime, a pan of water at the bottom of our home oven does just fine.
My favorite way to enjoy the baguette...warm out of the oven, sliced and dipped in olive oil and balsamic vinaigrette.
Hubs moved on from baguettes to challah bread. Challah is a childhood favorite of his. Again, You Tube was his source of choice. He made 3 braid challahs, 6 braid challahs, mini single rope challahs looped around to look like a braid. Again, it was hard to keep up. Though some did go to waste, much of it is stored in our freezer. Fresh or frozen, it makes a fantastic french toast (more on that shortly). And I'm positive it will make a wonderful bread pudding, once I get around to making it!
From challah, Hubby then went on to sourdough and that's where he's been for the last couple of months. Sourdough is a whole other animal that requires a "starter". This is where the whole science of bread making really begins to mystify me. I'm sure I'm going to butcher this, but a starter is very simply, a combination of flour and water and a lot of patience. Over time your starter catches yeast in the air. Did you all know there is yeast in the air? I had no idea. When you've captured enough yeast, it starts eating the flour/water mixture and bubbles begin forming, releasing carbon dioxide (and sometimes alcohol).
Whoa, we're getting a little too sciencey!
You stir your starter daily and feed it more flour and water over time it starts to develop flavor. Some bread makers have starters that have been going for decades, even hundreds of years, which totally blows my mind. Hubby's starters are just beginning their journey. We have starters in our fridge, on top of our fridge and on our counter top at any given time. This magic mixture is what apparently gives the "sour" taste to sourdough bread. Several of Hubby's starters have bit the dust but he's got a great whole wheat starter going for a while now. For 4th of July he made a white wheat sourdough round that was insanely delicious (the white comes from the bread flour and wheat comes from the wheat starter). It was even more delicious when we slathered it with homemade rosemary garlic butter. Sorry, no sourdough pictures. We were too busy eating it!
Now I'm wondering what type of bread Hubs will take on next...I have a request in for some cinnamon swirl bread.
In the meantime, I wanted to share one of the ways I found to use some of the soft and lightly sweetened challah bread. In search of a recipe, I consulted my favorite source, the Cook's Illustrated Cookbook. I honed in on french toast, even though it's not typically one of my go to breakfast items. Truth be told, if I'm going to have something sweet, I'll always opt for a piece of cake or pie for breakfast. Seriously. But in reality I don't have cakes or pies laying around on most days (thank God!), so I thought our bounty of challah bread would be a great opportunity to give french toast a shot.
I have to say, I'm a convert. I think the secret to great french toast is most definitely the type of bread you begin with. So kudos to Hubby for making a fabulous bread! I love how pretty challah is.
I've made this french toast twice now and have been completely smitten with the results each time. The first go round I used fresh challah and the second (pictured below) I used frozen. Both turning out just perfect. And the nice thing is the same exact same instructions below can be used whether you are using fresh or frozen. The french toast is perfumed with cinnamon and vanilla...slightly crunchy on the outside and soft inside. Top your french toast with warm syrup, fresh preserves, berries or even a sprinkle of powdered sugar. I am not much of a maple syrup fan so I typically use preserves, slightly warmed. I topped our last batch with homemade jumbleberry preserves I made recently to use up a surplus of strawberries, blueberries and cherries. The preserves were a big hit and worked really well with the french toast. Jumbleberry recipe coming soon!
Treat you and your family to a special breakfast this weekend!
Enjoy!
P.S. I can't promise anything, but I'm working on getting Hubby to do a guest post on one of his bread making adventures. If you are interested in hearing more about bread, leave a comment to cheer Hubby on! He's a little shy when it comes to this sort of thing. ;)
French Toast
from Cook's Illustrated Cook Book
8 large slices of hearty white sandwich bread or challah bread
1 1/2 cups whole milk, warmed
3 large egg yolks
3 tablespoons packed light brown sugar
2 tablespoons unsalted butter, plus 2 tablespoons melted
1 tablespoon vanilla extract
1/2 teaspoon ground cinnamon
1/4 teaspoon salt
Preheat oven to 300 degrees. Place a wire rack on baking sheet and place the bread on the wire rack. Bake about 16 minutes, or until bread is dry throughout but with a slightly moist center. Flip bread halfway through baking. Remove bread and allow to cool for 5 minutes. Reduce oven temperature to 200 degrees and place wire rack and baking sheet back in the oven. You will be transferring your cooked french toast to keep warm.
In 9x13 pan add milk, egg yolks, brown sugar, 2 tablespoons melted butter, vanilla, cinnamon and salt and whisk until fully combined. Place bread in the mixture and allow to soak about 20 seconds per side, until saturated, but not falling apart. Transfer bread to a plate or baking sheet with a slotted spoon, allowing excess liquid to drain off.
Heat a 12 inch skillet (I used non stick) over medium low heat and melt 1/2 tablespoon butter. Add 2 slices of bread and cook until golden brown, about 3-4 minutes per side. Once done transfer to the wire rack in the warm oven. Repeat cooking process with remaining slices, cooking 2 slices at a time and adding another 1/2 tablespoon of butter for each batch.
Serve warm and top with your favorite topping such as syrup or preserves (slightly warmed) or fresh berries.
Monday, June 18, 2012
Blueberry Donut Muffins
Are you as shocked as I am that summer is really here? The weeks and months tick by with or without my approval. I mark the passage of time with the arrival of weekends and the denial of the restart of the work week. Holidays, birthdays and anniversarys pass. I fill up my 7 day medication dispenser with vitamins and such each Sunday evening (dang I feel like an old lady saying that). (I thought about erasing that last bit about the medication dispenser by the way.) And once a month I participate in Secret Recipe Club. Something I look forward to. It's a fun group to be a part of, but it also means another month has zipped by when I wasn't looking.
The best thing about the monthly arrival of SRC is trying out a new recipe. This month I was assigned Denise's blog, Creative Kitchen. I always have a blast browsing through a new blog, and Denise's was no exception. She has been blogging since 2009, she's busy with a family of five and focuses on making meals made with "real" whole foods. Creative Kitchen has a variety of sweet and savory dishes, all made with love and as few processed foods as possible. I admire Denise's committment to feeding her family real food, but keeping it in balance with the reality of our modern processed food society. It's a concept I'd like to incorporate more into my little family of two. Reading Denise's blog made me smile. She has an enthusiastic spirit that is evident in the stories she shares as well as the dishes she creates. Creative Kitchen definitely has a new follower!
Choosing just one recipe is always a challenge. I was drawn to several, but ultimately decided it was time to tackle the donut muffin. I am a fan of donuts. I am a fan of muffins. And a baked donut sure beats frying.
This recipe is easy to throw together on a Saturday morning as most of the ingredients can be found in a well stocked pantry. I thought my pantry was pretty well stocked, but as the donut muffins were baking, I realized I was completely out of butter. That almost never happens. I always have butter stashed away in the freezer.
Not this time.
The donut muffins require the top of the baked donuts to be dipped in melted butter and then in cinnamon sugar. What to do? Go to the store at 7:30 am on Saturday morning in my yoga pants and bed head? Nope. Send Hubby to the store for me? Um, he was still sleeping.
Time to improvise.
I had some fresh blueberries in the fridge and I had already been thinking about making a blueberry sauce to drizzle over the donut muffins. Why not use that in place of butter? It was one of those happy accidents that turned out really well.
The donut muffins have the texture of a cake donut. Add in fresh blueberry preserves and a cinnamon sugar crunch on top and you have a tasty breakfast treat on your hands. I enjoyed one or three with a cup of early grey tea. Now that's the way I like to start my weekend. Denise recommends doubling the recipe, and I see why. These little babies go fast! Thanks for the recipe Denise!
Now, let's see how quickly July arrives. In the meantime...
Enjoy!
Blueberry Donut Muffins
adapted from Creative Kitchen
1/3 cup of shortening (CK used coconut oil)
1/2 cup sugar
1 egg
1 1/2 cups all purpose flour (CK used whole wheat flour)
1 1/2 teaspoons baking powder
1 teaspoon salt
1/4 teaspoon nutmeg
3/4 cup milk
Topping:
1/3 cup blueberry preserves (see recipe below or if using store bought, heat preserves in microwave about 30 seconds to 1 minute, until loose)
1/4 cup sugar mixed with 1/2 teaspoon cinnamon
Preheat oven to 350 and spray muffin tin with cooking spray, or line with paper liners. I used my mini muffin pan (which is a medium sized mini--as opposed to a small mini) and it yielded 12 muffins (I would plan on 6-8 full size muffins).
In a medium bowl whisk shortening, sugar and egg until fully combined. In another medium bowl, stir flour, baking powder, salt and nutmeg together. Stir flour mixture into shortening mixture in thirds alternating with milk until just combined.
Fill muffin cups 2/3 full and bake for 18-20 minutes for mini's or 25 minutes for full size, or until a toothpick comes out clean. Allow muffins to cool and dip tops in the blueberry preserves and then dip in cinnamon sugar mixture.
Blueberry Preserves
from The Ginger Snap Girl
1 cup fresh blueberries
1/3 cup sugar
1 1/2 teaspoons lemon juice
Combine all ingredients in a small saucepan and cook on medium high heat. Boil mixture for 15 minutes, stirring frequently, until slightly thickened. It will continue to thicken upon cooling.
Friday, June 15, 2012
White Chocolate Blueberry Almond Cookies
I do a lot of stuff in my mind. Like accomplishing way more tasks in a day than humanly possible. In my mind, every night I plan to get up early the next day to start conquering the to do list. The list is all checked off at the end of the day and I beam with satisfaction.
I also exercise a lot (still in my mind). I envision myself running and sweating and feeling so accomplished by the fact I can actually run. It's like I'm running a 5K everyday. And I see my jeans slipping on and buttoning with ease because of all this running I'm doing.
Since I'm exercising it's only natural that I'm also eating really really healthy (yet tasty) foods. Again, we are still in my mind. And I feel all energized and clean from eating such nutritionally rich super foods. I'm practically glowing from all this healthiness.
And of course I still have time to check a few more things off my to do list before I turn in for the night. Then I get up and do it all over again.
I'm sure you can guess where this is going.
Reality. Why does reality always come along and ruin everything?
In real life I'm lucky if I get through 1/3 of my to do list on most days. Even if I actually set my alarm to rise early and tackle a few more projects in my day...I pretty much always snooze. At least 3 times, sometimes more. And I rarely exercise. If I do, it certainly doesn't involve running. Best case scenario it involves a swift walk, occasionally up a hill if I'm feeling really adventurous. It's so much more fun to run in my head I guess! Food is the one area where sometimes I accomplish the lofty goals my mind has in store. I try to eat healthy-ish. But I also do more than my fair share of indulging in cookies, cakes, pies, ice cream....more cookies.
Cookies live in my mind. And thankfully they are a pretty regular reality around here. They are my indulgence of choice. I'm always looking to try new cookie flavor combos. These cookies were completely experimental. I was looking for something different to send for Operation Baking GALS this month. I was very happy with the finished product and hope they made it through 7 days of travel overseas.
I took a white chocolate chip macadamia nut recipe and pretty much went to town. It started with plump dried blueberries (I'm pretty certain blueberries are a super food! Right? Right??) and almonds (good for you too!), along with butter and plenty of brown sugar. Okay, those last two are questionable in the health department, but they make these oh so chewy and caramelly delicious. Don't forget about the sweet, creamy, white chocolate chips. All the flavors work really well together...blueberry pie, meets cheesecake, meets cookie. Good stuff.
I better go back to exercising in my head.
Enjoy!
White Chocolate Blueberry Almond Cookies
from The Ginger Snap Girl
Yields 36 cookies
2 1/4 cups all purpose flour
1 teaspoon baking soda
1 teaspoon salt
2 sticks unsalted butter, room temperature
1/4 cup sugar
1 1/4 cups packed brown sugar
2 eggs
2 teaspoons pure vanilla extract
2 cups white chocolate chips
1 3/4 cups dried blueberries
1 3/4 cups chopped almonds
Preheat oven to 375 and line 3 baking sheets with parchment paper. In a medium whisk flour, baking soda and salt. In the bowl of a stand mixer fitted with the paddle attachment (you can also use a hand mixer) cream butter and sugars on medium speed until pale and fluffy, about 2 minutes. Turn mixer to low and add eggs one at time, until incorporated. Mix in vanilla. Add in flour mixture in three batches and mix on low until just incorporated. Add white chocolate chips, blueberries and almonds and mix on low until evenly distributed.
Using a medium cookie scoop (about 2 tablespoons) scoop out 12 cookies per baking sheet. Bake for 11-13 minutes until lightly golden brown, rotating sheets from front to back and top to bottom halfway through cooking. Allow to cool on baking sheet for 5 minutes and transfer to a wire rack to cool completely.
Tuesday, June 5, 2012
No-Fuss Risotto
My risotto always turns out crunchy. Every time. Well all 5 or 6 times I've made it. No matter how much broth I stir in or slowly I incorporate it, it comes out much more al dente than I prefer. I think risotto is some kind of art that the right side of my brain has never been able to master. Lucky for me the brilliant testers at Cook's Illustrated created a paint by numbers version. Don't assume because it's "no-fuss," that it is any less fabulous than risotto made via the traditional method (I've had some excellent ones in restaurants). This unique method of cooking the risotto covered in a dutch oven produces a creamy, velvety rice perfumed with wine and Parmesan cheese. Ahhhhh! And it's just right. Not crunchy in the slightest (and also not mushy).
This is cause for serious celebration! Okay, maybe not that serious. But I was a little impressed with myself for making a risotto that I would be proud to serve to guests. Finally!
Oh, see that bread in the background? That's Hubby's handiwork on his quest to master the baguette. :) Go Hubby! This is one of his early works where he forgot to score the bread...but that didn't deter us from gobbling it all up. He's gotten quite good at it and can whip out a baguette in no time these days.
To the folks at Cooks Illustrated: I'm fairly certain you guys and gals are cooking geniuses.
The only comment I have on the risotto, other than the heavenly heartwarming thoughts I have when thinking about it, is the teaspoon of lemon juice called for in the recipe was unnecessary in my opinion. Hubby agreed as well...it's tasted too lemony. If you want a lemony risotto, keep it in. The recipe calls for a cup of white wine so there is already a fair amount of acid to balance the rich, creamy, Parmesan cheesy goodness.
Risotto is comfort food akin to a good homemade macaroni cheese. The variations and flavor profiles are vast. And I'll be trying several of them out now that I've been introduced to this no-fuss method.
Here's to easy (non crunchy) risotto!
Enjoy!
No-Fuss Risotto
from Cook's Illustrated Cookbook
5 cups low-sodium chicken broth
1 1/2 cup water
4 tablespoons unsalted butter
1 large onion, finely chopped
3/4 teaspoon salt
1 clove garlic, minced
2 cups Arborio rice
1 cup dry white wine
2 ounces Parmesan cheese, finely grated (about 1 cup)
2 tablespoons chopped fresh parsley
2 tablespoons chopped fresh chives
1 teaspoon fresh lemon juice (I will omit next time)
Salt and pepper to taste
Heat broth and water in a large saucepan on high until it reaches a boil, then reduce to a simmer.
In a dutch oven over medium heat, melt two tablespoons of butter. Add in onions and 3/4 teaspoon of salt and cook until the onion is soft about 5 to 7 minutes, stirring often. Stir in garlic and cook until fragrant, about 30 seconds. Stir in Arborio rice and cook, stirring frequently, until the rice is translucent around the edges, about 3 minutes. Add the wine, stirring continually, and cook until fully absorbed, about 2 to 3 minutes.
Stir in 5 cups of broth/water mixture and reduce heat to medium low, cover and simmer for 16 to 19 minutes, until nearly all the liquid has been absorbed, stirring twice during that time. Add 3/4 cup of broth/water mixture and stir gently and continuously about 3 minutes until the risotto is creamy. Stir in Parmesan cheese.
Remove from heat and cover. Allow the risotto to stand for 5 minutes. To finish, stir in remaining 2 tablespoons of butter, parsley, chives and lemon juice. If you want a looser consistency, add additional remaining broth/water mixture. Season with salt and pepper and serve.
Wednesday, May 30, 2012
Kit Kat Ice Cream
Kit Kat's were hands down my favorite candy bar as a kid. "Gimme a break, gimme a break, break me off a piece of that Kit Kat bar!" Come on, sing it with me! "Gimme a break, gimme a break, break me off a piece...."
Sorry. Had to do it.
This was long before I took a liking to dark chocolate. In fact, these days, I rarely eat milk chocolate. After going to the dark side, I find milk chocolate a little too sweet. But I still have a soft spot for my childhood favorite. I came across this recipe on Baked Bree and it made me smile, feeling a surge of nostalgia. Kit Kat's and ice cream sounded like the perfect way to enjoy my favorite candy bar. Plus my cat's name is Kit Kat. No relation to the candy bar, but sweet nonetheless.
The ice cream made it's debut over the long weekend. Memorial Day weekend is a turning point in the year. It marks the (unofficial) start of summer. It's also the anniversary of when Hubby and I officially bought our current home 8 years ago and embarked on a number of heavy duty home improvement projects. It's also the one year anniversary of the purchase of our very first ice cream maker. So you see, the Kit Kat ice cream was meant to be this weekend.
I'm a few days late here, but still want to highlight that Memorial Day is more than a long weekend and fun ice cream. It's a day dedicated to remembering and honoring the brave men and women who have served our country and have lost their lives. Their bravery and sacrifice is what makes it possible for us to enjoy the freedom and civil liberties that make life great in America. I have to be honest that I have not paid this national holiday the homage it deserves in the past. I am embarrassed to admit that I posted last year about our Memorial Day weekend without a single mention of the meaning of the holiday. It's too easy to get caught up in life and forget to take a moment to think about all that we have to be thankful for. This my reminder to be mindful and my opportunity to say thank you to the soldiers that have lost their lives in service and thank you to the soldiers currently serving.
Thank you.
If you have a soft spot for Kit Kat's, give this ice cream a try. You won't be sorry. Unless you (nearly) eat it all by yourself like I someone I know.
Enjoy!
Kit Kat Ice Cream
from Baked Bree
1 cup whole milk
3/4 cup sugar
2 tablespoons cocoa powder
1/4 cup malted milk powder
Pinch of salt
3 egg yolks
3 ounces milk chocolate, chopped
1 cup heavy cream
1 tablespoon pure vanilla extract
3 full size Kit Kat bars
In a saucepan heat milk, sugar, cocoa powder, malted milk powder and salt over medium heat to a just a simmer until sugar and cocoa powder are dissolved. Do not boil.
Whisk eggs in a medium bowl and very slowly stream in half of the hot milk mixture to the eggs, whisking continuously. If you add it too quickly the eggs will scramble. Add the egg and milk mixture back to your saucepan and heat on medium low until mixture is thickened (the mixture should coat the back of a wooden spoon). This only took a few minutes for me.
Pour the mixture through a fine mesh strainer into a medium bowl. Add chopped chocolate, heavy cream and vanilla and stir until the chocolate is melted and the mixture is smooth. Cover the mixture with plastic wrap and chill for at least 4 hours or overnight.
Pour mixture into your ice cream maker and churn accordingly to the manufacturer's instructions. While the ice cream is churning, chop the Kit Kat bars into 1/4 inch pieces (reserving 2 sticks for garnish). Transfer ice cream into a container and stir in the Kit Kat pieces. Cover and freeze until firm, 4 hours or overnight.
Friday, May 25, 2012
Strawberry Cream Cheese Crumble Tart
This is a post of random thoughts...and eventually a strawberry tart. Mostly because my mind refuses to focus on one train of thought at the moment.
Random thought #1:
Operation Baking GALS rocks. I sent my first box of baked goods off to Afghanistan on May 8th and earlier this week I received emails from three soldiers expressing their thanks. I can't tell you how cool it was to get those emails. And it was extra cool, because each email addressed me as, "Ma'am." So official! The next round of baking starts on June 1st - 13th. That means you have time to join the GALS and share some goodies with our troops overseas. To join head to the Baking GALS site, check out the FAQ's and then click on "Register New Account". Once you are registered you can access the teams and read about each solider(s) that team is baking for and choose a team to join. I seriously wanted to join 3 different teams this time, but I'm taking it slow and going to just stick with one for my first few rounds. Meanwhile, thoughts of cookies are dancing in my head.
Random thought #2:
In the wake of Facebook's (less than) stellar introduction to the stock market I am finally getting around to telling you all The Ginger Snap Girl now has a Facebook fan page! Yeah! For some reason I was nervous to put up a page. What if no one "likes" my page? But I can always count on my friends and family to be my cheering section. So I'm super excited to have 46 likes. If you'd like to make it 47, 48, 49 or magic number 50, check it out... facebook.com/thegingersnapgirl. Like most things, now that I've done it, I wonder what the heck I was nervous about to begin with?
Random thought #3:
Are you all geared up for the Memorial Day weekend? Do you have travel plans or barbecuing plans? Tackling a home improvement project? Or lounging on the beach? All of these things sound pretty good to me. We're keeping it low key over here. Already did our Costco run to stock up on watermelons, blueberries and feta cheese, among other things. Barbecuing is on the agenda, along with seeing The Avengers, maybe some planting in the garden/flower bed and dinner with friends at one of our favorite restaurants, California Shabu Shabu.
Random thought #3.1:
Have you ever had shabu shabu? We've only gone to one shabu shabu place, so I really have no clue how it compares to any other...but it's so good that we have no need to look further. Shabu shabu is Japanese style of cooking your food in a pot of boiling water. This is a do it yourself meal where you "swish-swish" thinly sliced meats and vegetables in a hot pot until cooked (which takes literally 5 seconds for beef). The cooked stuff gets dipped in sauces and then eaten with rice. The sauce is where it's at. Honestly, the meat and veggies are just a vehicle in which to consume large portions of ponzu and sesame sauce (similar to peanut sauce). So. Freakin'. Mouth wateringly delicious. Can't wait.
Really random thought #4:
I had a dream last night that Hubby and I were on a long road trip, driving at night, pulling a boat behind our Jeep (we don't have a boat). Then in slow motion I see headlights coming towards us. In our lane. It was a big old clunker car circa 1977. We are headed straight for the clunker's headlights and I close my eyes waiting for impact. But we just keep driving. The car swerves and misses us, crashing into something on the side of the road. What does that mean? Never mind. I am pretty sure I don't want to know.
Random thought #5:
This weekend marks the one year anniversary of the purchase of our ice cream maker. I am SO making ice cream to celebrate. Now the hard part....choosing a flavor. Perhaps this Kit Kat Ice Cream? Lime Sherbet? My own concoction?
Random thought #6:
While working from home today I turned around from my desk to see this (sorry it's a little blurry)...
And this....
Random thought #7:
Holiday weekends make me think about childhood barbecues at my grandparents house and crave deviled eggs, potato salad and strawberry shortcake. Three things I've never posted. I need to work on that.
Random thought #8:
Enough with random thoughts.
Strawberry Cream Cheese Crumble Tart has been on my baking to do list for a year. I first saw the recipe on Nick Malgieri's blog and bookmarked it. Strawberry season passed last year and I never got around to making it. I was recently reminded about it when Tracey of Tracey's Culinary Adventures and Michelle of Brown Eyed Baker each posted beautiful renditions of what I knew would be an awesome tart. So when I needed a dessert for Mother's Day, this was it!
The tart starts with a sweet cookie crust. Cream cheese goodness and strawberries fill the crust and a chunky, crunchy crumb adorns the top. The tart was a hit with the fam, just one lonely peace remaining. If you're looking for a special dessert to bring to a Memorial Day party, this would be perfect.
This dessert is not hard to make. It is however, time consuming. Make the cookie crust dough the day before. It requires chilling time before you roll it out and more chilling time after you roll it out. But don't bake it yet. Cover it and store in the fridge. Bake the crust and the crumble topping at the same time on the day you plan to serve the tart. Mix the cream cheese filling and cut the berries while the crust and crumble bake. Assemble it all no more than a few hours before you plan to serve it. I found the crumble to crust/filling ratio to be a little high. I only used about 3/4 of the crumble. I left my tart at room temperature for about 3 hours prior to serving. It didn't cut into the nice clean pieces I was hoping for. Next time I will store the tart in the fridge until about an hour prior to serving this tasty tart!
For the recipe head over to Nick's blog.
Enjoy!
Subscribe to:
Posts (Atom)


